Vanilla Bean Cupcakes and Buttercream Frosting

Vanilla Bean Cupcakes {{Baking Bytes}}

Happy belated Mother’s Day to all the moms out there, but especially to mine for being my proofreader (and just generally awesome). Thanks Mom!

Treadwell Ditch Trail 2013

This month my best friend finished her Master’s degree in Computer Science, which is super exciting! To celebrate the occasion I offered to make cupcakes for the party. The first time I made these cupcakes, a year ago, they turned out delightful so I decided to revisit the recipe.

Vanilla Bean Cupcakes {{Baking Bytes}}

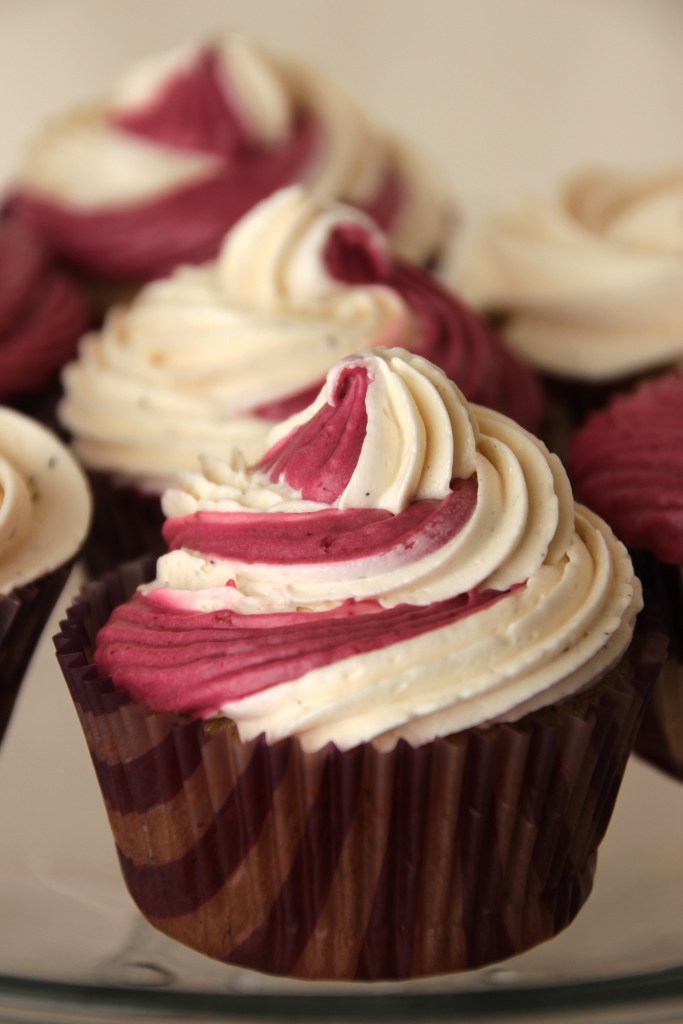
Some of you may be thinking, “Vanilla? How boring.” but I assure you these cupcakes are amazing. Unless you are just completely anti-vanilla, in which case I think you might want to get that checked out. These cupcakes are light and summery with a full vanilla flavor and pretty specks of vanilla bean throughout. They are quite delicious on their own, but of course make a great base for almost any frosting. For this occasion I used the vanilla buttercream from the original recipe, as well as a blackberry buttercream I sort of made up as I went. Although it was delicious, it’s not quite ready to share. But don’t worry, it’ll definitely be up here soon.

Vanilla Bean Cupcakes {{Baking Bytes}}

This is a very beginner friendly recipe as well as an excellent staple for the experienced baker. The original recipe calls for a vanilla bean, but I substituted vanilla bean powder which you can buy off Amazon. I love vanilla bean powder because it’s far less hassle (and cheaper!) than whole beans but has a much stronger flavor and the lovely specs that extract doesn’t. You can also use it in place of vanilla extract (or in addition to) in pretty much any baked recipe. I hear it’s also great to add a little to your coffee grounds before you brew it, but I haven’t personally tried this (yet).

Vanilla Bean Cupcakes {{Baking Bytes}}

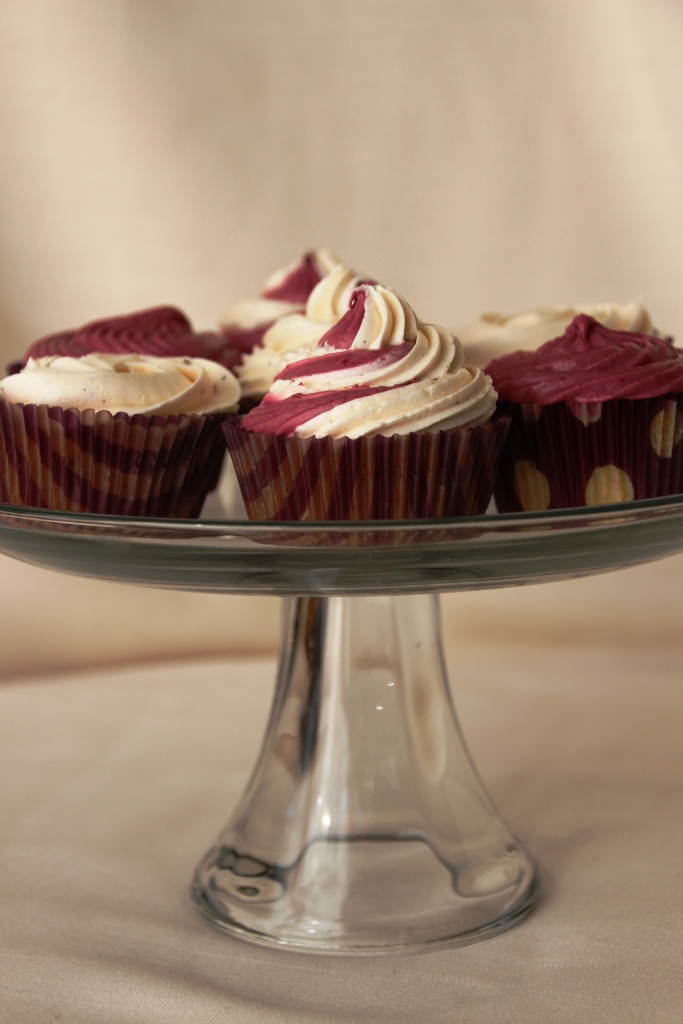
These cupcakes are great for any occasion, but they are best for decently large parties as the recipe makes over three dozen. You could try shrinking the recipe, of course, but I suspect your friends would prefer you had extras to give away.

Pair with the vanilla bean buttercream frosting below, or your favorite frosting recipe. It would go great with a whipped cream frosting if you want to keep the whole concoction extra light. Maybe even Bailey’s whipped cream.

Vanilla Bean Cupcakes

Adapted from Bella’s Bistro
Makes so many cupcakes (~40)

Ingredients

3 cups cake flour (or all-purpose)
1 Tbsp baking powder
1/2 tsp salt

1 cup unsalted butter, room temp
2 tsp vanilla bean powder

2 cups sugar
4 large eggs, room temp

1 1/4 cup buttermilk
1 tsp vanilla extract

Directions

  1. Preheat oven to 350 degrees Fahrenheit and line muffin tins with cupcakes liners.
  2. In a small bowl, whisk together flour, baking powder, and salt; set aside. Use an electric mixer on medium speed to beat butter and vanilla powder together until light and fluffy, 3-4 minutes.
  3. Add sugar and beat until completely combined.
  4. Add eggs one at a time, mixing until just combined after each one. You may need to scrape down the sides of the bowl.
  5. In a small cup, mix together buttermilk and vanilla extract; set aside.
  6. Beginning and ending with the flour mixture, add in alternating additions with the buttermilk, mixing on low speed just until incorporated between each addition.
  7. Scrape the sides of the bowl if necessary, and mix an additional 15 seconds.
  8. Using a 3 Tbsp scoop, fill the cupcake liners and bake for 18-20 minutes (a toothpick should come out clean).
  9. Let rest at least 5 minutes in the pan, then remove cupcakes to a wire rack to cool completely.
  10. Frost and decorate as desired.

Vanilla Bean Cupcakes {{Baking Bytes}}

Vanilla Bean Buttercream Frosting

Adapted from Bella’s Bistro
Makes enough for ~20 cupcakes

Ingredients

1 1/4 cups unsalted butter, room temp

2 1/2 cups powdered sugar

2 Tbsp heavy cream
2 tsp vanilla extract

Directions

  1. Using an electric mixer, beat butter on medium-high speed until smooth.
  2. Add sugar and beat on low speed until incorporated completely.
  3. Stir in vanilla and cream, then beat on medium-high speed for a few minutes until light and fluffy.
  4. Pipe or spread on completely cooled cupcakes as desired.

Oatmeal Craisin White Chocolate Chip Cookies

Welcome, friends, I hope you’ve had a lovely April. Montana is still struggling to fully commit to spring but right now it’s delightfully sunny and almost 60, which makes for a smiley Lindsey instead of the frowny Lindsey of last weekend’s flurries.

Oatmeal Craisin White Chocolate Chip Cookies {{Baking Bytes}}

This weekend I decided to cover one of our household cookie staples. These are personally one of my favorites, although M is a bit more indifferent towards them. Regardless, if you like Craisins and white chocolate, you’ll likely enjoy today’s recipe. A bit less sweet than your average cookie, these are a light and summery cookie great for lunches and snacks (or dinner, I don’t judge). They freeze exceptionally well in case you want to make a double batch and store the extras. (As if you can have extra cookies, ha!)

Oatmeal Craisin White Chocolate Chip Cookies {{Baking Bytes}}

I love these cookies for their light texture and cranberry white chocolate combo, but also because they feel just a bit healthier than the usual peanut butter and chocolate combos you find ’round these parts. Obviously they’re still cookies, but I feel slightly less guilty having a few of these. (Psyche! I never feel guilty eating cookies.) And cranberries are fruit, and fruit is healthy, so basically these are healthy, right?

My favorite part about these cookies is that even though they taste summery to me, they have no seasonal ingredients, which means you can make them all year round. Especially in late January after the Christmas fun has worn off and spring isn’t quite on the horizon. They are also super easy and take minimal measuring cups, which are always extra points in my book.

Oatmeal Craisin White Chocolate Chip Cookies {{Baking Bytes}}

For this recipe I like to use my small 1 Tbsp cookie scoop that results in bite-sized delights. If you prefer a large cookie, you’ll need to bake them an extra minute or two, so bake a test cookie to figure out the timing.

Oatmeal Craisin White Chocolate Chip Cookies

Adapted from Ocean Spray
Makes ~4 dozen small cookies

Ingredients

2/3 cup butter, softened
2/3 cup light brown sugar

2 eggs

1 1/2 cups oats (not quick oats)
1 1/2 cups all-purpose flour
1 tsp baking soda
1/2 tsp salt

2/3 cup Craisins dried cranberries
2/3 cup white chocolate chips

Directions

  1. Preheat oven to 375 degrees Fahrenheit and line two cookie sheets with silicon mats.
  2. Beat butter and sugar on medium speed until fluffy.
  3. Thoroughly beat in eggs.
  4. Whisk together oats, flour, baking soda, and salt in a separate bowl.
  5. Beat in flour mixture in three or four additions, mixing well between each addition.
  6. Gently stir in Craisins and white chocolate chips until well distributed.
  7. Using a 1 Tbsp cookie scoop, drop onto cookie sheets and bake for 8-10 minutes, (I usually do 9) or until lightly browned.
  8. Let cool on cookie sheet for a couple minutes before transferring to a wire rack to cool completely.
  9. Store in an airtight container on the counter for several days, or in the freezer for several weeks.

Lemon Bundt Cake

Hello my friends,  I’ve been busy attempting to find a lemon cake to share with you guys. As mentioned last post, attempt #1 was rather a fiasco, resulting in an overflowing, collapsed mess that was somehow over-baked and under-baked at the same time. And to top it off, it failed to cleanly come out of the pan.

Failure

Disaster.

The following week I tried again, using a new recipe. This recipe baked beautifully but was not quite as lemony as I prefer. I like lemon desserts to smack you in the face with lemon rather than leaving you wondering if that was really lemon flavored after all.

And so this weekend, attempt #3 was meant to boost the lemon flavor from the previous week, which was successful, finally.

Lemon Bundt Cake {{Baking Bytes}}

I finally present to you a fully lemony bundt cake for your springtime pleasure. If, like me, you’re ignoring the attempts at snow outside and the chilly wind, and looking longingly towards the blue patch of sky, bake this cake. This morning was a rather gray day, with flurries of now, but as I type up this post it’s now sunny and nearing 50 degrees.

Lemon Bundt Cake {{Baking Bytes}}

Obviously the weather gods approve of lemon.

Fairly dense but not sickeningly sweet, the lemon scent permeates the air even before you have a taste. The color of sunshine guarantees a smile even on a cloudy day, and the burst of flavor leaves no questions about its contents. Although I love a strong lemon flavor, I realize it’s not for everyone. If you prefer it a bit more subtle, leave out the syrup step entirely. If you want the experience to have a bit more ka-pow (definitely a technical term), the syrup will give you that. Add as much or as little of it as you like, but make sure you poke deep holes into the cake to allow the syrup to permeate all the way through, or you’ll be left with a soggy bottom/middle that sticks to your wire rack. Don’t be afraid of the holes, they won’t show once the cake is inverted.

Lemon Bundt Cake {{Baking Bytes}}

This is an easy cake, and although a teensy bit time-consuming, it’s very beginner friendly. It would make a delightful addition to any table, sure to please any lemon fan. If you do decide to forego the syrup step, I recommend using a thinner glaze than shown here so you can cover the entire cake. The glaze is a necessary complement to the plainer cake and this will ensure you have some with every bite.

Lemon Bundt Cake {{Baking Bytes}}

Lemon Bundt Cake

Adapted from Baking Bites
Serves 8-12

Ingredients

Cake

3 cups all-purpose flour
1 tsp baking powder
1/2 tsp baking soda
1/2 tsp salt

3/4 cup butter, room temp
1 1/2 cups sugar

3 large eggs
2 Tbsp fresh lemon zest

1/2 cup fresh lemon juice
1/2 cup buttermilk

Syrup

1/4 cup fresh lemon juice
1/2 cup sugar

Glaze

1 1/4 cup powdered sugar
1-3 Tbsp fresh lemon juice

Directions

  1. Preheat oven to 350 degrees Fahrenheit. Butter and flour a 10+ cup bundt pan.
  2. Whisk together flour, baking powder, baking soda, and salt. Set aside.
  3. In a large bowl, beat butter and cream on medium speed until lightly colored and fluffy.
  4. Add eggs one at a time, beating until just combined between each one.
  5. Stir in lemon zest.
  6. Add one third of the flour mixture and beat until just incorporated.
  7. Repeat with lemon juice, one third of flour mixture, buttermilk, and remaining flour mixture (in that order), stirring just until incorporated with each addition.
  8. Scoop into prepared pan, gently smoothing out the top.
  9. Bake for 40-45 minutes, or until a toothpick comes out mostly clean.
  10. During the last 10 minutes of baking, heat 1/4 cup lemon juice and 1/2 sugar to boiling, then remove from the heat.
  11. Immediately after removing from the oven, poke deep holes in the bottom of the cake, and slowly pour the lemon syrup evenly over it, letting it soak into the cake.
  12. Cool in pan for 15 minutes, then carefully invert onto a wire rack to cool completely.
  13. After the cake is cooled, vigorously stir together powdered sugar and lemon juice, adding more or less of each to desired consistency, and drizzle over the cake.
  14. Let the glaze set 20-30 minutes, then serve on its own or with a scoop of vanilla ice cream.

Notes

  • You’ll need 5-6 lemons for the whole recipe
  • A skewer or a meat thermometer is ideal for poking holes

Soft and Chewy Oatmeal Chocolate Chunk Cookies

I was originally planning to share a lemon bundt cake with you guys today, but the recipe was almost a total flop. Still edible, but not a recipe I’d ever use again, and definitely not pretty enough to entice anyone into making it anyway. Instead, please enjoy this cookie recipe, and hopefully in a week or two there actually will be a lemon bundt cake featured here.
Oatmeal Chocolate Chunk Cookies {{Baking Bytes}}

Four years ago my mom emailed me a recipe entitled “Best Oatmeal Chocolate Chip Cookies”. I labeled it under “recipes” in my Gmail account, and then promptly forgot about it.

Until now.

Oatmeal Chocolate Chunk Cookies {{Baking Bytes}}

When M is in town, I try to bake cookies every week so he can have them in his lunches. I do occasionally miss a week (at which time he makes his own, because it usually means I made a pie instead), but most of the time Sunday is cookie day. Peanut butter chocolate chip are a household staple, as well as oatmeal raisin chocolate chip, or oatmeal Craisin white chocolate chip. (One of these days each of these recipes will make an appearance on here.) One week however, I wasn’t feeling like the regulars and when I asked M for suggestions all he came back with was “something with chocolate chips.”

So helpful.

Oatmeal Chocolate Chunk Cookies {{Baking Bytes}}

I perused my recipes folder and rediscovered the email with this one. Since I had everything on hand, I decided to give it a shot. This was a wise decision as it is easily the best oatmeal chocolate chip cookies I’ve ever made, and probably one of the best cookie recipes, period. Unlike your average oatmeal cookie, this one calls for the oatmeal to be finely ground in a blender before adding it to the dough, resulting in the wholesome flavor of oatmeal without the usual telltale texture. Super soft even a week later (in case you, too, forget one in your backpack) and a bit less sweet than most chocolate chip cookies, this recipe has definitely become a new staple at our house. I even made it two weeks in a row, which is a pretty rare event around here.

Oatmeal Chocolate Chunk Cookies {{Baking Bytes}}

Using both white and brown sugar gives the soft texture and very slight caramel flavor generally found in peanut butter cookies, while the oatmeal lends a wholesome flavor that almost makes you feel like you’re eating something healthy. (Pro tip: you aren’t.) The original recipe calls for chocolate chips and a chopped up chocolate bar, but I decided to use the bag of Nestle chocolate chunks I had in the cupboard. (I have a slight addiction to buying random bags of baking chips. Shh.) Due to their size, I opted to forgo my usual one tablespoon cookie scoop in favor of the three tablespoon size I generally reserve for cupcakes. This was my second wise decision of the day, as we ended up with three dozen bakery-sized cookies perfectly saturated with chocolate chunks.

Oatmeal Chocolate Chunk Cookies {{Baking Bytes}}

Pour a glass of milk and have a couple. You can thank me later.

Soft and Chewy Oatmeal Chocolate Chunk Cookies

Makes 3 dozen large cookies

Ingredients

2 1/4 cups (310 g) flour
1 tsp baking powder
1 tsp baking soda
1/2 tsp salt

1 cup unsalted butter, room temp
1 cup (200g) white sugar
1 cup (150g) brown sugar, lightly packed

2 eggs
1 tsp vanilla

2 1/2 cups (250g) oatmeal, finely ground

~12 oz (360g) package chocolate chunks

Directions

  1. Preheat oven to 375 degrees Fahrenheit.
  2. Whisk together flour, salt, baking powder, and baking soda. Set aside.
  3. Cream butter and both sugars until fluffy.
  4. Add eggs and vanilla and beat until just combined.
  5. Add flour mixture and beat until just combined.
  6. Push dough to the bottom of the bowl, add ground oatmeal, and stir until just combined.1
  7. Push dough from the beaters, add the chocolate chunks, and stir until chocolate is well distributed.2
  8. Use a 3 Tbsp cookie scoop and place dough balls at least 2″ apart on a cookie sheet.3
  9. Bake for 12-14 minutes, let cool on the pan for a few minutes, then remove cookies to a wire rack to cool completely.
  10. Store in an airtight container; cookies stay soft for at least a week (at which point ours were all eaten.)

Notes

1 If you don’t push the dough off the paddle, it likely won’t mix properly.
2 It may be necessary to mix the last bit of oatmeal into the dough by hand.
3 I couldn’t fit more than 9 cookies on a sheet at one time.


Chocolate Pudding Pie and Baileys Whipped Cream

Happy St. Patrick’s Day! I have to admit it’s not my favorite “holiday”, but it has the redeeming quality of being near my birthday. I turned 25 on Saturday (yes, I’m an Ides of March baby) and celebrated by running my first half marathon of the year. One down, five to go. I got a new PR of 2:17:03, which makes me feel very confident I’ll meet my yearly goal of 2:10, and hopeful that maybe I’ll even meet my stretch goal of 2:00 (or close to it). My best friend also completed her first 10k which is super exciting! Judging by her smile, I’d say I didn’t completely scare her away from running. (Phew.) (Parentheses!)

Running!

I usually celebrate my birthday with a chocolate pie, but after the race and then attending a party with one of M’s Antarctica coworkers I didn’t feel up to making one. Instead, I made one yesterday and added a teensy bit of Irish flair for today’s post.

Chocolate Pudding Pie with Baileys Whipped Cream {{Baking Bytes}}

Chocolate pie is a long-standing favorite of mine and probably my most requested birthday dessert, although cherry pie would be a close second. Even from scratch, chocolate pie is an easy dessert to make, and a hard one to screw up, which makes it great for beginners. I can even personally attest that whipped cream is stiff enough for regular birthday candles, although I skipped those this year.

Chocolate Pudding Pie with Baileys Whipped Cream {{Baking Bytes}}

Flaky pie crust, creamy pudding, and fluffy whipped cream are a combination that can’t go wrong, unless you are one of those weird people that doesn’t like sweets. (Seriously, I do not understand this. No judgments, just confusion.) But if you are one of those people, you probably aren’t reading this post anyway.

This pie is fairly rich, but the whipped topping helps keep it from feeling overly dense. Even so, you may want to start with a smaller piece than I have in my pictures, and make a note to go back for seconds. It should keep for a few days in the fridge, but it would be best to have a few friends over to share it. I’m sure they won’t mind helping you out.

Chocolate Pudding Pie with Baileys Whipped Cream {{Baking Bytes}}

If you’re new to homemade pies, pudding, or whipped cream, have no fear! This is a great starter pie and will be sure to give you some confidence in the kitchen. If you’re still apprehensive, feel free to substitute a pre-made pie crust (but please, use the roll out dough) or a cookie crust. Or skip the crust entirely and pour the pudding into individual serving glasses. (Although this rather deviates from the “pie” idea.) You could also use cool whip for the topping: just thaw it in the fridge and add some Baileys. I’ve included recipes for homemade versions of all three steps if you really want to wow your audience (and your taste buds.)

Pre-baked Single Pie Crust

Adapted from Better Homes & Gardens
Makes one 9″ pie crust

Ingredients

1/3 cup shortening

1 1/4 cup flour
1/2 tsp salt

4-5 Tbsp ice water

Directions

  1. Measure shortening into a small bowl and place in the freezer for 15-20 minutes.
  2. Pour water and a few ice cubes into a cup and set aside.
  3. Preheat oven to 450 degrees Fahrenheit.
  4. In a small bowl, whisk the flour and salt together until well combined.
  5. After shortening is cold, combine with the flour and salt and mix with a pastry blender (or a fork) until blended into pea-sized pieces.
  6. Add ice water one tablespoon at a time, mixing gently after each addition. Repeat until all pastry is moistened and it all sticks together.
  7. On a lightly floured surface, gently flatten pastry into a disc, and then roll out large enough to fit your pie plate.
  8. Transfer dough to pie plate and crimp the edges.
  9. Prick liberally with a fork over the entire bottom and sides of the crust in order to prevent shrinkage.1
  10. Bake crust for 10-12 minutes, then set aside while you make the filling.

Chocolate Pudding Pie with Baileys Whipped Cream {{Baking Bytes}}

Chocolate Pudding Pie

Adapted from Ezra Pound Cake
Makes one 9″ pie

Ingredients

1 pre-baked pie crust

2 cups milk
1/2 cup half and half
5 ounces chopped semi-sweet chocolate

4 large egg yolks2
3/4 cup sugar

3 Tbsp cornstarch
1 1/2 tsp vanilla
1/4 tsp salt
1 Tbsp dark cocoa powder (optional)3 

Directions

  1. Place milk, half and half, and chopped chocolate into a medium sauce pan. Over medium heat, warm the mixture until chocolate is melted, stirring occasionally.
  2. In a separate bowl, stir together egg yolks and sugar until well mixed.
  3. Add corn starch, vanilla, salt, and cocoa (if desired) and stir until completely combined.
  4. When the chocolate is melted, slowly pour the hot liquid into the egg mixture, whisking constantly until smooth.
  5. Return entire mixture to the saucepan, and heat on medium until it thickens and bubbles slowly. (5-10 minutes)
  6. Remove from the heat and stir gently until pudding is smooth, then pour directly into prepared pie crust.
  7. Cover immediately with plastic wrap, pressing it directly onto the filling to prevent a skin from forming.
  8. Refrigerate at least two hours, or until ready to serve. Then top with whipped cream.

Baileys Whipped Cream {{Baking Bytes}}

Baileys Whipped Cream

Borrowed from The Cupcake Project
Makes about 6 cups

Ingredients

2 cups heavy whipping cream
2/3 cup sugar
2 Tbsp Baileys Irish cream liqueur4 

Directions

  1. Using an electric mixer (whisk attachment for a stand mixer) beat the cream until very soft peaks form.
  2. Gently stir in the sugar and Baileys until just incorporated.
  3. Continue beating the cream until soft-medium peaks form.
  4. Spoon onto chilled pie, then use a spatula or spoon to create swirls.5
  5. Top with chocolate jimmies, mini chocolate chips, or chocolate curls, if desired.
  6. Return to fridge, or serve immediately.

Chocolate Pudding Pie with Baileys Whipped Cream {{Baking Bytes}}

Notes

1 I really don’t think you can over-prick a pie crust.
2 Don’t throw out the egg white, make meringues!
3 I like richer chocolate flavor, but if you’re not into dark chocolate just leave this out. It’ll still be delicious.
4 If you just want regular whipped cream, use 3-4 tsp vanilla instead.
5 You will probably have about a cup or more left over. Store in a sealed container in the fridge and it’ll keep for several days. It’s great to use on hot chocolate or ice cream or to eat with a spoon.