Pumpkin Pie Jack-o-lanterns

Fall actually hit Montana while I was gone so I woke up to frost this morning for my bike ride to work. It was glorious. I just returned from my whirlwind half marathon tour yesterday so I am pretty tired, but very glad to be home. Three great races and lots of fun seeing new places and old faces in all four Lower 48 timezones. This week I have a bonus post for you! I actually thought of this idea last year, but never got around to implementing it, so I decided I should definitely get it done this year.

Pumpkin Jack-o-lantern Mini Pies {{Baking Bytes}}

Pumpkin pie is one of my favorite pies and I will happily eat it all year round. Unfortunately M doesn’t super care for it so mostly I just make it in the fall when I don’t mind having it for breakfast all week (yum). It’s a traditional dessert this time of year, which can be boring (according to some) so I thought I’d try giving it a new package.

Pumpkin Jack-o-lantern Mini Pies {{Baking Bytes}}

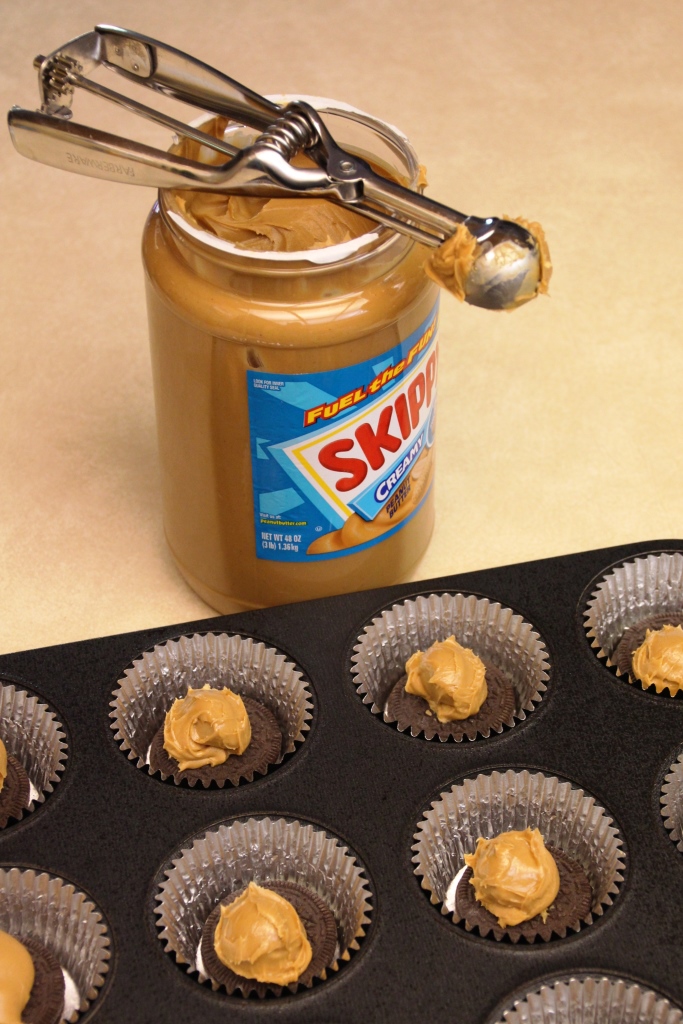
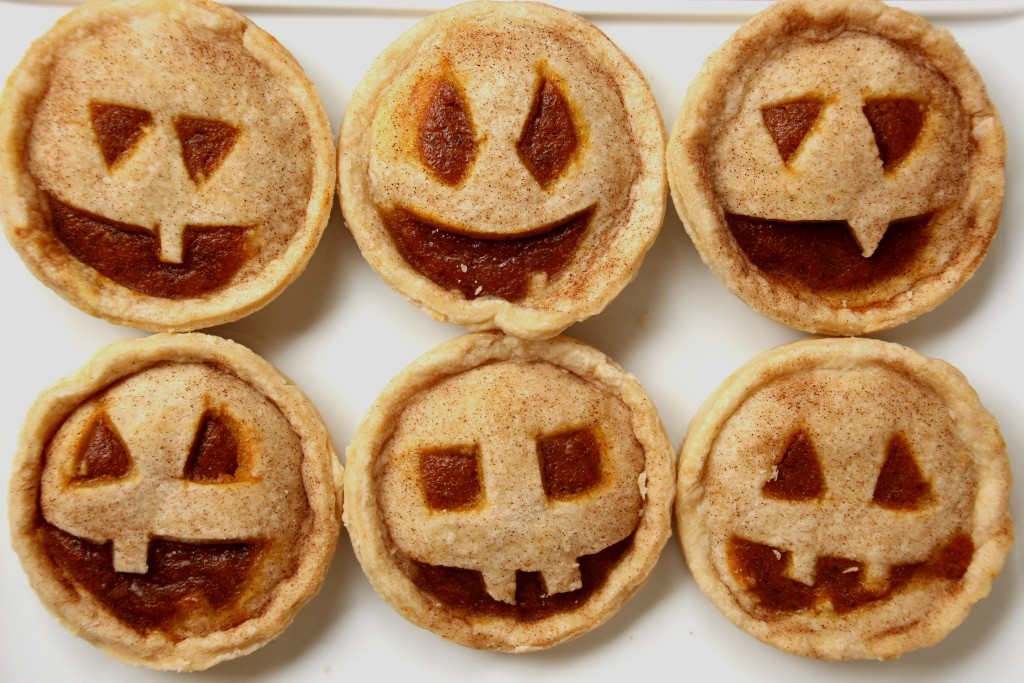
I used my normal pie crust recipe and pie filling recipe, and then used mason jar rings to form little pies. The jack-o-lantern faces make them great for Halloween but with a different decoration (like the leaf cutouts below) they’d be great for any fall potluck. They are way easier to serve and eat which makes them great for when you aren’t having a sit down dinner. They do have a high crust to filling ratio, so make sure you use a crust recipe that you like; I have mine linked below if you don’t already have a favorite.

Pumpkin Jack-o-lantern Mini Pies {{Baking Bytes}}

They are a little time consuming, especially if you cut out faces, but not difficult and I’d say pretty beginner friendly. I got 9 out of my recipe but that could vary based on how thin you roll your crust and how many times you are able to reuse the scraps. (I wouldn’t recommend more than once or twice as the dough gets very tough the more you handle it. Tip: you can drip a little extra water to help the scraps stick together again to re-roll.)

Pumpkin Jack-o-lantern Mini Pies {{Baking Bytes}}

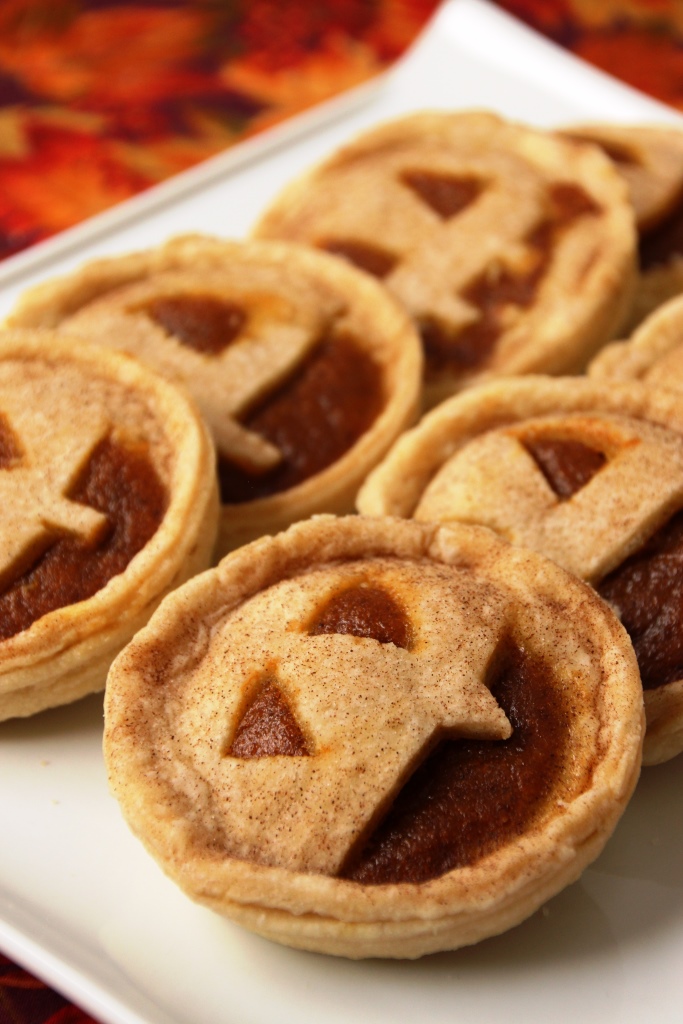
Your usual pumpkin filling, yummy pie crust, and a dusting of cinnamon sugar makes a great treat that’s easy to portion control and is a wonderful whipped cream vessel. The cuteness is an added perk. =)

If you need a dessert for your Halloween parties this weekend, give these a try.

Pumpkin Pie Jack-o-lanterns

Makes about 8 double-crust handpies

Ingredients

Pastry for double-crust pie

1/3 cup sugar
1/2 tsp ground cinnamon
1/4 tsp salt
pinch ground cloves

1 egg
1 cup pumpkin puree
1/4 cup heavy whipping cream

cinnamon & sugar mixture (optional)

Other Supplies

8+ wide-mouth jar rings
1 small-mouth jar ring with lid
1/4 cup of water or one egg white

Directions

  1. Line a cookie sheet with a silicon mat or parchment paper. Preheat your oven to 350 degrees Fahrenheit (or wait a bit since some of these steps can be time-consuming.)
  2. Whisk together sugar, spices, and salt in a medium bowl.
  3. Stir in egg, pumpkin, and whipping cream until combined. Set aside.
  4. Take half of your crust pastry and roll it out slightly thinner than you normally would. Use a 4″ biscuit cutter to cut out as many rounds as possible. Repeat with remaining pastry.
  5. For jack-o-lanterns, cut faces into half of the unbaked pie crust circles. (Totally optional, of course.)
  6. Place appropriate number of wide-mouth jar rings (not lids!) upside-down on your prepared baking sheet and spray with cooking spray. Set aside. (Preheat your oven to 350 degrees Fahrenheit if you haven’t already.)
  7. Using the small jar ring with lid inside, gently place one pie crust circle on top of it (yes it will hang over the sides, that’s important.)
  8. Carefully spoon about 3 tablespoons of the pumpkin mixture into the center of the pie crust, such that it is contained by the jar lid ring.
  9. Brush the circumference of the circle with water or egg white, and top with one of your jack-o-lantern faces, pressing the edges together to seal completely.
  10. Gently remove the sealed pie from the small ring/lid and transfer to one of the wide-mouth rings such that it is centered and the edges are supported by the ring. Your pumpkin may overflow a little, but with practice you’ll get better.
  11. Repeat steps 7-11 with remaining pastry and pumpkin mixture. If you have a decent amount of pumpkin mixture remaining, pour it into a (sprayed) ramekin or small glass baking dish and bake the same as the pies.
  12. If desired, sprinkle cinnamon & sugar mixture over the pies (I do this with pretty much all my pies), then bake for 30-40 minutes, or until a small knife inserted into the pumpkin mixture comes out clean.
  13. Let cool completely, then serve with whipped cream.
Advertisement

Peanut Butter Oreo Overload Brownies

Phew. Okay kids, I promised you sugar and here it is. All of it. So much.

The other week Pinterest lit up with these brownie Oreo peanut butter cupcake delights. The ones I happened across didn’t lead to a recipe, but it looked pretty straightforward. All I needed was a reason to make them because I certainly wasn’t going to eat 18 of these babies. Luckily, my work had a charity bake sale and these immediately came to mind as something I could donate.

Peanut Butter Oreo Overload Brownies {{Baking Bytes}}

Due to the brownie mix (which is one of the few things I’m okay using a mix for), these come together simply with relatively little time commitment and are easy to transport for parties. But let me warn you, they are rich! I am not normally one of those people who thinks thing are too sweet (I can eat chocolate pudding pie for daaaays) but these take it to a whole new level. I also don’t typically eat packaged candy (which is probably part of why it’s a bit overwhelming to me) but I made an exception for these.

Peanut Butter Oreo Overload Brownies {{Baking Bytes}}Peanut Butter Oreo Overload Brownies {{Baking Bytes}}

With a glob of peanut butter sandwiched between two Oreos and surrounded by brownie, these things do not mess around. Maybe you only want half of one, maybe you want five, I don’t judge. The fudgy-ness of a brownie, the crunchy-ness of an Oreo, and a smooth peanut butter filling give you all the textures you could want in one chocolatey bite.

Peanut Butter Oreo Overload Brownies {{Baking Bytes}}

I topped mine with some Reese’s peanut butter chips for some added flair, and because I always have them on hand anyway. Totally not necessary but they do look prettier that way, and as we all know: you do eat prettiness.

Peanut Butter Oreo Overload Brownies {{Baking Bytes}}

These would be great for an upcoming Halloween party (maybe cut them in half for kids) if you want to get away from all the pumpkin flavors. (If you don’t, my pumpkin ginger cupcakes are amazing, not that I’m biased.)

Peanut Butter Oreo Overload Brownies

Inspired by various Pinterest pins
Makes ~18

Ingredients

1 box brownie mix (for 8×8 pan)1
–> plus any ingredients called for on package

1 package Oreos (or knockoffs)
peanut butter
Reese’s peanut butter chips (optional)

Directions

  1. Preheat oven to 325 degrees Fahrenheit. Line muffin pans with cupcake liners and lightly grease with cooking spray.
  2. Mix the brownie batter according to package directions and set aside.
  3. Place an Oreo (or knockoff) in the bottom of each muffin liner and top with one teaspoon of peanut butter (using a cookie scoop will greatly speed up this process.)
  4. Gently press a second cookie on top of the peanut butter, pressing down till the peanut butter is spread evenly across the cookie.
  5. Add two rounded tablespoons of brownie batter on top of the Oreos, using a toothpick to spread it evenly down the sides and across the top. Liners should be almost completely full.
  6. Top with Reese’s peanut butter chips (optional).
  7. Bake 20-25 minutes (the tops should be matte).
  8. Let cool completely in the pan, then store in an airtight container.

Notes

1 I used the Ghirardelli brownie mix that Costco sells, but it would be much easier to use a mix that doesn’t have chocolate chips/chunks in the batter.

You may have a little leftover brownie batter, just bake it in additional liners, filling each about 2/3 full. Great for brownie sundaes after you’ve given all these away.

Mini Pumpkin Cheesecakes

Fair warning, I never tire of pumpkin. I’ve already made my 2nd pumpkin pie of the season and I’m sure there will be a 3rd involved at Thanksgiving. As pumpkin pie is equally good for breakfast as it is for dessert, I don’t mind having a whole one to myself and happily eat it for several days in a row. I greatly look forward to Operation: Eat Everything Pumpkin! (which takes place annually between October and December) and do my best to mix in some new recipes along with my old favorites. If you’re looking for a slightly less traditional pumpkin dessert to serve this Thanksgiving, look no further.

Mini Pumpkin Cheesecakes >> Baking Bytes

Traditional pumpkin and classic cheesecake come together in a wonderful dessert sure to please pumpkin lovers and cheesecakes fans alike. Even my boyfriend, who isn’t a huge fan of pumpkin, thinks these are pretty delicious. Smooth, creamy, and rich, it could very well become a new annual favorite. Even better, the mini size makes for ready to go individual servings and lets you enjoy the evening instead of attempting perfect slices with all eyes on you. These pop perfectly from the pan, and are excellent plain or with a swirl of whipped cream.

Mini Pumpkin Cheesecakes >> Baking Bytes

This recipe does require a specialty pan, of course, but if you have room in your cupboards you surely won’t regret the purchase. Mini cheesecakes are great for potlucks, large dinners, and dessert parties because they’re easy to transport, quick to serve, and require no utensils to eat (although I do prefer a fork, myself.) However, if all you have is a regular cheesecake pan, head over to the original recipe to see instructions for a standard 9″ cheesecake. I’ve not made the full version [yet], but I’m sure it’s equally amazing.

So whether you try some new recipes or stick with the tried and true favorites, have a wonderful Thanksgiving weekend. (Or a wonderful regular weekend, for my foreign readers.)

Mini Pumpkin CheesecakesMini Pumpkin Cheesecakes >> Baking Bytes

Adapted from Glorious Eats
Makes 12 mini cheesecakes

Ingredients

Crust
3/4 cup graham cracker crumbs1
1 Tbsp light brown sugar
1/4 tsp cinnamon
2 Tbsp butter, melted

Filling
8 oz cream cheese, at room temp
1/2 cup plus 1 Tbsp canned pumpkin puree
1 egg
2 Tbsp sour cream
1/2 cup white sugar
1/8 tsp ground nutmeg2
pinch of ground cloves

1 Tbsp flour
1/2 tsp vanilla extract

Directions

  1. Preheat oven  to 350 degrees Fahrenheit and lightly spray a mini cheesecake pan.
  2. Using a fork or pastry blender, mix the crust ingredients in a small bowl.
  3. Add a rounded tablespoon of the mix to each well in the pan, and press firmly to form a crust, sealing the edges well.3
  4. Using an electric mixer, beat the cream cheese until fluffy and smooth.
  5. Beat in pumpkin, eggs, sour cream, sugar and spices, then add flour and vanilla and beat until completely combined.
  6. Divide batter among the wells, about 3 Tbsp of filling atop each crust.
  7. Bake for 20 minutes, remove from oven, and cool 15 minutes on the counter.
  8. Cover lightly with plastic wrap and refrigerate 2 hours or until ready to eat.
  9. Top with whipped cream and a sprinkle of cinnamon, if desired, and serve to adoring fans.

Mini Pumpkin Cheesecakes >> Baking Bytes

Notes

About 6 graham crackers.
The original recipe calls for fresh, but dried works just fine.
A flat-bottomed shot glass works nicely for this, but use your fingers to make sure the edges are well sealed.
4 The cheesecakes keep well in the fridge for several days, or in the freezer for up to two months. They’re a great dessert to have on hand! Store in an airtight container.

Cinnamon Glazed Pumpkin Donuts {and Halloween}

Much like the rest of the 20-something white girl population, pumpkin is my favorite fall flavor. October is a highly anticipated month as I count the days towards what I officially call “Pumpkin Season.” Granted, this date is completely arbitrary, but since Bozeman summer generally extends well into September anyway, October 1st seemed a good choice.

IMG_1968Cinnamon Glazed Pumpkin Donuts >> Baking Bytes

Since I’ve already posted my favorite pumpkin bread, pumpkin pie, pumpkin cupcakes, and pumpkin milkshake, I sought a new recipe to share this year. A Pinterest post led me to these donuts, which I ever so slightly adapted to fit my preferences. A moist and pleasantly spiced pumpkin donut topped with a cinnamon glaze is the perfect start to a fall morning. As this is a baked donut recipe, it does require a donut pan, but I promise you won’t regret the purchase. My one complaint about my pan is that it only holds six donuts, when all recipes make twelve. (First world problems, haha.)

Cinnamon Glazed Pumpkin Donuts >> Baking Bytes

These would be a great way to kick off Halloween morning, sharing them with family, friends, or coworkers. Like many of you (I’m guessing), I already attended a Halloween party this past weekend, but maybe there’s a day-of party happening Thursday, or you just want to make something easy this fall. Whatever the occasion, these donuts are an easy way to bring the pumpkin flavor to breakfast.

Did you have a costume this year? I dressed up as Donatello (the Ninja Turtle, not the Renaissance artist), using a costume my mom made my older brother when he was five. That makes this costume almost as old as me, but still amazingly awesome.

I hope you hum the theme song for the rest of the day.

Heroes in a half shell – Turtle Power!

Cinnamon Glazed Pumpkin Donuts

Barely adapted from Taste and Tell
Makes 12 donuts

Ingredients

2 cups all-purpose flour
1 1/2 tsp baking powder
1/4 tsp baking soda
1/2 tsp salt
1 1/2 tsp cinnamon
1/2 tsp nutmeg
1/4 tsp ginger

1/2 cup brown sugar (not packed)
1/4 cup butter, room temperature
1 cup pumpkin puree
2 eggs

1 tsp vanilla
2 Tbsp milk

1 1/2 cups powdered sugar
1/2 tsp vanilla extract
1/2 tsp cinnamon
2 Tbsp milk

Directions

  1. Preheat your oven to 350 degrees Fahrenheit. Butter a donut pan and set aside.
  2. In a small bowl, whisk together flour, baking powder, baking soda, salt, cinnamon, nutmeg, and ginger.
  3. Using an electric mixer on medium speed, beat together brown sugar, butter, and pumpkin until thoroughly combined.
  4. Add eggs, mixing well, and then stir in milk and vanilla until completely incorporated.
  5. Stir in the dry ingredients, mixing until just combined.
  6. Spoon batter into a large Ziploc or pastry bag, cut off the tip, and pipe into the buttered donut wells.
  7. Bake for 10 minutes, or until a toothpick comes out clean. Cool in the pan five minutes, then remove to a wire rack to cool completely.
  8. For the glaze, whisk together the remaining ingredients in a small bowl.
  9. Dip cooled donuts in the glaze and return to the wire rack to set.
  10. Enjoy with a glass of milk or a mug of coffee, and a few friends to help you eat them.

IMG_2029Cinnamon Glazed Pumpkin Donuts >> Baking Bytes

Notes

1 These taste great made a day in advance, but the glaze tends to soak into the donut. If you can, glaze them on the day you intend to serve them so they’ll stay nice and pretty.