Bacon, Bean, & Brussels Bowl

One of my yearly intentions is to use up the special and fun ingredients I have hoarded over the years. Much like gift cards, I enjoy the idea of using fancy things even more than actually doing so. Unfortunately, this results in a somewhat ridiculous amount of my cupboard space being filled with anything I consider rare, expensive, or difficult to replace. In an effort to not wait for a special occasion but instead to make every day a special occasion, I’m off on a journey of using what we have.

Brussels, Bacon, & Bean Bowl {{Baking Bytes}}

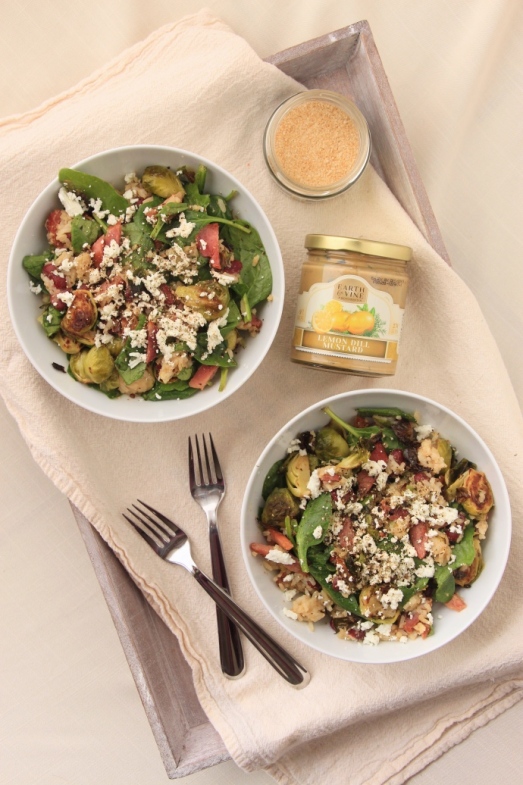
As such, when I rediscovered this delightful lemon dill mustard I started to put it on, well, everything. You may remember it from the meatloaf grilled cheese from two weeks ago. Wraps, sandwiches, scrambled eggs, burgers, bowls…you name it, I’ve done it. It’s a wonderful spring and summer condiment since it carries all the lightness of lemon with the heartiness of a mustard. I am nearing the end of the jar and after I make it through my remaining hoarded condiments, I will definitely be treating myself to another.

Brussels, Bacon, & Bean Bowl {{Baking Bytes}}

This bowl was born of needing to use up items in the fridge without making a trip to the store. In the current climate, not making unessential excursions outside the house is even more important, and it’s definitely cut back on our trips to the grocery store. Since it’s only about a 10-minute walk, I’m not usually opposed to heading over on a baking whim, but these days I am doing my best to avoid it.

Brussels, Bacon, & Bean Bowl {{Baking Bytes}}

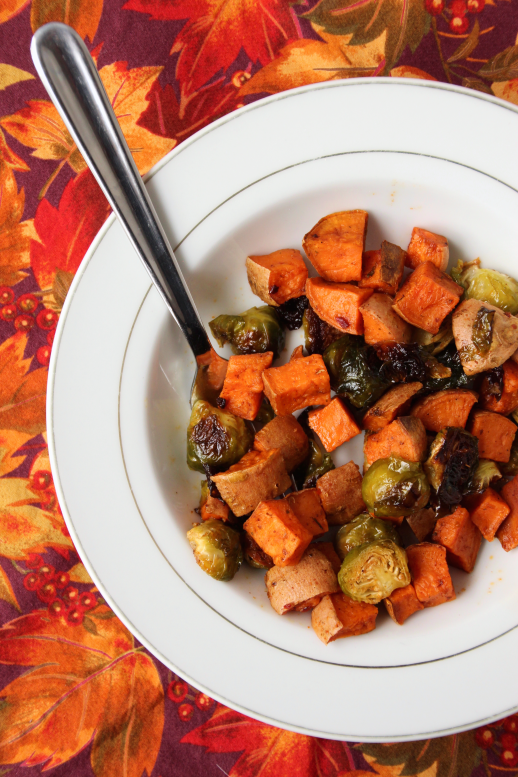
As such, the Brussels sprouts, canned kidney beans and copious amounts of bacon ends called to me. Mixed with a scoop of rice and a handful of spinach, the lemon dill mustard compliments everything while making it a cohesive dish. It’s extremely filling and hearty and easily tailored to your macro preferences, but hits a number of lovely flavors with minimal effort. Crispy Brussels, salty bacon, creamy rice and beans, and a pop of color from the spinach are all pulled together with a light coating of mustard (or any sauce you like) and a generous crumble of goat cheese. For vegetarian/vegan options, sub the bacon in favor of a few extra beans, and ditch the cheese or use your favor non-dairy version.

Brussels, Bacon, & Bean Bowl {{Baking Bytes}}

If you’re making a single serving you can easily do it in a cast iron skillet, but for the full recipe I preferred to use the oven, which is the method outlined below. (Mostly for less bacon grease to clean up afterward.) This dish is and excellent way to use up leftover rice and beans from tacos, and it’s delicious both warm and cold if your weather also tends to flip-flop back and forth. Keeps well in the fridge for a few days (mine was all gone by then) and makes an excellent entree or side for whichever spot on the table you’re looking to fill.

Bacon, Bean, & Brussels Bowl

Serves 2 (entree) – 4 (side)

Ingredients

1 Tbsp olive oil
3/4 lb Brussels sprouts, trimmed and cut into halves or fourths
1/4 tsp salt
2-4 oz bacon

2/3 cup (about half a can) kidney beans
1 cup cooked rice
2-4 Tbsp (lemon dill) mustard or other sauce
2 oz spinach
2 oz goat cheese (or Parmesan)
fresh pepper and dill, to taste

Directions

  1. Preheat oven to 400 degrees Fahrenheit.
  2. Line 1/3 of the sheet with foil, with the ends turns up to form a mini tray. Arrange bacon on the foil.
  3. Drizzle olive oil on the remainder of the baking sheet and add sprouts and salt. Use your hands and toss until well coated. Spread evenly on the tray, cut side down, if possible.
  4. Roast for 18-20 minutes, or until bacon is to desired crispiness. Remove foil with bacon and continue to roast the sprouts for another 5-10 minutes or until crispy. Place the bacon on a paper towel to drain, then chop into bite-sized pieces.
  5. Meanwhile, in a large bowl add the beans, rice, and 2 tablespoons mustard. Use a rubber scraper to gently toss until well coated.
  6. When the Brussels are done, add them and the bacon to the bowl and stir gently until evenly coated. Taste and add additional mustard, if desired.
  7. Stir in spinach, then top with goat cheese, pepper, and dill. Serve immediately for a warming entree, or cover and refrigerate until ready to eat. Great as leftovers either chilled or reheated in the microwave.

Notes

Words

Advertisement

BBQ Jackfruit Sandwiches & Maple Walnut Brussels Slaw

(Long post incoming, but I promise the recipes are worth it!)

Week four already! Is October going by crazy fast for anyone else? After spending the first half of month in Europe I am now in Iowa for work and boy is my body confused. Here’s hoping my sleep and my stomach get back on track soon.

This week is entree week. Pulled pork is one of my absolute favorite meals and Pinterest piqued my curiosity of substituting jackfruit for the meat. I’ve seen it multiple times over the last few years but never actually got around to trying it. This menu was the perfect opportunity to give it a shot since it nicely fits the theme and is inherently vegetarian and lactose-free.

BBQ Jackfruit Sandwiches {{Baking Bytes}}

I vaguely considered using fresh jackfruit until I saw the size of one and realized I didn’t want enough to feed the entire Mongol army. Feel free to go fresh if you like, or stick to canned if you want a slightly less exhausting adventure. Ensure you rinse your canned stuff thoroughly in order to remove as much of the “can” flavor as possible. I will fully admit canned jackfruit is not widely stocked nor cheap in my area, but it was definitely a fun recipe nonetheless.

Is it pork? No. Is it delicious? Yes. While it definitely won’t fool any meat eaters since the texture and flavor are both quite different, it’s still an awesome addition to your repertoire and a fun way to add a vegan option to a barbecue spread. And either way it was a perfect vessel for the most amazing barbecue sauce I’ve ever made.

Smoky Sweet BBQ Sauce {{Baking Bytes}}

Smoky, sweet, and just enough spice, this barbecue sauce is definitely my go-to recipe. My mom actually sent me this recipe like six months ago and I completely forgot about it until I was considering the menu for this series. I am so glad I finally gave it a try because I personally think my slightly adapted version is just perfect. Easy, smooth, and a perfect balance of smoke and spice without the overload of sugar store-bought varieties typically employ. It comes together in about five minutes and keeps in the fridge for quite a while, so if you try nothing else about this recipe, definitely give the sauce a go! I’ll definitely be using it on everything from burgers to meatloaf to actual pulled pork going forward.

The last piece in this delightful sandwich is the slaw. Pulled pork sandwiches are nearly always accompanied by some kind of coleslaw and I wanted to include that element here as well. Inspired by an existing Olivelle recipe of which I’ve already posted another version, this one is simple but a perfect sweet and crunchy  addition to the barbecue flavor. An equal mix of barrel aged white balsamic and their new vanilla maple olive oil blend into a light and sweet dressing that compliments the crisp sprouts and cabbage without competing with the barbecue sauce. I added some walnuts for extra crunch and that slight nutty flavor adds just a little interest to the whole experience.

Maple Walnut Brussels Sprouts Slaw {{Baking Bytes}}

Sandwiched between your favorite lightly toasted bun with a spread of (mayo), the jackfruit and slaw combine into a sweet and spicy experience that’s not only delicious, but also pretty healthy. It’s inherently vegetarian and can be easily made vegan by subbing or ditching the mayo, making it appropriate for a wide variety of diet preferences. It’s a lovely cozy fall meal but would also be awesome for those summer potlucks, so keep it handy all year long.

BBQ Jackfruit Sandwiches {{Baking Bytes}}

Whether you try one piece or the whole shebang, I hope you find a new go-to somewhere in the set!

BBQ Jackfruit Sandwiches

Serves 4-6

Ingredients

Smoky Sweet BBQ Sauce
6oz can tomato paste
1/2 cup unsweetened applesauce
1/4 cup tomato sauce
1/4 cup Smoked Balsamic Vinegar
1/2 tsp liquid smoke, optional
2 Tbsp Sweet Smoked Chili Rub
1 Tbsp Applewood Smoked Sea Salt1
15 twists Bourbon Barrel Smoked Black Peppercorns1
1/4 tsp ground chipotle or cayenne pepper, optional

Maple Walnut Brussels Sprouts Slaw
1/2 lb Brussels sprouts, trimmed and shredded (about 3 cups)
1 cup shredded red cabbage
1/2 cup walnuts, chopped

3 Tbsp Barrel Aged White Balsamic Vinegar
3 Tbsp Vanilla Maple Olive Oil
1/2 tsp Vanilla Bean Sea Salt

BBQ Jackfruit
2 Tbsp Caramelized Garlic Olive Oil
3 (14oz) cans young jackfruit in water2
2 Tbsp Sweet Smoked Chili Rub
1 cup smoky sweet barbecue sauce
3/4 cup water

for each sandwich
1 burger bun, toasted
1/2 cup bbq jackfruit
1/4 vanilla maple slaw
mayo (or your favorite vegan substitute), to taste
additional barbecue sauce, to taste

Directions

  1. For the sauce: Blend all sauce ingredients until well combined; store in a pint jar and refrigerate until ready to use, up to 6 weeks.
  2. For the slaw: In a medium bowl, mix together Brussels sprouts, cabbage, and walnuts.
  3. In a pint glass or mason jar, whisk together Barrel Aged White Balsamic, Vanilla Maple Olive Oil, and Vanilla Bean Sea Salt until completely combined.
  4. Stir dressing into Brussels mixture until well mixed. Cover and refrigerate until ready to use, up to 5 days.
  5. For the bbq sandwiches: Drain and thoroughly rinse jackfruit, then pat dry. Set aside.
  6. In a large frying pan or wok, heat the olive oil until shimmering.
  7. Stir in jackfruit and Sweet Smoked Chili Rub and toss until well coated.
  8. Stir in barbecue sauce and water, then reduce heat to medium and simmer until jackfruit is tender and most of the liquid is absorbed.
  9. Spread mayo on bottom half of a toasted bun; top with 1/2 cup jackfruit, 1/4 cup slaw, and additional barbecue sauce, to taste.
  10. Cover with the other half of the bun and enjoy immediately.

Notes

You can substitute plain salt and pepper with minimal taste difference, but the smoky versions add a lovely depth of flavor.

If you prefer meat, I harbor no judgement for substituting normal pulled pork!

Jalapeño Cornbread & Strawberry Jalapeño Lime Chia Jam

Week three, commence! This week brings a super fun cornbread and jam combination that’s been in my head since Olivelle released their Jalapeño Lime Balsamic Vinegar this summer. Strawberry and jalapeño are a really fun combination and cornbread is one of my favorite side dishes. I tweaked my go-to recipe to be lactose-free, included some extra flavors, and behold: a new happiness was born.

Jalapeño Cornbread and Jam {{Baking Bytes}}

Moist and with just the right amount of crumble, this cornbread is excellent on its own or smothered in your favorite condiment. It goes wonderfully with chili or barbecue and is perfect all year round. The jalapeño adds a lovely flavor with as much (or in my case, as little) heat as you like depending on how many seeds you remove. The hint of lime is a fun surprise and ties it into the chia jam with perfection.

Jalapeño Cornbread and Jam {{Baking Bytes}}

Chia jam is something that has intrigued me for awhile but I somehow never got around to making until just now. I realized one of my hesitations was the texture, but using a berry bypasses this since fruits like strawberry and blackberry already result in a more seedy texture than stone fruits.

Strawberry Jalapeño Lime Chia Jam {{Baking Bytes}}

Frozen strawberries from Oregon (mostly to appease M) are readily available and have tons of flavor. A splash of the balsamic and a spoonful of chia seeds and in less than ten minutes you have a truly excellent jam. The fun part about this one is you could easily substitute a different balsamic for a completely different flavor. The Barrel Aged for a more standard pairing, or perhaps Sweet Basil for a fun spring edition. The world is your oyster jam!

Jalapeño Cornbread and Jam {{Baking Bytes}}

Whip up a batch of cornbread and jam and they are sure to brighten any chilly day. Individually both excellent, together these recipes create that perfect sweet and spicy combination without a ton of extra sugar.

Jalapeño Cornbread and Jam {{Baking Bytes}}

But if you want to drizzle honey on top of the whole thing, you won’t be wrong.

Strawberry Jalapeño Lime Chia Jam

Makes about 1 cup

Ingredients

1 cup frozen strawberries1
1 Tbsp chia seeds
1 Tbsp Jalapeño Lime Balsamic Vinegar

Directions

  1. In a small saucepan, simmer strawberries over medium until softened.
  2. Mash or puree berries to desired texture (I like mine chunky), then stir in chia and balsamic.
  3. Let cool briefly before serving; store leftovers in the fridge.

Notes

Why frozen? Unless you live in the Willamette Valley, the flavor is going to be better than fresh berries. Feel free to use fresh if you prefer though!

Jalapeño Honey Cornbread

Makes an 8×8″ baking dish

Ingredients

1 cup yellow cornmeal
3/4 cup white flour
1/4 cup whole wheat flour
1/4 cup sugar
1 Tbsp baking powder
1/4 tsp Lime Fresco Sea Saltoptional

2 large eggs
3/4 cup milk (cow, almond, coconut)
1/3 cup butter, melted
1/4 cup vegetable oil1
2 Tbsp honey, melted
2 Tbsp Jalapeño Lime White Balsamic Vinegar

1 jalapeño, diced (remove seeds for a milder flavor)2

Directions

  1. Preheat oven to 400 degrees Fahrenheit. Lightly coat an 8×8″ baking pan with nonstick spray or oil. Set aside.
  2. In a medium mixing bowl, whisk together dry ingredients until well combined.
  3. In a small mixing bowl, whisk together wet ingredients until well combined.
  4. Fold wet ingredients into dry until just combined, then stir in jalapeño.
  5. Pour into prepared pan and bake 25-30 minutes, or until golden brown along the edges and a toothpick inserted into the center comes out mostly clean.
  6. Let cool briefly, then serve with jam.

Notes

1 For an extra limey flavor, substitute some or all Tahitian Lime Olive Oil.

For a legitimately spicy experience, don’t remove the seeds. I removed most of mine to keep the heat down and the flavor light.

Spicy Maple Roasted Root Vegetables

Welcome to week two, friends. Continuing with the sweet and spicy theme, this time we’re pairing maple with a snazzy piri piri spice blend on some lovely roasted root vegetables perfect for cozy evenings.

Roasted Spicy Maple Veggies {{Baking Bytes}}

Sweet and spicy is my favorite combination and in my opinion nothing works quite so well on the sweet side as maple syrup. With its own robust flavor, maple is nicely complemented by a number of spicy additions, my own favorite being chipotle. I ventured slightly off my beaten path in favor of using Olivelle’s Piri Piri World Spice blend, featuring a number of different chili peppers and a hint of lemon. It packs quite a bit of heat which means the tin will last other wusses like me quite a long time.

Roasted Spicy Maple Veggies {{Baking Bytes}}

I actually made this recipe a bit differently the first time, and then promptly re-made it after the release of their Vanilla Maple Olive Oil at the end of September. I knew immediately it was perfect for this recipe and round two was even better than the first iteration. (I originally used Caramelized Garlic, which you can see in the round one pictures.)

Roasted Spicy Maple Veggies {{Baking Bytes}}

You can use any firm vegetables here, but I chose a mixture of my favorite fall options. Acorn (or butternut) squash are prolific this time of year, and go well with both sweet and savory flavors. Sweet potatoes are a staple in my world and I rounded out the festive orange ensemble with carrot. Pumpkin would also work nicely to keep monochromatic medley, or for some contrasting color add Brussels sprouts as I did in my second batch.

Roasted Spicy Maple Veggies {{Baking Bytes}}

The maple flavor of the olive oil is not sweet, but has an amazing savory profile that works perfectly with the heat of the spice blend. I rounded mine out with a bit of Cumin Spice Sea Salt, to add just a bit more depth to the whole shebang.

For that hint of sweet and a boost of maple flavor, the roasted veggies are lightly drizzled with pure maple syrup and then popped in the oven for a few more minutes to let it caramelize a bit. I kept mine more on the spicy side than the sweet side, but for a more standard glazed carrot experience just up the maple syrup to two or more tablespoons. Sweet, spicy, and cozy, this recipe is definitely going to become a go-to on cold days.

spicy_maple_veggies_4

A perfect complement to any fall dinner, the sweet and spicy combination brings some warmth and fun to any meal. It’s perfect for Thanksgiving too, going beyond those traditional sugar-filled recipes and adding a little something extra to the table. On the off chance you have any leftovers, it’s also perfect atop a spinach salad or underneath a fried egg.

Spicy Maple Roasted Root Vegetables

Serves 4

Ingredients

4 large carrots, peeled and diced1
1 small butternut or acorn squash, peeled and diced
1 medium sweet potato, diced

2 Tbsp Vanilla Maple (or Caramelized Garlic) Olive Oil
3/4 tsp Piri Piri World Spice, to taste2
1/4 tsp Cumin Spice Sea Salt

1-2 Tbsp pure maple syrup, to taste

Directions

  1. Preheat oven to 400 degrees Fahrenheit. Lightly spray a baking sheet with oil or non-stick spray.
  2. Combine all veggies in a medium bowl, and add olive oil and spice blend. Use a rubber scraper to toss until well coated.
  3. Spread veggies evenly on prepared baking sheet (save your bowl), and roast for 15-20 minutes, until just before done.
  4. Return veggies to the bowl and toss with maple syrup. Spread back onto the baking sheet and roast another 3-5 minutes to allow syrup to lightly caramelize.
  5. Serve promptly.

Notes

About 4-6 cups total veggies, so mix and match to your heart’s content.

For a mild experience, use 1/2 teaspoon, or if you like more heat, increase to 1 or 1 1/2 teaspoons.

Chive & Onion Cream Cheese

Sometimes we all need a superbly simple recipe to bring to a potluck, adorn a cheeseboard, or just brighten up our daily sandwiches a bit. This cream cheese is exactly that. It takes about 10 minutes to put together and keeps well in the fridge for at least a week, by which time I’m certain it’ll all be gone.

Chive & Onion Cream Cheese {{Baking Bytes}}

You may be wondering why you’d bother making your own chive & onion cream cheese when it’s something readily available at the grocery store, but fortunately I have two great answers for that. Admittedly this recipe was original born from the necessity of using lactose-free cream cheese, which is available at the store but only in the plain variety. One of my best friends is exceptionally lactose-intolerant and making this from scratch allowed her to enjoy it too. However, having made it I am here to tell you it’s well worth the homemade effort because not only can you customize the proportions and use up excessive chives from your garden, but pieces of fresh onion and garlic gracing the creamy goodness is far superior to most recipes that call for the powdered variety.

Chive & Onion Cream Cheese {{Baking Bytes}}

I started off this adventure on Pinterest as per usual, and nearly all of the abundant recipes used powdered or dehydrated onion and garlic. While I’m sure this is also fine, especially if it’s what you have on hand, the idea of freshly sautéed produce intrigued me and I opted to give that a try. Requiring a pan and a smidge of olive oil seemed a small price to pay for the depth of flavor and freshness received in return.

Chive & Onion Cream Cheese {{Baking Bytes}}

I am not normally one who cares for chunky spreads, preferring smooth nut butters and pureed jams, but this is definitely an exception. Creamy goodness punctuated by soft and golden bits of onion and garlic and adorned with fresh green chives is a perfect combination of flavor and color without being texturally odd.

Chive & Onion Cream Cheese {{Baking Bytes}}

Use this spread with crackers as I have here, atop bagels and toast, inside a cucumber sandwich, or to dress up a wrap. The neutral flavors go with nearly anything and I’m confident you’ll have no trouble finding delicious uses for the batch. Feeding a crowd? Might want to double it to make sure you have some leftovers for yourself.

Chive & Onion Cream Cheese

Makes about 6 oz

Ingredients

1-2 Tbsp olive oil
1/4 cup minced yellow onion
2 cloves garlic, minced

1-2 Tbsp fresh chives, minced
4oz cream cheese (lactose-free if needed), room temperature

Directions

  1. If you haven’t already, set your cream cheese on the counter to soften.
  2. In a small saucepan over medium heat, heat the oil until shimmering.
  3. Add onion and garlic and sauté until fragrant and onions are translucent. Add to a small bowl and allow to cool about ten minutes.
  4. Add cream cheese and chives and fold in until well combined.
  5. Store in the fridge until ready to eat, allowing cream cheese to rest on the counter about 10 minutes before serving.