Cookie Fruit Pizza

Just in case you still need an a quick and easy dessert for any Labor Day Weekend festivities, I am posting this a week early. Although I generally avoid mixes and pre-made desserts, everyone needs a couple quick go-to recipes for those impromptu barbecues and summer parties. Usually I make brownies because the Ghirardelli mixes are fantastic, but when I want to bring a lighter or non-chocolate dessert and don’t have the time for cupcakes or lemon pie spoons, I’ll tend towards fruit pizza or (peanut butter Cheerio treats). Made with a store-bought cookie dough, the longest step is preparing the fruit. It can be put together in less than an hour, assuming you have all the ingredients, and is a great crowd pleaser.

Cookie Fruit Pizza {{Baking Bytes}}

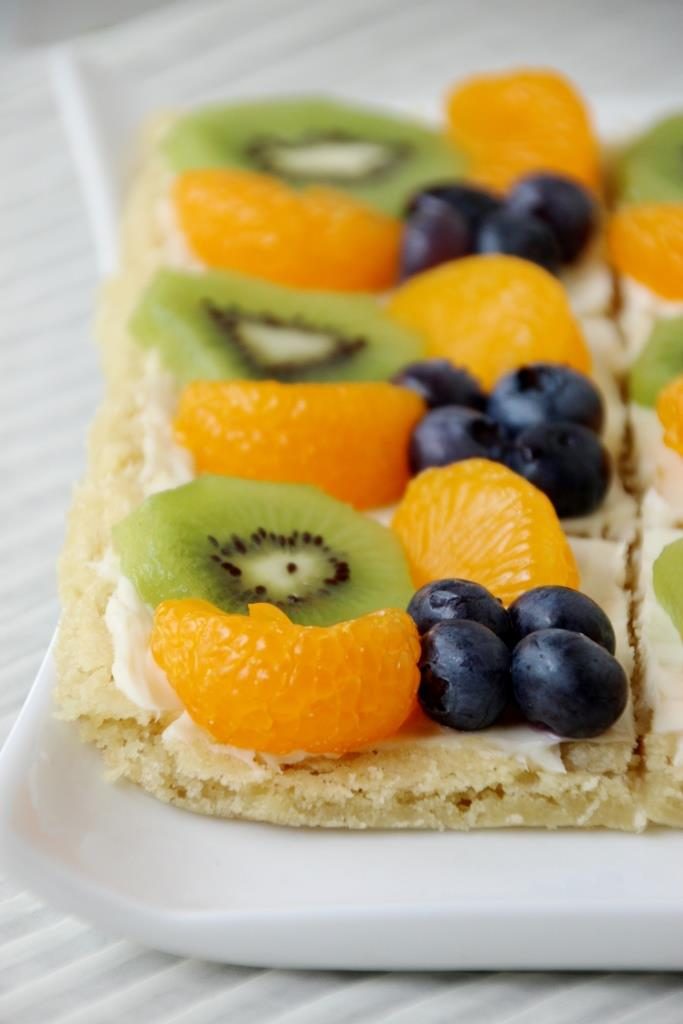
Although any fruit can be used, my favorite options are strawberries, kiwis, raspberries and blueberries. The first two can be sliced easily whereas the latter two options require no cutting. I usually opt for a combination of fruits as it’s both delicious and prettier. In general I just use what I have on hand or what looked good at the store, which this time happened to be kiwi, blueberries, and mandarins. You really can’t go wrong other as long as you are careful to either not choose fruit that browns quickly, or to serve everything promptly. Think of the pizzas as your palette and choose whatever flavor combinations you like best.

Cookie Fruit Pizza {{Baking Bytes}}

I did all mine the same, but you can certainly do each slice differently if you don’t have enough of a fruit, or just to allow people to pick their flavors. Since the cookies are pre-sliced, it’s easy to lay out each one identically or differently, and they’ll be ready to serve right away. Clearly you could also use a pizza pan for the normal round shape and slice into wedges, but I find the squares are easier to handle, less inclined to break, and just as pretty.

Despite most fruit pizzas being topped with some kind of glaze over the fruit, I never add one. The cookies and cream cheese frosting are already plenty sweet and the fresh fruit really shines if it isn’t drenched in extra sugar and fruit juice. It also saves an extra several minutes of prep time which is great since this is supposed to be a quick dessert.

Cookie Fruit Pizza {{Baking Bytes}}

Although I kept it simple this time, another delicious option is to add a spice to your cream cheese frosting. I keep it relatively low sugar since the cookies have plenty on their own, but the addition of some cinnamon, cardamom, nutmeg, chipotle, or whatever you think would blend with your fruit selection would be an awesome way to add a little pizzazz. Start with 1/8 – 1/4 teaspoon and then add more as necessary.

Cookie Fruit Pizza {{Baking Bytes}}

And if you’re not pressed for time, you can absolutely substitute your own sugar cookie recipe!

Cookie Fruit Pizza

Adapted from Pillsbury’s Fanciful Fruit Pizza
Makes 12 servings (1 quarter-sheet pan)

Ingredients

1 roll (16.5 oz) Pillsbury® Create ‘n Bake® refrigerated sugar cookies (or about 2 cups of your own recipe)1

4 oz cream cheese, room temperature2,3 
2 Tbsp sugar
1/4 tsp vanilla

1 1/2 cups fresh fruit (strawberries, blueberries, raspberries, kiwis, peaches, etc)

Directions

  1. Wash and slice the fruit (if necessary) laying it on paper towels to soak up excess water.
  2. Preheat oven to 350 degrees.
  3. Spray the edges of a quarter or half cookie sheet (ideally one with a lip) with cooking spray, then line with parchment paper, allowing the paper to overhang the long edges of the pan.
  4. Press dough evenly in the bottom of the pan (if you’re using a normal-sized cookie sheet, it will only fill half the pan), use a rolling pin to smooth at the end.
  5. Bake about 20 minutes or until golden brown, then cool completely.
  6. Run a butter knife along the edges of the pan, then use the parchment paper to gently lift the whole batch out onto a cutting board (or the counter).
  7. Use a pizza cutter or a sharp knife to trim the raised edges (optional, but it makes it easier to spread the frosting).
  8. At medium speed, beat cream cheese, sugar, and vanilla with an electric mixer until light and fluffy, and spread evenly over cooled crust.
  9. Using a knife or plastic pizza cutter, cut the crust into 8-12 servings3, or whatever size you want. If your pan is lipped, make sure you specifically cut the edges as a pizza cutter won’t reach there.
  10. Arrange the fruit on top4, keeping with in the guidelines for easy serving.
  11. Pro tip: use the parchment paper to move the cookies all at once back to your pan or your serving platter, then cut the extra paper away so it doesn’t show.
  12. Fruit pizza is just fine on the counter for a few hours, but cover and refrigerate leftovers overnight. The cookies are best on day one as they will get much softer in the fridge. For a make-ahead option, bake the cookies and leave them on the counter, make the frosting and store it in the fridge, slice and drain the fruits and store them in the fridge, then assemble the next day.

Notes

This is enough to fill a quarter-sheet pan. I love having this size around and am actually thinking I’d like to have two. If you only have half-sheet pans (normal size), then just press the dough into half of the pan, or double the recipe to make 24 servings.
Lower fat (or fat-free) cream cheese will work just fine.
This makes enough frosting for a thin coating, so if you like lots of frosting you may want to double it.
You don’t have to pre-cut the sections (say, if you want to make an American flag pattern) but it makes it much easier and less messy to serve and eat later.
If you’re using very juicy fruit, avoid putting it on more than a couple hours in advance if possible.

Advertisement

Chocolate Peanut Butter Banana Pops

For this week’s regular post we will stick with the frozen theme, but with a somewhat healthier approach. Peanut butter and banana is one of my favorite combos, which you probably have noticed from previous posts. Similar to one of my favorite summer confections, these are reasonably healthy, easy to prepare, and a delightful addition to a hot day.

Chocolate Peanut Butter Banana Pops {{Baking Bytes}}

Sliced bananas spaced with peanut butter, frozen, and dipped with a thin layer of chocolate, they are sweet and satisfying without having the high sugar and calorie contents of more traditional desserts. The stick makes them great for kids and fun for adults, as well as easy to serve at potlucks and barbecues. Stored in a cooler they should be just fine for a few hours during your outside gatherings even during hot weather.

Chocolate Peanut Butter Banana Pops {{Baking Bytes}}

As an added bonus, you can easily tailor this recipe to suit your preferences and avoid boredom. If peanut butter or chocolate isn’t your style (or you are concerned for allergies), you can easily substitute almond butter, Nutella, caramel sauce, marshmallow creme, or whatever your heart desires. Drizzle the end result with white chocolate or colored candy melts to fit in with a theme, or roll in chopped nuts for a crunchy addition.

Chocolate Peanut Butter Banana Pops {{Baking Bytes}}

My directions make 4-6 servings depending on how high you make your stacks (and how many pieces you eat), but it’s easily scaled to make a bunch at a time. A cookie sheets works great for the initial freezing, and once the chocolate layer is completely frozen you can transfer the lot to an air-tight container or Ziploc for longer term storage. In a sealed container they’ll easily keep frozen and delicious for a few weeks, assuming you haven’t eaten them all yet.

Chocolate Peanut Butter Banana Pops {{Baking Bytes}}

Make a quick batch of these today, then check back on Friday morning for a brand new (and adults-only) ice cream recipe.

Chocolate Peanut Butter Banana Pops

Makes 4-6 pops

Ingredients

2 medium bananas, ripe
2 Tbsp peanut butter
1/4 cup chocolate chips1
1 Tbsp coconut oil

Directions

  1. Line a plate or small cutting board with parchment paper. Set aside.
  2. Peel and slice2 bananas into approximately 1/2″ pieces, discarding (eating) rounded ends. Divide into equal stacks.
  3. In a small microwave safe container, microwave peanut butter for 30 seconds. Stir until liquid and smooth. If necessary, heat in additional 10-second intervals.
  4. Gently slide bananas onto Popsicle sticks, dipping (or spooning) peanut butter onto each slice. End with an undipped piece, then carefully place onto parchment paper. You will likely not use all the peanut butter.
  5. Freeze at least two hours.
  6. In a small microwave safe container, heat chocolate chips and coconut oil for 30 seconds. Stir until smooth and completely combined. If necessary, heat in additional 10-second intervals. For ease of dipping, pour into a tall, skinny container (like a champagne flute).
  7. Dip each banana pop into the chocolate, swirling to cover completely. Gently return to parchment paper.
  8. Return to freezer for at least 30 minutes, or until ready to serve.

Notes

For a richer chocolate experience, you can double the amount of chocolate chips simply repeat steps 6-7 to produce a thicker chocolate layer.

Obviously you could skip slicing and just dip banana halves or thirds into peanut butter and then chocolate, but I like the stacks so they end up straighter and able to stand up on end, as well as a higher banana to peanut butter ratio. But if you want to go that route, I certainly won’t judge.

Easy Zucchini Rollups

A few weeks ago during a relaxed trip to Costco, one where I actually perused all the aisles (except the chips/drinks aisles…I never go down those), I noticed a Roasted Garlic & Chili Aioli sauce. (It was much cheaper at Costco, for the record.) It was low sugar and sounded delicious, so I took a chance and bought the two-pack on a whim. I figured if it was good I could keep one at home and one at work, and if it wasn’t, I’d just donate them both to work. Fortunately for me, it is amazing and I’ve been using it on all sorts of things.

Also a few weeks ago, I decided to give up bread and peanut butter for the month of June. With my marathon training I’ve gained a couple extra pounds and wanted to help myself ditch them a little sooner. Bread and peanut butter are both life staples for me, and I figured if I just gave up one I would end up over-compensating with the other, so ditching both seemed optimal. Terrible, but optimal.

Marathoner!

I completed my marathon on Saturday (Horray! I made it!) and will be cutting my miles back a bit to a more manageable weekly schedule. I have a 5k on Saturday and a half (probably) in mid-July, so that’ll help keep up the schedule, just without those crazy 20-milers. I did make a planned exception for bread on race day (huckleberry stuffed French toast and a Monte Cristo for brunch…so good) but otherwise I’ve been really good about my breadless life. Mostly been doing scrambled eggs or a modified version of my favorite green smoothie1 for breakfast, lettuce wraps for lunch, and quinoa bowls or crock pot meals for dinner. The aforementioned aioli has been just fantastic for adding flavor and a little kick to those wraps and quinoa bowls.

Easy Zucchini Rollups {{Baking Bytes}}

Another favorite lunch are these zucchini rollups. They are super easy and only take a few minutes to prepare, which makes them great for both during work and after. I like to broil mine for a couple minutes (we have a toaster oven at work) for melty cheese, but you can absolutely eat them cold and crunchy as well.

Thin zucchini (use a mandolin, trust me) is topped with whatever you want, then rolled up into a tasty wannabe sandwich. My go-to concoction is listed below, but really you can use almost anything. Meat-lover? Use extra slices or multiple varieties. Vegetarian? Nix the meat and add extra veggies. Vegan? Sub hummus or pesto for the aioli, ditch the meat and cheese, and load up on leafy greens, peppers, mushrooms, or whatever else you’re in to. Savory cream cheeses are delightful as a condiment (you can ditch the regular cheese, or not), basically any cheese will work as long as it’s sliced thinly or a soft cheese, and you can mix it up with ham, turkey, roast beef, pepperoni, or whatever your favorite sliced meat is.

Easy Zucchini Rollups {{Baking Bytes}}

For extra crunch or to up the veggie factor, thinly sliced bell peppers, carrots, onion, extra zucchini, cucumber, or whatever you have lying around will work just great. Cut it to the width of your zucchini slices and you are good to go. If you are adding sliced or shredded items, it works best to add them on top of your condiment to kind of glue everything together. Add a couple of layers of spinach, kale, chard, or whatever you have lying around and you have a tasty and well-rounded meal, easily tailored to your preferences for taste and portion sizing.

I find the zucchini slices will keep in the fridge for at least a week if they are submerged in water, so you can slice and dice all your veggies ahead of time to speed up the preparation process when you’re ready to make them. Use as little or as much of each topping as you like, just leave a couple of inches of one end empty so it’ll stay rolled up. However, if, like me, you get a bit overzealous sometimes, you can poke a toothpick through to secure them.

Easy Zucchini Rollups {{Baking Bytes}}

Great for lunch, dinner, or even as an appetizer, these zucchini rollups are a delicious and healthy (and low carb, and can be gluten-free, if you’re into that) option to have in the repertoire. I’ve not tried it, but I am sure they would keep in the fridge for a few hours after being assembled if you need to make them ahead of time.

Give them a try and be sure to report back with your favorite flavor combinations!

Easy Zucchini Rollups

Ingredients

1 large zucchini
Cheese, thinly sliced (I used cheddar)
Meat, thinly sliced (I used deli ham)
Aioli sauce (or condiment of choice)
Spinach

Topping ideas: thinly sliced bell pepper, julienne-cut carrots or zucchini, any leafy greens, cream cheese, pesto, honey mustard, sliced almonds, hummus, etc

Directions

  1. Use a mandolin or a lot of patience to very thinly slice a zucchini. If it is too thick they will just break instead of roll. (I used the thinnest setting on my mandolin.) Store slices submerged in water in the fridge until ready to use.
  2. Start the broiler on your oven and line a baking sheet with parchment paper.
  3. Press zucchini slices with a paper towel to remove excess moisture, and lay gently on the baking sheet.
  4. Layer zucchini with meat, cheese, aioli, and spinach (and any additional toppings), leaving about 2″ of the wider end completely empty.
  5. Gently roll from the filled end, securing with a toothpick if necessary (mainly depends on how thick your toppings are.)
  6. Broil 1-2 minutes, until cheese is melted. Note: it is likely that your paper and toothpicks will char, but the rollups will be perfect.
  7. Enjoy immediately!

Notes

Made as said in the recipe except substitute 3Tbsp PBfit for peanut butter (another Costco whim), use plain Greek yogurt, and 1/2 cup milk. I also add 2 Tbsp chia seeds to 5 Tbsp water, let sit until gelled, and add that too. I also freeze and crush my spinach ahead of time so I can fit in closer to 1.5 cups in my little blender, with the added benefit that I don’t have to blend things in two stages to make sure it’s finely pureed.

Smoked Salmon and Spinach Scrambled Eggs

I recently went back to Alaska for a long weekend to see my family and celebrate my aunt’s birthday with a race and a camping trip. Since I needed 15 miles for my marathon training, I “warmed up” with 8.8 miles before running the 10k, which was a lot of fun. It didn’t even rain the whole time. The camping trip followed the next day (we camped in a cabin, in case you were appalled at the idea of camping in winter in Alaska) and she celebrated properly by having the adventure catered, which was awesome. Unfortunately for her, the caterer assumed she was feeding 7-10 Dwayne Johnsons instead of 7-10 normal-sized women, and gave her a rather mind-blowingly massive amount of food. Luckily for me, that means I came back to Bozeman with some of the extra smoked salmon – yum!

Smoked Salmon & Spinach Scrambled Eggs {{Baking Bytes}}The following weekend I needed to run 17 miles for my marathon training – my longest run to date. I wasn’t really concerned about this until I actually started running. Oh boy. It was one of those runs where the first mile was hard and every mile after that just got harder. Hopefully it was just an off day and this week’s 20-mile goes much more smoothly. In any case, I eventually made it through those 17 miles and back home, but I was pretty freaking exhausted.

Smoked Salmon & Spinach Scrambled Eggs {{Baking Bytes}}

Fortunately I was able to reward myself with smoked salmon and scrambled eggs! Packed with protein and smokey salmon flavor, this was a great way to recuperate after an arduous adventure. The spinach adds some extra nutrients and great flavor, as well as some color for presentation. (Remember, you do eat prettiness.) Superbly filling, slightly decadent, and requiring minimal brainpower, this is possibly the perfect recovery meal. I definitely encourage all you distance runners out there to try it! (Or if salmon isn’t your thing, you can always give my veggie scramble a try instead.)

Smoked Salmon & Spinach Scrambled Eggs {{Baking Bytes}}This is a super easy meal and is equally fantastic by itself, served with toast, rolled up in a tortilla, or as the inside of a bagel sandwich. Tons of options depending on your mood and how hungry you are. Feel free to add a few tablespoons of shredded cheese for extra flair, although it’s certainly not necessary.

Smoked Salmon & Spinach Scrambled Eggs {{Baking Bytes}}

With salmon season coming along soon I hope you’ll be able to give this a try. Or maybe you need to clear out last year’s frozen supply to make room for new stuff. Either way, this is an awesome way to have smoked salmon for breakfast (or lunch, in my case.)

And either way, I highly recommend following this meal with reading a book outside in the sunshine.

Smoked Salmon and Spinach Scrambled Eggs
Makes 1 serving

Ingredients

olive oil
1/2 cup fresh chopped spinach
1/4 – 1/3 cup diced smoked salmon
seasoning, to taste (optional, I use 1/4 tsp steak seasoning)

2 eggs
2 Tbsp milk (optional)

Directions

  1. Heat a splash of oil in a small frying pan over medium heat until it thins and is easy to swirl in the pan.
  2. Add salmon and spinach and sauté for 2-3 minutes, stirring often, until salmon is heated through and spinach is wilted.
  3. Meanwhile, beat eggs and milk in a small bowl until combined.
  4. Add eggs to frying pan and use a spatula to gently stir them until cooked through.
  5. Serve immediately, solo or with a side of toast and coffee. Also great wrapped up in a tortilla or as a bagel breakfast sandwich.

Veggie Scrambled Eggs

Happy Wednesday everyone. The two recipes I originally had considering sharing this week (and baked last weekend) both require a second iteration, so instead I am sharing my favorite quick breakfast. On the days I am not racing out the door to the gym (mainly Fridays), I like to treat myself to something different from my usual toast with peanut butter and cinnamon. Scrambled eggs with veggies has become my go-to weekday treat so I thought I’d share this fast and easy recipe with you today.

Veggie Scrambled Eggs {{Baking Bytes}}

Recipe might be a bit of a generous term considering just how easy it is, but it’s a great thing to have in the repertoire. Eggs are great for protein to keep you full longer, and veggies round out the meal nicely. Steak seasoning adds a little extra something without any extra work. My favorite veggies to add are bell peppers and zucchini, but you can absolutely use whatever your favorites are. Just bear in mind that some things will take longer to cook (e.g. potatoes) and others will cook much more quickly (e.g. spinach) and adjust steps 2 and 3 according to your choices. You can also easily add some shredded cheese if that’s your style; I like to add it about one minute before the eggs are done cooking so it stays in slightly larger chunks while still getting melty.

Veggie Scrambled Eggs {{Baking Bytes}}

This super simple recipe doesn’t need much talking up so I’ll end here. Enjoy!

Veggie Scrambled Eggs
Makes 1 serving

Ingredients

olive oil
1/2 cup diced veggies (e.g. zucchini and bell pepper)
1/4 – 1/2 tsp steak seasoning (I use the larger amount, but it may be more than some people want)

2 eggs
3 Tbsp milk (optional)

Directions

  1. Heat a splash of oil in a small frying pan over medium heat until it thins and is easy to swirl in the pan.
  2. Add veggies and steak seasoning (no need to pre-mix) and sauté for 2-3 minutes, stirring often, until veggies are heated through and softened to desired texture.
  3. Meanwhile, beat eggs and milk in a small bowl until combined.
  4. Add eggs to frying pan and use a spatula to gently stir them until cooked through.
  5. Serve immediately, solo or with a side of toast and coffee.