Protein Porridge

Happy 2019, folks. I hope everyone had a wonderful year, but if not, I hope this coming one is everything you hoped 2018 would be. I am not much of a resolution setter, but I am a huge fan of goals and personal challenges, and also a numbers person. Last year I tried 76 new recipes, shared 36 posts with you lovely readers, started an Instagram, tried and liked a lower carb lifestyle, discovered the magic that is a spiralizer, and went to several difference food-related classes and events, including learning how to make vodka infusions and homemade sausage. I am looking forward to putting those last two things to good use this year, and sharing them with all of you.

One of my December challenges was to keep a food log, in which I write down all the things I eat every day. It’s an analog version so obviously not a calorie tracker, but it makes me stop and think before eating and helps me to choose healthier options, especially during the food cluster that is the holiday season. I feel very successful this year, navigating lots of deliciousness in healthy ways without feeling like I deprived myself of seasonal treats.  Whether, like me, you are looking to maintain a good thing, or perhaps to start anew, this easy peasy breakfast is a great way to start the day.

Protein Porridge {{Baking Bytes}}

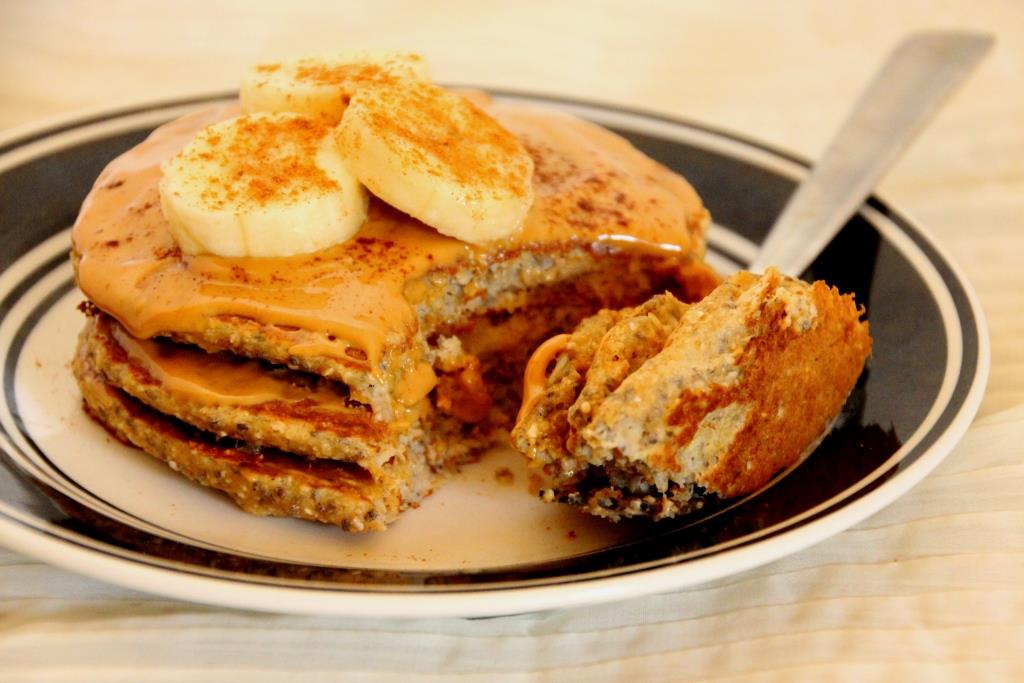
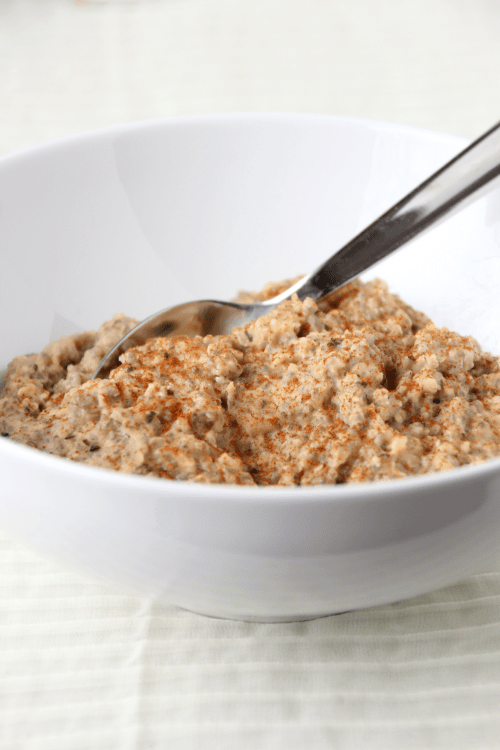
In August when I went lower carb, I basically stopped eating my go-to breakfast of banana peanut butter oatmeal. Since it would’ve been half my carbs for the day, I opted for yogurt parfait and chia pudding and probably unhealthy amounts of eggs. As the weather cooled, however, I found myself missing my warm bowl of morning oats even more. I am no longer tracking my macros, but I’m still opting to do lower carb and higher protein whenever possible, so I set out to find an appropriate winter option. Patterning off my summer recipes, I kept the chia and hemp I’ve become accustomed to and added a few oats for volume. Quick oats work best since the hemp and chia don’t need much time to cook, but lightly blended old-fashioned oats works great too. (I tried it once without grinding them and didn’t care for the textural juxtaposition, but you can nix the grinding process if you don’t mind it.) Warm, cozy, filling, and even faster at cooking, this is my new favorite way to start a chilly morning.

Protein Porridge {{Baking Bytes}}

Even without the boosts this recipe has about 12 grams of protein, but I nearly double that with peanut butter powder and/or protein powder. I personally like the peanut butter powder best since it doesn’t affect the texture and adds a nice peanuty flavor with less fat than regular peanut butter (of which there is already plenty from the hemp and chia). You can use up to 1/4 cup depending on your calorie needs, although I typically use two tablespoons. Alternatively, you can use your favorite protein powder. This is a great option if you’re allergic peanuts or using mix-ins that aren’t typically paired with peanut flavor. Don’t add more than two tablespoons though (about half a scoop), because the resulting texture will be noticeably grainy and a little strange.

Protein Porridge {{Baking Bytes}}

Shockingly (jokes), my go-to mix-ins are half a banana and cinnamon, which pairs nicely with my peanut butter powder. Most fruits are great for this, and it’s a good way to use frozen produce as well. Just heat the produce first and then mix in the rest of the ingredients. If you’re not a peanut butter person (weird), I’ve listed a few other varieties that are excellent with or without protein powder. I also typically stir in a little plain yogurt to add that creaminess, or just actual heavy cream when I’m feeling more decadent. You can 100% skip this if you are dairy-free, or use your favorite non-dairy substitute. Although I don’t usually add it, a teaspoon or two of maple syrup is a nice addition for the more tart berries or options like pumpkin that are not inherently sweet.

Protein Porridge {{Baking Bytes}}

You can easily mix together all the dry ingredients in individual portions, then just add your mix-ins and water and you’re ready to go. I like to prep mine in 8oz containers so I can use it to measure the appropriate amount of water if I’m not at home. Additionally, nix the fruit entirely (but maybe up the spices) for a camping-friendly instant porridge that just requires hot water.

Get your protein in a cozy porridge and start your morning warm and happy. Give it a try and share your favorite mix-ins in the comments!

Protein Porridge

makes one serving

Ingredients

basic porridge
1/4 cup quick oats1
2 Tbsp chia seeds
2 Tbsp hemp seeds
2-4 Tbsp peanut butter powder OR 1 Tbsp natural peanut butter (optional)
2 Tbsp protein powder (optional)
6-8 oz water

2 Tbsp plain Greek yogurt OR 1/2 Tbsp heavy cream (optional)
1 tsp maple syrup (optional)

flavor ideas with peanut butter
1/2 banana, mashed + 1/4 tsp cinnamon
1/2 cup blueberries, mashed + 1/8 tsp cardamom

flavor ideas without peanut butter
1/2 cup peaches, mashed + 1/4 tsp cinnamon + pinch of nutmeg
1/2 cup pumpkin puree + 1/2 tsp pumpkin pie spice
1/4 cup unsweetened shredded coconut + coconut cream instead of yogurt

Directions

  1. If using fruit, mash it into the bottle of a microwaveable bowl.
  2. Add oats, seeds, peanut butter, protein powder (if using), spices of choice, and water. Stir until well combined.
  3. Microwave on high for about 2-3 minutes (2:20 in my microwave is just how I like it) OR use boiling water and let sit, covered, until thickened.
  4. Stir in yogurt and/or maple syrup, if desired.
  5. Enjoy immediately.

Notes

You can also use 1/4 cup old-fashioned oats, lightly ground in a blender. I often do this method since we always have regular oatmeal on the counter for M. Also, if you are gluten-free, use certified oats to keep this recipe up to par.

Advertisement

Banana Cacao Nib Scones

Hello my lovely readers, I hope the beginning of the new year is going smoothly for everyone. (If you want to get straight to the recipe, feel free to skip to the non-italicized text.) With regards to resolutions, this year I’ve decided to do something a little different. Alongside my usual set of running/baking/professional goals, I’ve decided to set a theme: mindfulness. Each month I am going to focus on being more mindful about something in my life. After reading the cookbook Run Fast, Eat Slow I have been inspired to make January’s theme into Mindful Eating.

This doesn’t mean counting calories or following a list of restricted items, but it’s more about improving my relationship with food. It’s easy to feel guilty about eating (or not eating) certain things, to rush through meals in order to move onto something else, to just make things because they’re easy and fast and not because I’m particularly excited to eat them. This month I’m going to focus on food in a way that makes me happy, both mentally and physically: taking the time to make things from scratch as well as actually slowing down and enjoying what I’m eating; having fewer meals in front of a screen; enjoying decadent items as treats not cheats; focusing on what makes me feel happy and energetic and ready for the days to come. 

This is intended to be a long-term change in the way I really think about food. Although I’m not one to be exacting about my diet, I do often feel restricted by what society is touting as healthy these days. Healthy doesn’t necessarily mean low-fat or low-calorie, carbs are not the devil and sugar isn’t the end of the world. Certainly I am going to be mindful of eating unnecessary added sugar, but I already know a low-carb diet doesn’t work that great for me, fats are important for flavor and staying power, and I want every calorie I eat to come from something I enjoy. I will no longer be describing anything as “guilt-free” because food should not be inherently shameful. I would love to hear your thoughts on this endeavor, should you be willing to share them. (Also I highly recommend the book, and you can expect to see some of those recipes on here in the coming months.)

In light of that, today we have another recipe that I made mostly out of curiosity. Consistent readers (and anyone that knows me in real life) will know that I don’t bake anything dairy-free, gluten-free, flourless, or vegan with any amount of regularity because these are not food traits I personally find important. I am, however, often intrigued by such recipes and will make them on occasion just for funsies.

Banana Cacao Nib Scones {{Baking Bytes}}

The original recipe called for things I don’t buy, like self-raising flour, coconut sugar, and almond meal, but I followed her modification suggestions and made a few of my own to tailor the recipe for myself. I replaced some of the flour with ground oatmeal for a heartier flavor, nixed the almond meal in favor of chia seeds, and used regular ole’ brown sugar instead of coconut sugar. I cut the sugar way back since I was figuring the banana adds a fair amount of sweetness (and because I already have my favorite sweeter scones) and added some whole oatmeal for texture.

Banana Cacao Nib Scones {{Baking Bytes}}

A few weeks ago I found some cacao nibs on massive clearance, and bought two of the bags. They were a great addition to these scones, no extra sugar but a little bit of chocolate flavor to enhance the banana. However they are definitely not cheap so feel free to leave them out or use mini chocolate chips as a more decadent replacement.

These scones are fairly dense but soft and moist and delicious. They are also pretty healthy, with low amounts of added sugar and a little bit of protein and good carbs from the oatmeal. Probably you shouldn’t eat three of them, but one is a perfect light-ish breakfast, especially when paired with a cup of coffee.

Banana Cacao Nib Scones {{Baking Bytes}}

I made these a few times and below is my favorite of those iterations. It can be baked into regular size or mini scones, depending on your preferences and whether you plan to serve them solo or as part of a fuller breakfast. They’re also easily portable and a great brunch option, although I think they’re best slightly warmed.

The banana and oatmeal combination is delicious by itself or topped with any number of toppings. Jam or butter and cinnamon sugar were my favorites, but mostly I ate them plain. I especially like the less sweet version if it’s going to be spread with a sweet topping anyway, but you can definitely increase the sugar here if you prefer.

Banana Cacao Nib Scones {{Baking Bytes}}

Give these a try and let me know what you think, and if any of your friends could guess they were vegan.

PS – These can be made gluten-free by using gluten-free flour and uncontaminated oats, and they are vegan/dairy-free unless you use normal chocolate chips, although I’m sure there are vegan/dairy-free versions of those out there you could substitute with.

Banana Scones

Adapted from OmNomAlly
Makes 12-16 mini or 6-8 large scones

Ingredients

2 large, overripe (~300g) bananas
1/2 cup (120 mL) coconut oil, melted
1/4 – 1/3 cup (40-60g) lightly packed brown sugar1
2 Tbsp (20g) chia seeds
1 tsp vanilla

1 1/4 cups (190g) all-purpose flour (use almond flour for gluten-free options)
1 1/2 cups oatmeal (120g), finely ground2
1/2 cup (40g) oatmeal, whole
1 Tbsp baking powder
3/4 tsp salt
1/4 cup cacao nibs, optional3

Directions

  1. Preheat oven to 400 degrees Fahrenheit. Line a baking sheet with a silicon mat or parchment paper.
  2. In a large bowl, mash banana completely. Add coconut oil (microwave briefly if it’s not already mostly liquid), brown sugar, chia, and vanilla. Whisk until well combined, then let rest at least 3 minutes, or until chia seeds have softened.
  3. Add flour, both ground and whole oatmeal, baking powder, salt, and cacao nibs (or chocolate chips), and stir until completely combined. Mixture will be a little loose and quite sticky, but should be solid enough to hold its shape.
  4. Pour onto prepared baking sheet and shape into rounds about 1″ tall. Use two rounds for mini scones, or one for large scones. Use a pizza cutter or a sharp knife to cut rounds into 6 or 8 wedges.
  5. Bake until golden on top and slightly browned on the bottom, about 20 minutes. Be careful not to over bake; they are better slightly too moist than slightly too dry.
  6. Serve warm. Great plain, with butter and cinnamon sugar, or your favorite jam. Store leftovers in an airtight container on the counter up to 3 days, but they are best on day one.

Notes

For sweeter scones, especially if you’re going to enjoy them plain, use the larger amount, or up to 1/2 cup. For less sweet scones, especially if you’re going to doctor them with jam, use the smaller amount. I personally like 1/4 cup best even plain, but the masses may prefer a sweeter option.

Use a blender to grind 1 1/2 cups of the oatmeal into a powder. Leave 1/2 cup as normal for texture. =)

Cacao nibs are a great way to add a little chocolate flavor without the sugar and calories of chocolate chips. They are quite mild but delicious in baked goods. However for a more decadent treat, or if you don’t have cacao nibs on hand, you can substitute mini chocolate chips for delicious results, or leave them out entirely.

Banana Protein Pancakes

Back in June when I had given up bread for the month, I pinned this recipe as something to try if I was absolutely craving pancakes. I didn’t end up trying it that month, and perhaps it will feel somewhat out of season, but after a ridiculous amount of ice cream over the last two months I was looking for something rather less decadent to share with you. Originally a vegetable dish was on the docket, but after a surprise visit from M two weekends ago, and driving to Michigan with my best friend this week, I ran out of time to give it the effort it really deserved. This seemed like a great time to try such a simple recipe and with all the hot weather we’ve been having, a few minutes in front of a griddle is way more appealing that turning on the oven for half an hour.

Banana Protein Pancakes {{Baking Bytes}}

The first time I made this recipe 100% as directed and although it was delicious, it wasn’t quite what I was hoping for. Substantially more moist and less fluffy than a normal pancake, I attempted to lighten it up a bit. I increased the dry:wet ratio with more oatmeal and nixing the applesauce, and decided to add a bit of baking powder like a regular recipe would. This definitely improved the experience for me, but it’s certainly not necessary.

Banana Protein Pancakes {{Baking Bytes}}

Very filling, no added sugar, high protein, and with a wonderful banana flavor, these pancakes are super quick and guilt-free meal – great for nights when you just need to eat something, pronto. I enjoyed mine with peanut butter, banana slices, and cinnamon because that’s how I always eat pancakes (and also so I wouldn’t have half a banana left over), but they are also delightful with real maple or berry syrup if you’re looking for a sweeter treat.

A few disclaimers: are these light and fluffy like normal pancakes? No. Do they stay rather more wet than your favorite recipe? Yes. Are they super delicious anyway? Absolutely. While they’re not a substitute for a true pancake experience, they are excellent in their own right. They are also gluten-free if you use uncontaminated oats, which is probably useful for some people.

Banana Protein Pancakes {{Baking Bytes}}

I added chia seeds and peanut butter powder to mine, but these items are both optional. I think chia is a great way to get a little extra protein without compromising flavor and texture, but you can absolutely reduce the amount or leave it out entirely. Same with the peanut butter powder; I bought some at Costco on a whim and have found it great to use in smoothies and quick breads, but it is also completely optional, especially if you’re going to top your pancakes with peanut butter anyway. I will say that if you are ditching the peanut butter powder, you probably want to use the higher amount of oatmeal if you don’t like pretty moist pancakes.

Banana Protein Pancakes {{Baking Bytes}}

Below find the recipe for one serving. I don’t expect the batter would keep super well, so make just enough for that time. It is so fast to make there’s no need to make it ahead, I promise. The three small pancakes (with peanut butter) was perfect for me, but it’s easily scaled to feed more people. Goes great with sides of bacon, sausage, scrambled eggs, etc. For the athletes out there, I think these would be great pre-run if you have enough time, or as a fantastic post-run recovery meal, particularly with a cup of coffee to go with it.

Give them a try and let me know what you think!

Peanut Butter Banana Protein Pancakes

Adapted from Liz Heather
Serves 1 (three ~4″ pancakes)

Ingredients

1/2 ripe banana, well mashed
1 egg
1 tsp vanilla
1/2 – 1 Tbsp chia seeds (optional, I used 1 Tbsp)

1/3 cup oatmeal, finely ground
3/4 tsp baking powder
1/4 tsp cinnamon
pinch of salt
1-3 Tbsp peanut butter powder (optional,  I sometimes use 2 Tbsp)

Blueberries, raspberries, sliced banana (optional)

Directions

  1. In a small bowl, mix together banana, egg, vanilla, and chia seeds. Allow to rest until chia seeds have softened, about 5 minutes.
  2. Meanwhile, heat electric griddle to 300 degrees Fahrenheit (or medium heat on a stove).
  3. Retrieve banana mixture and add oatmeal (use a blender to grind it first if you haven’t already), baking powder, cinnamon, salt, and peanut butter powder (if using), and mix until well combined. Mixture will be fairly thick.
  4. Add about 1/4 cup of batter on the griddle, manually spreading to about 4″ in diameter.  If desired, gently press fresh fruit into the top of the batter. Cook 3-5 minutes each side, until nicely browned. They will be a bit darker than normal pancakes; that is expected. Repeat with remaining batter (I was able to barely fit all three pancakes on my small griddle at one time.)
  5. Serve immediately with remaining sliced banana, peanut butter, maple syrup, blueberry sauce, cinnamon and sugar, or your favorite toppings.

Easy Zucchini Rollups

A few weeks ago during a relaxed trip to Costco, one where I actually perused all the aisles (except the chips/drinks aisles…I never go down those), I noticed a Roasted Garlic & Chili Aioli sauce. (It was much cheaper at Costco, for the record.) It was low sugar and sounded delicious, so I took a chance and bought the two-pack on a whim. I figured if it was good I could keep one at home and one at work, and if it wasn’t, I’d just donate them both to work. Fortunately for me, it is amazing and I’ve been using it on all sorts of things.

Also a few weeks ago, I decided to give up bread and peanut butter for the month of June. With my marathon training I’ve gained a couple extra pounds and wanted to help myself ditch them a little sooner. Bread and peanut butter are both life staples for me, and I figured if I just gave up one I would end up over-compensating with the other, so ditching both seemed optimal. Terrible, but optimal.

Marathoner!

I completed my marathon on Saturday (Horray! I made it!) and will be cutting my miles back a bit to a more manageable weekly schedule. I have a 5k on Saturday and a half (probably) in mid-July, so that’ll help keep up the schedule, just without those crazy 20-milers. I did make a planned exception for bread on race day (huckleberry stuffed French toast and a Monte Cristo for brunch…so good) but otherwise I’ve been really good about my breadless life. Mostly been doing scrambled eggs or a modified version of my favorite green smoothie1 for breakfast, lettuce wraps for lunch, and quinoa bowls or crock pot meals for dinner. The aforementioned aioli has been just fantastic for adding flavor and a little kick to those wraps and quinoa bowls.

Easy Zucchini Rollups {{Baking Bytes}}

Another favorite lunch are these zucchini rollups. They are super easy and only take a few minutes to prepare, which makes them great for both during work and after. I like to broil mine for a couple minutes (we have a toaster oven at work) for melty cheese, but you can absolutely eat them cold and crunchy as well.

Thin zucchini (use a mandolin, trust me) is topped with whatever you want, then rolled up into a tasty wannabe sandwich. My go-to concoction is listed below, but really you can use almost anything. Meat-lover? Use extra slices or multiple varieties. Vegetarian? Nix the meat and add extra veggies. Vegan? Sub hummus or pesto for the aioli, ditch the meat and cheese, and load up on leafy greens, peppers, mushrooms, or whatever else you’re in to. Savory cream cheeses are delightful as a condiment (you can ditch the regular cheese, or not), basically any cheese will work as long as it’s sliced thinly or a soft cheese, and you can mix it up with ham, turkey, roast beef, pepperoni, or whatever your favorite sliced meat is.

Easy Zucchini Rollups {{Baking Bytes}}

For extra crunch or to up the veggie factor, thinly sliced bell peppers, carrots, onion, extra zucchini, cucumber, or whatever you have lying around will work just great. Cut it to the width of your zucchini slices and you are good to go. If you are adding sliced or shredded items, it works best to add them on top of your condiment to kind of glue everything together. Add a couple of layers of spinach, kale, chard, or whatever you have lying around and you have a tasty and well-rounded meal, easily tailored to your preferences for taste and portion sizing.

I find the zucchini slices will keep in the fridge for at least a week if they are submerged in water, so you can slice and dice all your veggies ahead of time to speed up the preparation process when you’re ready to make them. Use as little or as much of each topping as you like, just leave a couple of inches of one end empty so it’ll stay rolled up. However, if, like me, you get a bit overzealous sometimes, you can poke a toothpick through to secure them.

Easy Zucchini Rollups {{Baking Bytes}}

Great for lunch, dinner, or even as an appetizer, these zucchini rollups are a delicious and healthy (and low carb, and can be gluten-free, if you’re into that) option to have in the repertoire. I’ve not tried it, but I am sure they would keep in the fridge for a few hours after being assembled if you need to make them ahead of time.

Give them a try and be sure to report back with your favorite flavor combinations!

Easy Zucchini Rollups

Ingredients

1 large zucchini
Cheese, thinly sliced (I used cheddar)
Meat, thinly sliced (I used deli ham)
Aioli sauce (or condiment of choice)
Spinach

Topping ideas: thinly sliced bell pepper, julienne-cut carrots or zucchini, any leafy greens, cream cheese, pesto, honey mustard, sliced almonds, hummus, etc

Directions

  1. Use a mandolin or a lot of patience to very thinly slice a zucchini. If it is too thick they will just break instead of roll. (I used the thinnest setting on my mandolin.) Store slices submerged in water in the fridge until ready to use.
  2. Start the broiler on your oven and line a baking sheet with parchment paper.
  3. Press zucchini slices with a paper towel to remove excess moisture, and lay gently on the baking sheet.
  4. Layer zucchini with meat, cheese, aioli, and spinach (and any additional toppings), leaving about 2″ of the wider end completely empty.
  5. Gently roll from the filled end, securing with a toothpick if necessary (mainly depends on how thick your toppings are.)
  6. Broil 1-2 minutes, until cheese is melted. Note: it is likely that your paper and toothpicks will char, but the rollups will be perfect.
  7. Enjoy immediately!

Notes

Made as said in the recipe except substitute 3Tbsp PBfit for peanut butter (another Costco whim), use plain Greek yogurt, and 1/2 cup milk. I also add 2 Tbsp chia seeds to 5 Tbsp water, let sit until gelled, and add that too. I also freeze and crush my spinach ahead of time so I can fit in closer to 1.5 cups in my little blender, with the added benefit that I don’t have to blend things in two stages to make sure it’s finely pureed.