January is often a time for change; new diets, new fitness routines, new personal and professional goals. I am no exception to this rule, but this year I have a slightly different goal in mind with regards to my eating and this blog.
Off and on I’ve struggled with healthy eating, to the point that it’s been hard to feel good about eating anything that isn’t a plain vegetable. We are so inundated by “guilt-free” and “skinny” and “clean-eating” recipes that it starts to feel like every food is measured by how terrible of a person I am for eating it. This year, I’m done with that. Fat is not the enemy, carbs are not the enemy, and if I’m going to eat dessert then why the heck would I want it to be “skinny” or “light”. If you see me using these phrases here, please point them out. I know that changing my relationship with ingredients is not a one-woman task, and if you want to join me in this endeavor, I welcome all the help I can get.
In light of that, here is an extremely normal cookie recipe because if you’re going to have a cookie, have a proper cookie. (Those “skinny” recipes never work anyway, since most of the time people just eat twice as many of them.) Peanut buttery goodness complemented with the rustic flavor of oatmeal and the chocolatey crunch of peanut butter M&M’s, these are sure to please any peanut butter fan.

I’ve been making the standard peanut butter cookie recipe on the back of the Jif jar for as long as I can remember (even saving a label when my Costco started carrying Skippy instead), and it’s still one of my favorites. I usually add chocolate chips (and nix the sugar crosshatching) because nothing is better than melty chocolate and soft peanut butter cookie in one cozy mouthful. However, I also super love oatmeal cookies, and have featured a couple different ones on this site. Inspired by that flavor palate, I opted to adapt this recipe towards some oatmealy delight.
Largely the same as the original, I substituted some of the flour for some extra oatmeal mostly for texture purposes. I never pack brown sugar for cookie recipes, which I think blends nicely for the oatmeal pairing, but if you prefer a sweeter flavor then by all means pack that sugar firmly into your measuring cups.

For texture and color and always-welcomed chocolate, peanut M&M’s are a fun addition. I’ve also used peanut butter M&M’s and regular ole’ chocolate chunks, both with delicious success. Smooth peanut butter is my preference, but use chunky or add some chopped roasted peanuts if you’re in to that. Playing up the peanut flavor instead of just sugar is a nice twist on an old favorite, and it makes them great for hiking too.
Celebrate your progress towards your first month of goals, console yourself over the lack thereof, or just welcome in a new month with a batch of these cookies. Enjoying life is so much more than doing everything “right”, and a proper cookie is always a welcome lift in the day.
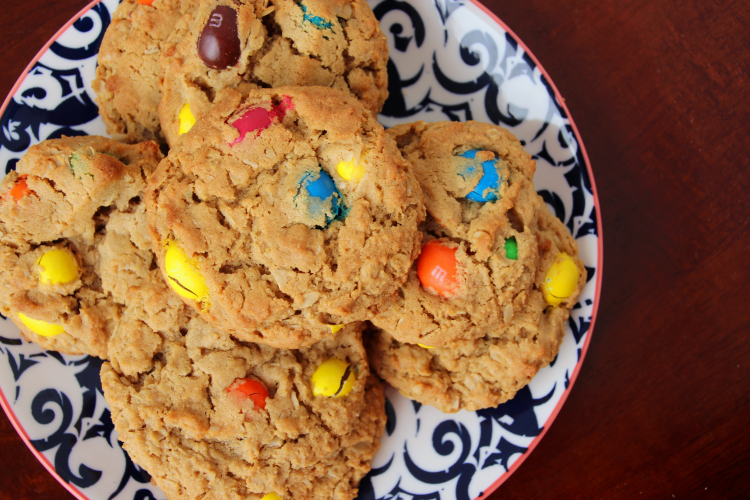
Oatmeal Peanut Butter M&M Cookies
Adapted from Jif
Makes about 3 dozen large cookies
Ingredients
3 cups (450g) all-purpose flour
2 cups (160g) old-fashioned oats
1 1/2 teaspoons baking soda
1 1/2 teaspoons salt
1 1/2 cup (400g) peanut butter (Jif or similar; I’ve never tried it with a “natural” sort)
1 cup (185g) shortening
2 1/2 cups (450g) unpacked light brown sugar
3oz milk
1oz vanilla extract
2 eggs
3 cups (550g) peanut M&Ms1
Directions
- Preheat oven to 375 degrees Fahrenheit. Line baking sheets with parchment paper or silicon baking mat. Set aside.
- In a large bowl, whisk together flour, oats, baking soda, and salt. Set aside.
- In the bowl of a stand mixer, combine peanut butter, shortening, sugar, milk, and vanilla. Beat until completely combined.
- Add eggs and beat until just combined.
- Stir in flour mixture until combined. Dough should not stick to your finger if you press it; add additional flour 1/4 cup at a time if necessary.
- By hand, stir in M&Ms (so they don’t break.)
- Use a 1/4 cup cookie scoop to add balls of dough to cookie sheets (I could only fit about 8 on a pan), flattening the tops slightly.
- Bake 13-15 minutes, or until bottoms are lightly browned; remove to a cooling rack to cool completely.
- Store in an airtight container up to one week, or in the freezer for longer term storage.
Notes
1 Or any one of the following: peanut butter M&M’s, regular M&M’s, chocolate chunks, chocolate chips, roasted peanuts, etc. Mix and match to your heart’s desire.