BBQ Jackfruit Sandwiches & Maple Walnut Brussels Slaw

(Long post incoming, but I promise the recipes are worth it!)

Week four already! Is October going by crazy fast for anyone else? After spending the first half of month in Europe I am now in Iowa for work and boy is my body confused. Here’s hoping my sleep and my stomach get back on track soon.

This week is entree week. Pulled pork is one of my absolute favorite meals and Pinterest piqued my curiosity of substituting jackfruit for the meat. I’ve seen it multiple times over the last few years but never actually got around to trying it. This menu was the perfect opportunity to give it a shot since it nicely fits the theme and is inherently vegetarian and lactose-free.

BBQ Jackfruit Sandwiches {{Baking Bytes}}

I vaguely considered using fresh jackfruit until I saw the size of one and realized I didn’t want enough to feed the entire Mongol army. Feel free to go fresh if you like, or stick to canned if you want a slightly less exhausting adventure. Ensure you rinse your canned stuff thoroughly in order to remove as much of the “can” flavor as possible. I will fully admit canned jackfruit is not widely stocked nor cheap in my area, but it was definitely a fun recipe nonetheless.

Is it pork? No. Is it delicious? Yes. While it definitely won’t fool any meat eaters since the texture and flavor are both quite different, it’s still an awesome addition to your repertoire and a fun way to add a vegan option to a barbecue spread. And either way it was a perfect vessel for the most amazing barbecue sauce I’ve ever made.

Smoky Sweet BBQ Sauce {{Baking Bytes}}

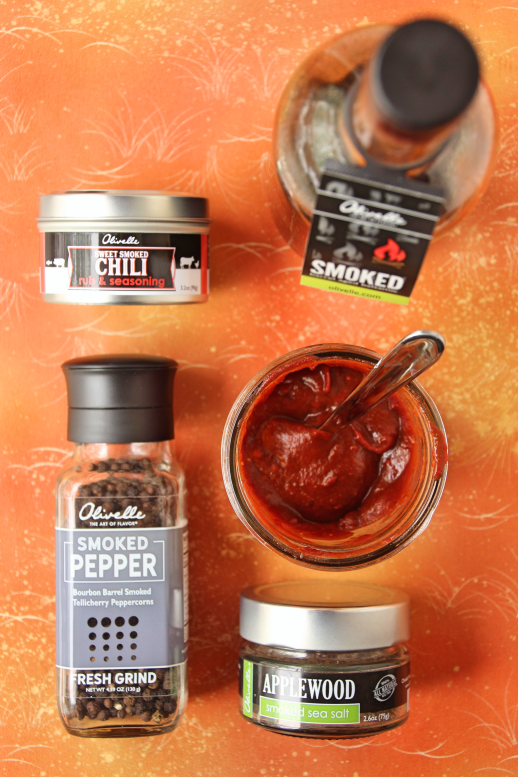
Smoky, sweet, and just enough spice, this barbecue sauce is definitely my go-to recipe. My mom actually sent me this recipe like six months ago and I completely forgot about it until I was considering the menu for this series. I am so glad I finally gave it a try because I personally think my slightly adapted version is just perfect. Easy, smooth, and a perfect balance of smoke and spice without the overload of sugar store-bought varieties typically employ. It comes together in about five minutes and keeps in the fridge for quite a while, so if you try nothing else about this recipe, definitely give the sauce a go! I’ll definitely be using it on everything from burgers to meatloaf to actual pulled pork going forward.

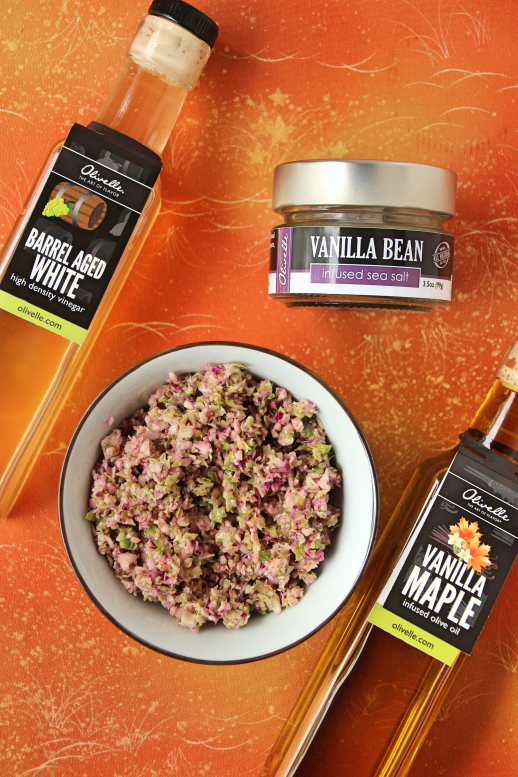
The last piece in this delightful sandwich is the slaw. Pulled pork sandwiches are nearly always accompanied by some kind of coleslaw and I wanted to include that element here as well. Inspired by an existing Olivelle recipe of which I’ve already posted another version, this one is simple but a perfect sweet and crunchy  addition to the barbecue flavor. An equal mix of barrel aged white balsamic and their new vanilla maple olive oil blend into a light and sweet dressing that compliments the crisp sprouts and cabbage without competing with the barbecue sauce. I added some walnuts for extra crunch and that slight nutty flavor adds just a little interest to the whole experience.

Maple Walnut Brussels Sprouts Slaw {{Baking Bytes}}

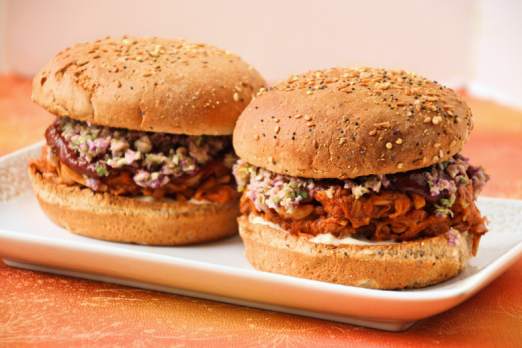
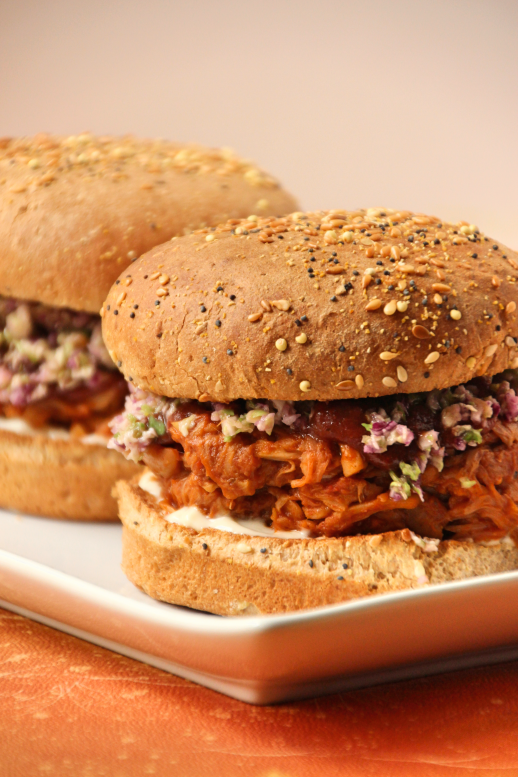
Sandwiched between your favorite lightly toasted bun with a spread of (mayo), the jackfruit and slaw combine into a sweet and spicy experience that’s not only delicious, but also pretty healthy. It’s inherently vegetarian and can be easily made vegan by subbing or ditching the mayo, making it appropriate for a wide variety of diet preferences. It’s a lovely cozy fall meal but would also be awesome for those summer potlucks, so keep it handy all year long.

BBQ Jackfruit Sandwiches {{Baking Bytes}}

Whether you try one piece or the whole shebang, I hope you find a new go-to somewhere in the set!

BBQ Jackfruit Sandwiches

Serves 4-6

Ingredients

Smoky Sweet BBQ Sauce
6oz can tomato paste
1/2 cup unsweetened applesauce
1/4 cup tomato sauce
1/4 cup Smoked Balsamic Vinegar
1/2 tsp liquid smoke, optional
2 Tbsp Sweet Smoked Chili Rub
1 Tbsp Applewood Smoked Sea Salt1
15 twists Bourbon Barrel Smoked Black Peppercorns1
1/4 tsp ground chipotle or cayenne pepper, optional

Maple Walnut Brussels Sprouts Slaw
1/2 lb Brussels sprouts, trimmed and shredded (about 3 cups)
1 cup shredded red cabbage
1/2 cup walnuts, chopped

3 Tbsp Barrel Aged White Balsamic Vinegar
3 Tbsp Vanilla Maple Olive Oil
1/2 tsp Vanilla Bean Sea Salt

BBQ Jackfruit
2 Tbsp Caramelized Garlic Olive Oil
3 (14oz) cans young jackfruit in water2
2 Tbsp Sweet Smoked Chili Rub
1 cup smoky sweet barbecue sauce
3/4 cup water

for each sandwich
1 burger bun, toasted
1/2 cup bbq jackfruit
1/4 vanilla maple slaw
mayo (or your favorite vegan substitute), to taste
additional barbecue sauce, to taste

Directions

  1. For the sauce: Blend all sauce ingredients until well combined; store in a pint jar and refrigerate until ready to use, up to 6 weeks.
  2. For the slaw: In a medium bowl, mix together Brussels sprouts, cabbage, and walnuts.
  3. In a pint glass or mason jar, whisk together Barrel Aged White Balsamic, Vanilla Maple Olive Oil, and Vanilla Bean Sea Salt until completely combined.
  4. Stir dressing into Brussels mixture until well mixed. Cover and refrigerate until ready to use, up to 5 days.
  5. For the bbq sandwiches: Drain and thoroughly rinse jackfruit, then pat dry. Set aside.
  6. In a large frying pan or wok, heat the olive oil until shimmering.
  7. Stir in jackfruit and Sweet Smoked Chili Rub and toss until well coated.
  8. Stir in barbecue sauce and water, then reduce heat to medium and simmer until jackfruit is tender and most of the liquid is absorbed.
  9. Spread mayo on bottom half of a toasted bun; top with 1/2 cup jackfruit, 1/4 cup slaw, and additional barbecue sauce, to taste.
  10. Cover with the other half of the bun and enjoy immediately.

Notes

You can substitute plain salt and pepper with minimal taste difference, but the smoky versions add a lovely depth of flavor.

If you prefer meat, I harbor no judgement for substituting normal pulled pork!

Advertisement

Lavender Honey Chèvre Ice Cream

Happy July folks and welcome to round SIX of National Ice Cream Month! Crazy to think I’ve been doing this for so long but it’s honestly my favorite part of the blog year. I hope you’re ready for some new favorites because I’m pretty excited about this year’s lineup.

Honey Lavender Chevre Ice Cream {{Baking Bytes}}

Week one makes use of one of my favorite delicately sweet flavors: lavender. Since discovering lavender creme brûlée at a since-closed local restaurant, I’ve used it across many ice cream flavors. This year I was searching for something lighter and a bit more subtle, and the prevalence of lavender, honey, and goat cheese combinations inspired me to create my own version here.

Honey Lavender Chevre Ice Cream {{Baking Bytes}}

Subtly flavored with lavender (although you can pump that up to your heart’s content) gives this ice cream a light and summery feel. Partially sweetened with honey, it has that somewhat caramel-like note I personally think blends beautiful. I added a small amount of goat cheese for a little tang, reminiscent of cheesecake without feeling heavy.

Honey Lavender Chevre Ice Cream {{Baking Bytes}}

This ice cream is all that smooth and creamy goodness you’re craving with a light flavor that is fully capable on its own but I’m sure would also blend beautifully with your favorite blueberry dessert. I’ve yet to have both a blueberry pie and a batch of this ice cream ready at the same time, but one day I will test my hypothesis. If you get to it first, be sure to let me know your thoughts.

Honey Lavender Chevre Ice Cream {{Baking Bytes}}


Round out your holiday weekend with a slightly less traditional dessert, and get ready for more ice creams and salads headed your way.

Lavender Honey Chèvre Ice Cream 

Makes ~6 cups

Ingredients

1 cup whole milk
1-2 Tbsp culinary lavender1

2 1/4 cups heavy whipping cream (ish)
1/3 cup honey
1/4 cup sugar
1/4 cup chèvre (goat cheese)

1/2 cup egg substitute
1/2 tsp vanilla

Directions

  1. Gently crush the lavender buds with a spoon (or a mortar and pestle, if you’re fancier than I am).
  2. In a small saucepan, heat milk on medium until it just starts to simmer, then remove from heat. Add lavender to the milk and allow it to steep for at least 30 minutes. Taste and when it starts to seem too strong, proceed to next step.
  3. Pour milk through a fine mesh strainer into a measuring cup to remove the lavender buds, pressing gently on the buds to release the most flavorful milk.
  4. Return to lavender milk to saucepan over medium heat and add enough heavy cream to bring the total to 3 cups.
  5. Add honey, sugar, and chèvre and whisk until smooth. (You can steep in some extra lavender at this point if it tastes too subtle.)
  6. Remove from the heat and whisk in egg and vanilla. Chill thoroughly, or overnight.
  7. Freeze according to your ice cream maker’s directions, then place in a cold freezer-safe bowl to freeze for an additional four hours, or overnight.
  8. A sprinkling of lavender buds makes a beautiful topping.

Notes

1 My lavender is losing its potency so I ended up at 5 tsp and should’ve used 6, but I would start with 4 tsp and see how you feel.

London Fog Ice Cream

[Welcome to July AKA National Ice Cream Month! To celebrate, each Friday I will be posting a new delicious ice cream flavor alongside my regularly scheduled posts. Hope you enjoy the series!]

Ten years ago (wow time flies) whilst gallivanting around London with a few high school friends, one of them introduced me to what has remained a favorite of mine ever since. Called a London Fog, it’s comprised of steamed milk, vanilla, and Earl Gray tea. Warm and caffeinated without being overly sweet, it’s one of my go-to treat beverages during the winter months.

It’s not even vaguely chilly outside, but I bribed a friend into watering my garden during a recent vacation with promises of homemade ice cream and she requested I attempt an Earl Gray version (as well as maple chipotle). Given my love of the London Fog I had no qualms about doing so and set off to make it happen. After a stop at our local Townshend’s Tea House for some loose leaf tea, I was pretty much set to give it a whirl. I chose to use loose leaf tea because it is not only typically much better quality, but it infuses into thicker liquids (i.e. milk) much better than bags do. You can certainly try a bagged tea if you really want, but I highly recommend splurging here if you can.

This is one of those flavors that worked beautifully the first time I tried, basically following my usual method for infused ice creams, like the coffee and lavender from years past. The wonderful and cozy flavor of Earl Gray works just as well in chilled dessert as it does in a warm beverage, and makes it much easier to enjoy during this 90*F nonsense we’ve been having. A dash of vanilla adds a mellow touch and, in my opinion, balances the tea nicely with the cream.


I like my flavors quite strong so I used a full half-cup of tea and let it infuse in the fridge overnight. It is critical to heat the milk before adding the tea, as the cold-brew method doesn’t quite work here, but it doesn’t take too long to heat some milk on the stove. If you prefer a milder flavor, you can use less tea or steep it for less time (or both). However, keep in mind it will be a bit more mild after churning than straight out of the fridge, since the volume of the ice cream is much larger.

This ice cream is a perfect way to bring a favorite cold-weather beverage into a warm-weather dessert. I enjoyed it plain, but for a little flair it’d be delightful with a shortbread cookie topping.


London Fog Ice Cream 

Makes ~6 cups

Ingredients

2 cups heavy whipping cream
1/2 cups egg substitute (optional)
3/4 cup sugar

1 1/2 cups whole or 2% milk
1/3 – 1/2 cup loose-leaf Earl Grey tea

1 tsp vanilla

Directions

  1. In a medium bowl, whisk together cream, egg substitute (if using) and sugar. Set aside.
  2. In a small saucepan, heat milk on medium until it just starts to simmer, then remove from heat. Add tea to the milk and allow it to steep for about 30 minutes.
  3. Slowly stream into cream mixture, whisking constantly (leave the tea in!)
  4. Cover and chill in the refrigerator completely, or overnight.
  5. Whisk in vanilla, then strain mixture with a fine mesh sieve, pressing on the tea to extract as much milk as possible.
  6. Freeze according to your ice cream maker’s directions
  7. Place in a cold freezer-safe bowl to freeze until firm, or overnight.

Lavender Vanilla Bean Ice Cream {National Ice Cream Month}

[Welcome! In case you missed it, July is National Ice Cream month. Each Wednesday in July I have shared a new ice cream recipe. If you missed the other recipes, they can be found hereherehere, and here.]

Several years ago, at a local restaurant called Over the Tapas, I tried a lovely dessert: lavender crème brûlée. Before this I’d never had lavender as a flavor, only a scent, but I was immediately a big fan. After debating attempting to copy the dessert, I decided I should probably start with standard crème brûlée before moving on to something that seemed a bit more complex.

Lavender Vanilla Bean Ice Cream {{Baking Bytes}}

Four years later I still haven’t made any sort of crème brûlée, but it still remains on the to do list. I’ll get to it some day. Maybe. In any case, I still love the idea of lavender in baked goods, so when Kristin from Pastry Affair posted her Lavender Vanilla Bean Cake, I knew I needed to try it.

However, it turns out I’m incredibly lazy about making cakes so I still haven’t done that either. It did, however, inspire a new ice cream flavor for me to work out. Surprisingly, it only took me one try to find a recipe I am perfectly happy with, so I’m sharing it with you all today.

Lavender Vanilla Bean Ice Cream {{Baking Bytes}}

Delicate (but not subtle) lavender combined with the familiar flavor of vanilla bean, this ice cream is the usual smooth and creamy concoction with the somewhat unusual twist of lavender. As mentioned, it is not a subtle lavender but it’s not overwhelmingly strong either. I even got several opinions on this just to make sure I didn’t need to tone it down. It pairs beautifully with vanilla bean, as expected, and the black specs add a little bit of interest.

Lavender Vanilla Bean Ice Cream {{Baking Bytes}}

I strained the buds from the ice cream but a few sprinkled atop each serving is pretty without making the texture strange.

Lavender Vanilla Bean Ice Cream {{Baking Bytes}}

This lovely addition to my repertoire finishes up National Ice Cream Month. I hope you found a new favorite, or at least some ideas to think about. Thanks for joining me and I’m sure it’ll be back next year with a brand new round of flavors.

Lavender Vanilla Bean Ice Cream {{Baking Bytes}}

(And if you’re overwhelmed with all the sugar this month, check back in a couple of weeks for a healthy entrée.)

Lavender Vanilla Bean Ice Cream 

Makes ~6 cups

Ingredients

1 cup whole milk (not half and half; 2% is okay if you must)
4 tsp culinary lavender

1 cup sugar
2 cups heavy whipping cream
1/2 cup egg substitute
2 tsp vanilla
1/2 tsp vanilla bean powder

Directions

  1. Gently crush the lavender buds with a spoon (or a mortar and pestle, if you’re fancier than I am).
  2. In a small saucepan, heat milk on medium until it just starts to boil, then remove from heat. Add lavender to the milk and allow it to steep for about 30 minutes. Pour milk through a fine mesh strainer to remove the lavender buds, pressing gently on the buds to release the most flavorful milk.
  3. In a large bowl, whisk together remaining ingredients with lavender milk until completely combined.
  4. Cover bowl and chill in the refrigerator at least 8 hours, or overnight.
  5. Freeze according to your ice cream maker’s directions, then place in a cold freezer-safe bowl to freeze for an additional three hours, or overnight.
  6. A sprinkling of lavender buds makes a beautiful topping.

Notes

1 I found that with the reduced fat from my usual recipe the ice cream froze a lot harder. I attempted adding a little vodka to rectify this, but I didn’t care for the added flavor. Instead, just let the ice cream rest on the counter for 5-10 minutes before you intend to eat it to make it easier to dish.

Fresh Peach Crisp & Cinnamon Vanilla Ice Cream

As the days start to get shorter, my thoughts turn to those of fall and how I’m probably not quite ready for that. Fortunately the produce section at Costco is still full of summer flavors. I had a flat of peaches to use up and not enough energy for a pie, so a peach crisp seemed in order.

Peach Crisp & Cinnamon Vanilla Ice Cream {{Baking Bytes}}

Peaches and cinnamon are one of my favorite flavor combinations and this crisp is no exception. Fresh peaches complimented by ground cinnamon is difficult to beat and nixing the pie crust makes it easier than pie. With the crispy topping it’s great on its own but being as I’m an a la mode kind of girl, I made a batch of ice cream to go with.

Obviously vanilla is the traditional choice, but on a whim I kicked it up a notch with a teaspoon of cinnamon. Best idea ever! It’s pairs beautifully with the crisp, and I’m sure it would go great with peach pie, rhubarb pie, or any number of other fruit desserts. It’s also delicious by itself for us cinnamon fanatics. I suggest you make a batch to go with your peach crisp – you’ll be glad you did!

Peach Crisp & Cinnamon Vanilla Ice Cream {{Baking Bytes}}

Full disclosure: I thought this crisp turned out a little runny, so if I make it again I’ll probably add another 1/2-1 teaspoon of cornstarch to the peaches before baking. If you try it that way, let me know what you think.

PS – If you’re cringing at the idea of peeling 6 peaches, check out my peach pie post for an easy and fast way to get it done!

Peach Crisp

Adapted from Brown Eyed Baker
Makes 8″x8″ dish

Ingredients

6 peaches (peeled, pitted and sliced)
1/3 cup sugar

1/4 cup butter, melted
1/3 cup brown sugar
3/4 cup flour
1/2 tsp baking powder
1/4 salt

1 Tbsp lemon juice
2 tsp cornstarch
1 tsp ground cinnamon
1/4 tsp salt

Directions

  1. Place peaches in a large bowl and gently fold in the sugar. Let stand for about 30 minutes, stirring occasionally.
  2. Meanwhile, make the topping: in a small bowl, whisk together brown sugar, flour, baking powder, and salt until well mixed. Add the butter and mix until completely combined and crumbly. You may want to use your hands. Set aside.
  3. Preheat oven to 350 degrees Fahrenheit.
  4. Whisk together lemon juice, corn starch, cinnamon, and salt in a small bowl.
  5. Drain peaches (for at least ten minutes), return to bowl, and stir in lemon juice mixture.
  6. Pour peaches into 8″x8″ glass baking dish, crumble topping over the peaches (pressing lightly to make sure it sticks) and bake for about 40 minutes, or until juices are bubbling and topping is crisp.
  7. Let cool for 15 minutes, or until ready to eat. Serve warm with a scoop of cinnamon vanilla ice cream (below).

Peach Crisp & Cinnamon Vanilla Ice Cream {{Baking Bytes}}

Cinnamon Vanilla Ice Cream

Makes ~6 cups

Ingredients

1 cup sugar
2 cups heavy whipping cream
1 cup half and half (or milk)
1/2 cup egg substitute
1 1/2 tsp vanilla
1/2 – 1 tsp ground cinnamon1

Directions

  1. Whisk together all ingredients until completely combined.
  2. Cover bowl and chill in the refrigerator at least 4 hours, or overnight.
  3. Freeze according to your ice cream maker’s directions, then place in a freezer-safe bowl to freeze for an extra three hours, or overnight.

Notes

1 I love cinnamon so I used the full teaspoon. If you’re not as big of a fan, you’d probably prefer a half teaspoon (or somewhere in between).