Blueberry Lemon Thyme Cupcakes

Spring has only just barely joined us here in Bozeman and I am ready for it. Although I haven’t yet figured out in what capacity I’m going to participate in running season this year, not needing multiple layers of clothing to visit the great outdoors is definitely improving my morale. M and I have been hiking every weekend since mid-March when the ski area closed, and with the social distancing practices it’s turned us from standard trails towards wandering about new-to-us public lands.

Blueberry Lemon Thyme Cupcakes {{Baking Bytes}}

As the snow became less frequent and the plants started to show bits of color, my typical lemon cravings arrived too. I’d had cupcakes on my list to make for approximately a year at this point and a springtime version seemed the obvious solution. (Plus it allowed me to use these gorgeous cupcake liners I bought at Costco way too many years ago.) Borrowing a recipe from the always-amazing Pastry Affair, I set out on a cupcake quest. I knew I wanted to incorporate an herbaceous aspect and with thyme being the most appropriate herb available at the store that day, I was inspired by yet another Pastry Affair scone recipe I’d made last year.

Knowing I wanted a lighter buttercream frosting in lieu of a decadent cream cheese concoction, I modified a separate recipe with another addition of thyme in order to harmonize the two recipes with plenty of springtime flavor.

Blueberry Lemon Thyme Cupcakes {{Baking Bytes}}

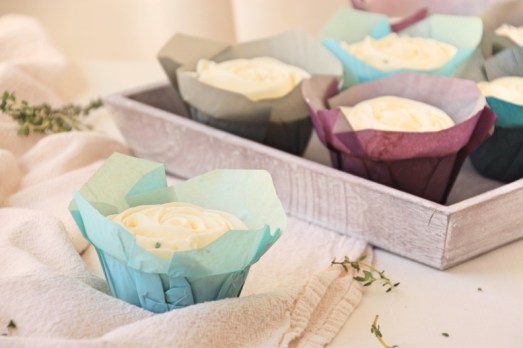
Moist and light, these cupcakes are packed with blueberries and accented with lemon and thyme for a slight twist on a classic. They are not exorbitantly sweet which means even with the buttercream frosting it’s a reasonable sugar high. (Still plenty sweet though, it is a cupcake, after all.) The frosting is fluffy and bright with a little thyme flavor, and a few specks of the herb throughout. I opted for some simple rose swirls to keep it a relatively light amount of frosting, and to bring an edible bouquet to my kitchen.

Blueberry Lemon Thyme Cupcakes {{Baking Bytes}}

These keep well on the counter, remaining moist and delicious for at least five days. Realistically probably longer but we’d given away or demolished all 18 of them by then. If you’re in need of a wonderful treat with plenty to share, these cupcakes are perfect. They’d make a lovely addition to Mother’s Day but are low-stress enough for any weekday treat.

Blueberry Lemon Thyme Cupcakes {{Baking Bytes}}

Blueberry Thyme Cupcakes

Vaguely adapted from Pastry Affair
Makes 18 cupcakes

Ingredients

1 3/4 cup cake flour
1/2 Tbsp baking powder
1/2 tsp baking soda
1/2 tsp salt

1/4 cup unsalted butter, at room temperature
3/4 cup white sugar
2-3 tsp fresh thyme, minced
1 tsp lemon zest, minced

2 large eggs

1/3 cup plain Greek yogurt
1/4 cup Sicilian Lemon olive oil (or any vegetable oil)
1 Tbsp vanilla

2/3 cup milk

1 1/2 cups blueberries, fresh or frozen
1 Tbsp flour (if using frozen berries)

Directions

  1. Preheat oven to 350 degrees Fahrenheit and prepare two cupcake tins with a total of 18 baking cups.
  2. In a small bowl, whisk together flour, baking powder, baking soda, and salt. Set aside.
  3. With an electric mixer, cream together butter,  sugar, and thyme until light and fluffy, at least 2 minutes.
  4. Beat in eggs one at a time, mixing thoroughly after each one, then mix in yogurt, oil, and vanilla.
  5. Add in the dry mixture about 1/4 cup at a time,  until mostly combined.
  6. Stir in the milk on low speed until the batter is smooth and there are no flour streaks.
  7. If you have frozen berries, toss them with the tablespoon of flour until well coated.
  8. Gently fold in the blueberries until evenly distributed.
  9. Fill each baking cup with about 1/4 cup off batter, then bake for 16-18 minutes or until a toothpick comes out clean. (If your tins will fit side by side on the same oven rack, you can bake them all at once, otherwise I recommend doing each tin separately.)
  10. Cool briefly in pan, then remove to a wire rack to cool completely prior to frosting.
  11. Frost as desired, then store in a sealed container on the counter up to one week (or until devoured.)

Lemon Thyme Buttercream Frosting

Borrowed from Sally’s Baking Addiction
Makes about 2.5 cups

Ingredients

1 cup unsalted butter, room temperature
4 1/2 cups powdered sugar
2 1/2 Tbsp lemon juice, freshly squeezed
2 Tbsp heavy cream
2 tsp lemon zest, minced
1 Tbsp thyme, minced
pinch of salt

Directions

  1. With an electric mixer, beat the butter until light and creamy, about two minutes.
  2. Stir in the remaining ingredients on low speed until just coming together.
  3. Beat on high speed for three minutes, until frosting is fluffy, uniform, and fragrant.
  4. If necessary, adjust consistency with an additional 1/4 cup powdered sugar another tablespoon of cream to thicken or thin, respectively.
  5. If you are relatively light with frosting (like me), you can store leftovers in the freezer. Bring to room temperature and beat again before using, adjusting texture with additional cream if needed.
Advertisement

Happy New Year (and an Announcement)

Happy New Year to all my friends, family, and the other people I’ve somehow tricked into reading this blog. 2019 was a big year for me personally and I’m really proud to have finished out the decade on such a high note.

In the food world I published 30 new posts here and tried 59 new recipes; discovered beet and mint play nicely together, and that coconut cream makes a delightful frozen dessert; took mimosas on a hike and had afternoon tea in the park; picked tons of low-bush blueberries and made sorbet for the first time; doubled down on my love of spicy-sweet combinations and made my own Olivelle menu; and ventured into cocktail making and took a Danish pastry class.

File_001.png

On a personal note I planned a sold-out Women Techmakers summit for International Women’s Day and hosted 5 additional meetups; spoke at a dinner and started publishing articles on LinkedIn; celebrated my 30th birthday and worked on my bucket list; visited Austin and Philadelphia for the first time and finally got to host my Canada friends; picked up over 200 pieces of trash plus Bozeman Clean Up Day; hiked the Juneau Ridge Trail with my dad and went to Norway (and Scotland and Denmark) with my aunt; learned how to do my makeup and got snazzy professional headshots.

File_001 (1).png

And in my first love, fitness, I PRd the Bangtail Divide 38k by 12 minutes and the Bridger Ridge Run by an hour and a half; survived the Loch Ness Marathon and helped my best friend run her first half; PR’d my squat, deadlift, and bench, and made progress towards a pull-up; ran 535 miles with 126 race miles, commuted 837 miles and moved 1738 miles for the year; ran on 98 days, biked on 162, and did 5 sun B salutations on 348.

File_001 (2).png

My goals for 2020 are not quite finalized but some for this blog are:

  • complete a food photography class
  • complete a photo editing class
  • try 3 vodka infusions
  • post 25 new recipes
  • continue my ice cream series
  • bake sourdough bread

Although I’m extremely proud of all my accomplishments from last year, there were also multiple times when I felt overwhelmed with doing all the things and found it difficult to appreciate the moments as they happened. I’ve also struggled with my relationship with food and the pressure to maintain consistency in every aspect of my life and feel like I need to take a step back to reset, re-evaluate, and recharge. In light of that, while I check those first two items off my list and plan the 2nd-Annual IWD Summit, I’m going to take a few months off from this blog. I’ll still be active on my Instagram and am likely to post a few easy recipes there, but there won’t be much going on here through March. I hope you will all be understanding of this sabbatical and I’m looking forward to coming back stronger and better in April.

In the meantime, please follow me on Instagram (or Facebook, they are cross-posted) and share with me your proud moments of 2019, your goals and intentions for 2020, and any new recipes you’d love to see here later this year.

Happy 2020!

~Lindsey

Pear & Pomegranate Protein Waffles

With just a couple of weeks left in the year and the holidays quickly approaching, I personal find December to be an easily overwhelming month: considering all the things that didn’t happen this year, planning for next year, panicking about what to get my father and brother for Christmas, getting increasingly irritated every time “Santa Baby” comes on the radio, and still attempting to maintain some sense of productivity at work. It can be so easy to forget to take quiet reflection time to rest and recharge but the fullest times of year are those during which we should make the most effort to do so.

Pear & Pomegranate Protein Waffle {{Baking Bytes}}

Make any morning special with these gorgeous and delicious waffles. Waffles are particularly nostalgic for me, having grown up eating copious amount of Belgian waffles on holidays and birthdays and the occasional breakfast for dinner. It’s a common Christmas morning breakfast at my parents’ house and something I always wish I made time for more often.

pear_pom_waffle_4

After a trip to Norway where a traditional Sunday morning means a hike and a waffle hut,  complete with jam and lightly sweetened whipped cream, I started to think I may have more Scandinavian traits than I thought. (Reading The Year of Living Danishly served only to validate this hypothesis.) While every week isn’t something I’ve managed to work into regular life, a morning run and a waffle never fails to feel like the perfect start to the day. (Full disclosure: actual Norwegians use substantially less cream and jam than I did here; it seems I have at least some ‘Merica in me too.)

Knutehytta Waffle {{Baking Bytes}}

The one things that has changed throughout the years is my preference on toppings. Instead of a flood of maple syrup or copious amounts of whipped cream and berries, I typically reach for a spoonful of peanut butter and a banana. After boosting the protein in the waffle itself with Kodiak Cakes Flapjack & Waffle Mix, protein powder and chia seeds, I dressed up this version with a colorful and festive combination that trends much more towards sophistication rather than cloying in its sweetness. (Although banana and peanut butter remains my go-to year round.)

Pear & Pomegranate Protein Waffle {{Baking Bytes}}

Creamy goat cheese is one thing I never tire of and it works beautifully all day long in sweet and savory dishes alike. Paired with sweet pears and tart pomegranate, a small drizzle of maple syrup pulls the whole thing together into a breakfast fit for a queen. A touch of sweetness keeps it from being an overwhelming start to the day, but I have certainly enjoyed this for brinner instead. Whichever time of day you choose to indulge, I’m confident this will not disappoint. (For a more reasonably sized meal when serving these with sides like eggs or breakfast meat, I personally find half of a waffle to be plenty. But you do you.)

Pear & Pomegranate Protein Waffle {{Baking Bytes}}

As a note, you do taste the protein powder a bit so make sure it’s a brand you like! Alternatively, you can skip it and substitute more flour instead. Either way you’ll have a delicious and freezer-friendly adventure ahead of you. However, if waffles are not your thing, check out these flavors in salad form instead.

Pear & Pomegranate Chèvre Protein Waffle

Makes about 6 waffles

Ingredients

Protein Waffles
1 3/4 cups Kodiak Cakes Flapjack and Waffle Mix1
1/2 cup plain or vanilla protein powder (or all-purpose flour)2
1/4 cup chia seeds
1/4 tsp salt
1/4 tsp cardamom, optional
1/8 tsp vanilla bean powder, optional

2 cups milk (almond, skim, whatever)
1/4 cup oil
1/2 tsp vanilla extract

2 eggs, separated

Toppings
8 oz goat cheese, crumbled
4-6 oz pomegranate seeds
1 ripe pear, thinly sliced
pure maple syrup, to taste
cinnamon or cardamom, optional

Directions

  1. In a large bowl, whisk together flour, protein powder, baking powder, chia seeds, and salt.
  2. In a separate small bowl, whisk together egg yolk, milk, oil, and vanilla.
  3. Gently fold wet ingredients into the dry ingredients until just combined. Set aside.
  4. In a small bowl or jar, beat egg whites until soft peaks form. (I like to use the whisk attachment on my immersion blender for this.)
  5. Carefully fold in egg white until almost no streaks remain, trying to keep as much volume as possible in the mixture. Let rest for about 5 minutes.
  6. Spray your waffle iron with nonstick spray and heat according to its manufacturer’s directions.
  7. Add about 2/3 cup of batter to the waffle iron and cook to desired darkness.
  8. Top each waffle with 1-2 oz goat cheese, pear slices, 1-2 Tbsp pomegranate seeds, and 1-2 Tbsp maple syrup. Sprinkle with cinnamon or cardamom, if desired, and enjoy immediately.3

Notes

1 If you don’t have this flour mix, you can substitute 1 3/4 cup whole wheat flour plus 1 Tbsp of baking powder, but the resulting protein content will be substantially lower.

2 You definitely get a little of the flavor of protein powder here, so make sure it’s not a flavor you hate. Or just substitute more flour in its place.

3 You can also freeze the cooked waffles! Wrap each serving carefully in plastic wrap and freeze until ready to use. Defrost on the counter or in the microwave, then lightly toast for a crispier texture.

Peppermint Mocha Ice Cream

With pumpkin spice latte season behind us we are fully in the throes of peppermint mochas. Although I love a good pumpkin spice anything as much as the next BWG, there’s something about a peppermint mocha that can’t be replaced by any other holiday beverage. Creamy, chocolatey, and pepperminty are three of my favorite dessert adjectives and adding espresso is rarely a mistake in my book. Armed with this information and my previously created peppermint crunch recipe, I set out to create the ice cream duplicate of my dreams.

Peppermint Mocha Ice Cream {{Baking Bytes}}

Chocolate ice cream, in some form or another, is a relative staple around here and I started with that basic recipe. The addition of espresso powder and pre-crushed peppermint candy took it from yes to yes and even writing this makes me wish I still had some in my freezer. Weekend plans, anyone?

Peppermint Mocha Ice Cream {{Baking Bytes}}

Although I love depth created by the brewed method found in my maple latte ice cream, using espresso powder here is not only easier, but it creates a more traditional mocha flavor. It’s also superbly easy to add more if you’d like to adjust the peppermint to coffee ratio a bit more in favor of the latter. Plus, the little speckles created from espresso and vanilla bean powders always speak to my aesthetic.

peppermint_mocha_ice_cream_5

I melted some of the candy into the base and stirred in the remainder for a little crunch. And honestly, because it looks more fun that way. As a general PSA, the pieces eventually dissolve even in the freezer, should you accidentally forget its in there for two months. Fortunately you can always just sprinkle on more and no one will be the wiser.

Peppermint Mocha Ice Cream {{Baking Bytes}}


Treat yourself to a seasonal delight in a new form and I promise you won’t be disappointed. Or if you’re one of those people that doesn’t do ice cream when it’s cold, hang onto this recipe for summer and celebrate Christmas in July, just like JoAnn.

Peppermint Mocha Ice Cream

Makes about 6 cups

Ingredients

2 cups cream
1 cup half and half
5oz chocolate, chopped
1/4 cup sugar
2 tsp espresso powder

1/2 cup egg substitute
1/3 cup crushed peppermint candy, divided1
1 tsp vanilla
1/2 tsp peppermint extract

Directions

  1. Add chocolate, espresso powder, and sugar to a heatproof bowl and set aside.
  2. In a medium saucepan, heat cream and half and half until simmering. Immediately pour over chocolate mixture and whisk until chocolate is melted and sugar is completely dissolved. Let cool on the counter about 10 minutes, or until not too hot to touch.
  3. Whisk in egg beaters, vanilla, extract, and 1/4 cup crushed peppermint candy. Refrigerate until completely chilled, at least four hours. Place a lidded freezer-safe container in the freezer to chill.
  4. When the mixture is ready, churn according to your ice cream maker’s directions. Add an additional 2 tablespoons of crushed peppermint candy during the last minute of churning.
  5. Immediately transfer ice cream to the pre-chilled bowl and sprinkle with remaining candy. Freeze at least 4 hours, or until ready to eat. Extra delicious with chocolate sauce or chopped chocolate-covered espresso beans!

Notes

I was lazy and bought it pre-crushed, but it’s a great way to use up any candy canes you have laying around!

Over time all the candy will dissolve into the ice cream even in the freezer. If, like me, you forget it’s in there and find in a while later, don’t be alarmed if there’s no solid pieces left!

Nut Butter Trio

Last year I borrowed a food processor a few times because I had been concerned I wouldn’t use it enough to make the storage space worth it. After the third time in as many weeks that particular hesitation seemed downright silly and I promptly put it on my Christmas wish list (thanks Mom!)

Nut Butter Trio {{Baking Bytes}}

My initial interests were hummus and pesto, which I made regularly throughout the summer and fall. Thoroughly sold on food processors, I adventured into the world of nut butters. Starting with an amazing one from my favorite cookbook, Run Fast, Eat Slow, I quickly caught the bug and tried other types as well. The recipes here are all small batches so you can test them out, but I usually double them now. (If you have extra, I am pretty sure your friends will help you out – mine always do.)

nut_butters_4

The first one (top/right, in my photos) is a minor adaptation from the RFES cookbook. Vanilla and espresso come together in a sweet and creamy peanut butter that is perfect for your morning toast or an afternoon pick-me-up. The espresso kick means it pairs perfectly with coffee and a hint of vanilla never goes wrong. I especially liked it on banana or pumpkin bread, but found I preferred the regular version with apples.

nut_butters_3

After peanuts I moved onto almonds (bottom/left). While I personally do not see the appeal of standard almond butter as a spread (unless you are allergic to peanuts), I do enjoy it in oatmeal and on yogurt parfaits on occasion. This iteration, however, is lovely on all your favorite morning carbs and especially so on oatmeal pancakes. Lightly sweetened and with plenty of poppyseed flavor, it’s a lovely twist on a peanut-free variety. For some springtime fun you could even add some lemon flavor via zest or infused olive oil to brighten the whole thing.

Nut Butter Trio {{Baking Bytes}}

Lastly, I gave walnuts a try (the dark one, clearly). The texture of this butter turned out a little grainier (although perhaps they just weren’t roasted/processed long enough) but the flavor is possibly my favorite. Hearty walnut balanced with a chai spice blend is a match made in fall heaven and definitely needs to grace your table soon. I make my own chai spice, but it is easily tailored to fit your preferences. I enjoyed this one on toast (obviously) and waffles; a light drizzle of maple syrup only adds to the experience.

Nut Butter Trio {{Baking Bytes}}

Whichever nut butter speaks to you the most, I hope you find a new favorite in this collection. There’s something for everyone here and I hope you use it as a starting point for all sorts of experimenting in the future. These butters would also make amazing gifts for the holiday season, a small 4oz jar of each flavor would be both adorable and delicious. (If you’re wondering about the super cute jars in my photos, they are upcycled Olivelle sea salt containers, so I’m not sure where to purchase them – sorry!)

Vanilla Espresso Peanut Butter

Modified from Run Fast, Eat Slow
Makes about 1.5 cups

Ingredients

2 cups roasted, salted peanuts

1 Tbsp brown sugar, to taste
1/2 Tbsp espresso powder
1/2 tsp vanilla bean powder
1 tsp vanilla extract

1 Tbsp chia seeds, optional
avocado or olive oil, optional1

Directions

  1. Add peanuts to a food processor and process until smooth, scraping the sides as necessary. This can take several minutes but the mixture should go from grainy to clumpy to a ball and finally, to creamy.
  2. Add in sugar, espresso powder, vanilla bean powder, and vanilla extract and blend until combined.
  3. If desired, add in avocado oil (for extra creaminess) and/or chia seeds (for a protein boost) and process again until incorporated.
  4. Let cool to room temperature, then transfer to a glass jar and store in the refrigerator until ready to use. Should keep at least one month.

Poppyseed Almond Butter

Makes about 1.5 cups

Ingredients

2 cups almonds2

1 tsp almond extract
2 Tbsp sugar, to taste
2-4 tsp poppyseeds, to taste
1 tsp salt

avocado or olive oil, optional1

Directions

  1. Preheat oven to 350 degrees Fahrenheit.
  2. Spread nuts on a large rimmed baking sheet and toast about 10 minutes, or until fragrant. Do not burn!
  3. Let the nuts cool for about 10 minutes, then add to a food processor and process until smooth, scraping the sides as necessary. This can take several minutes but the mixture should go from grainy to clumpy to a ball and finally, to creamy.
  4. Add extract, sugar, poppyseeds, and salt, then blend again until completely incorporated.
  5. If a smoother texture is preferred, drizzle in avocado oil to taste.
  6. Let cool to room temperature, then transfer to a glass jar and store in the refrigerator until ready to use. Should keep at least one month.

Chai Walnut Butter

Makes about 1.5 cups

Ingredients

2 cups walnuts2

2 Tbsp brown sugar
1/2 Tbsp chai spice
1/2 Tbsp vanilla
1/2 tsp salt

avocado or olive oil, optional1

Directions

  1. Preheat oven to 350 degrees Fahrenheit.
  2. Spread nuts on a large rimmed baking sheet and toast about 10 minutes, or until fragrant. Do not burn!
  3. Let the nuts cool for about 10 minutes, then add to a food processor and process until smooth, scraping the sides as necessary. This can take several minutes but the mixture should go from grainy to clumpy to a ball and finally, to creamy.
  4. Add sugar, spice blend, vanilla, and salt, then blend again until completely incorporated.
  5. If a smoother texture is preferred, drizzle in avocado oil to taste.
  6. Let cool to room temperature, then transfer to a glass jar and store in the refrigerator until ready to use. Should keep at least one month.

Notes

Depending on how much fat/water is still in your nuts and how chunky you like your nut butters, you may not need any oil. I found I liked some of them (almond butter especially) with oil in it just to smooth it out, but it’s totally up to you! Also a great place to try an infused olive oil for a different punch of flavor.

You can certainly buy pre-roasted and salted nuts here, just skip the additional salt in the recipe. However, I found the ones I tried to be too heavily salted for my preferences. If you have access to roasted unsalted nuts then that’s even better!