Olive Oil Chocolate Chili Mousse

Here we are friends, we made it to the end of October. Winter hit fast and hard here so I hope your neck of the woods is fairing better. If so, please send some our way. In the interim, I am placating myself with copious amount of tea and grumbling.

Chocolate Chili Mousse {{Baking Bytes}}

In the interim, week five is the best week: dessert week! I made these recipe ages ago with a different oil but knew it’d also be perfect with the chili oil for that spicy sweet situation. Chocolate and chili can never go wrong and this dairy-free recipe is even easier than its ice cream counterpart. The original calls for bittersweet chocolate but if, like me, your preferred grocery store does not carry it, a combination of unsweetened and semisweet work beautifully.

chocolate_chili_pudding_3

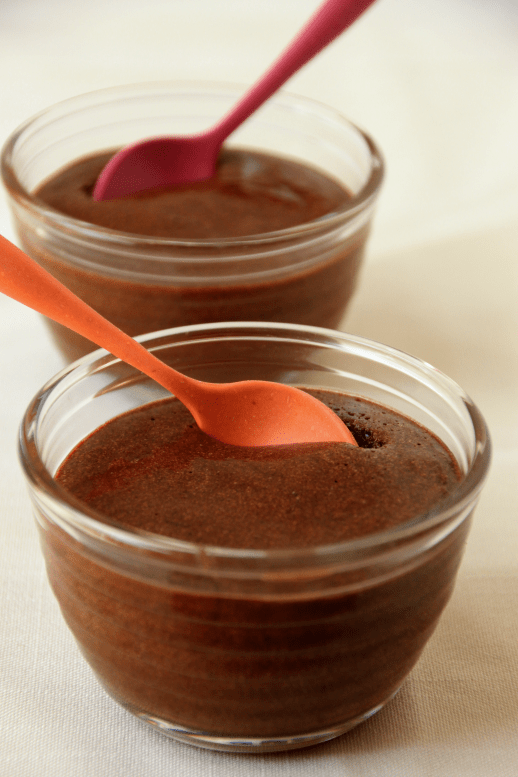
Fluffy, creamy, and oh so decadent, you’d never guess this mousse is made without heavy cream. It appears too thick at first but with a little patience it is just perfect closer to room temperature. That said, if you don’t mind the denser and slightly grainy temperature, by all means eat it straight out of the fridge. Smooth chocolate and spicy chili blend together in a flavorful and texturally pleasing delicacy, perfect for rounding out any meal.

Chocolate Chili Mousse {{Baking Bytes}}

This recipe uses beaten egg white for fluffiness but unlike a lot of egg white recipes, it makes use of the yolk too. I greatly appreciate not having a pile of yolks in the fridge to use up (although lemon curd is always a good idea) and love when recipes don’t leave you with odd leftovers. This mousse is super easy and beginner friendly, but does take a little patience when melting the chocolate and beating the egg whites. I promise it’s well worth your time.

Chocolate Chili Mousse {{Baking Bytes}}

It keeps well for several days, which makes it perfect for meal-prep and dinner parties (but set an alarm to take it out of the fridge!) You can also totally change up the flavor by substituting a different infused oil. I can vouch that Blood Orange is amazing (which is what I did the first time) but I am pretty sure most of the Olivelle lineup would be excellent, especially their new Vanilla Maple.

Olive Oil Chocolate Chili Mousse

Adapted from Nigella Lawson
Makes 6 servings

Ingredients

4 oz semi-sweet chocolate, chopped1
2 oz unsweetened chocolate, chopped1

4 large room temperature eggs, separated

7 Tbsp Vera Cruz Chili Olive Oil
1/4 cup superfine sugar
1/4 tsp + 1 pinch Vanilla Bean Sea Salt (or Habanero Heat for extra kick!)

Directions

  1. Set out six 6oz ramekins, jars, or bowls.
  2. Place chocolate in a small heatproof bowl over a pan of simmering water, and allow to melt, stirring occasionally. Remove chocolate while it’s still a bit chunky and stir to melt completely. Set aside for 10 minutes.
  3. In a medium bowl, use a hand mixer to whisk egg whites and pinch of salt in a clean bowl until it has firm peaks. Set aside.
  4. In a large bowl, combine egg yolks, sugar, and 1/4 tsp salt. Use the same beaters to whisk until pale and thick. Mixture should have about doubled in volume.
  5. Gradually stream in melted chocolate to egg yolk mixture, and use a rubber scraper to fold in completely.
  6. Scoop out 1/3 of the egg whites and vigorously stir into the chocolate mixture until completely combined.
  7. Scoop out another 1/3 of the egg white and gently fold in until mostly combined. Repeat with the remaining egg white (leaving any liquid in the egg white bowl behind) and gently incorporate until there are not white streaks.
  8. Divide mousse evenly between ramekins or small bowls/jars. Serve immediately for fluffy mousse, or refrigerate at least 20 minutes.
  9. If you are not serving within a couple of hours, press small squares of plastic wrap onto the surface of the mousse and top with an airtight lid. For best texture, set out at room temperature 40 minutes prior to eating.

Notes

Or a total of 6oz bittersweet chocolate, my grocery store just doesn’t carry it.

Advertisement

BBQ Jackfruit Sandwiches & Maple Walnut Brussels Slaw

(Long post incoming, but I promise the recipes are worth it!)

Week four already! Is October going by crazy fast for anyone else? After spending the first half of month in Europe I am now in Iowa for work and boy is my body confused. Here’s hoping my sleep and my stomach get back on track soon.

This week is entree week. Pulled pork is one of my absolute favorite meals and Pinterest piqued my curiosity of substituting jackfruit for the meat. I’ve seen it multiple times over the last few years but never actually got around to trying it. This menu was the perfect opportunity to give it a shot since it nicely fits the theme and is inherently vegetarian and lactose-free.

BBQ Jackfruit Sandwiches {{Baking Bytes}}

I vaguely considered using fresh jackfruit until I saw the size of one and realized I didn’t want enough to feed the entire Mongol army. Feel free to go fresh if you like, or stick to canned if you want a slightly less exhausting adventure. Ensure you rinse your canned stuff thoroughly in order to remove as much of the “can” flavor as possible. I will fully admit canned jackfruit is not widely stocked nor cheap in my area, but it was definitely a fun recipe nonetheless.

Is it pork? No. Is it delicious? Yes. While it definitely won’t fool any meat eaters since the texture and flavor are both quite different, it’s still an awesome addition to your repertoire and a fun way to add a vegan option to a barbecue spread. And either way it was a perfect vessel for the most amazing barbecue sauce I’ve ever made.

Smoky Sweet BBQ Sauce {{Baking Bytes}}

Smoky, sweet, and just enough spice, this barbecue sauce is definitely my go-to recipe. My mom actually sent me this recipe like six months ago and I completely forgot about it until I was considering the menu for this series. I am so glad I finally gave it a try because I personally think my slightly adapted version is just perfect. Easy, smooth, and a perfect balance of smoke and spice without the overload of sugar store-bought varieties typically employ. It comes together in about five minutes and keeps in the fridge for quite a while, so if you try nothing else about this recipe, definitely give the sauce a go! I’ll definitely be using it on everything from burgers to meatloaf to actual pulled pork going forward.

The last piece in this delightful sandwich is the slaw. Pulled pork sandwiches are nearly always accompanied by some kind of coleslaw and I wanted to include that element here as well. Inspired by an existing Olivelle recipe of which I’ve already posted another version, this one is simple but a perfect sweet and crunchy  addition to the barbecue flavor. An equal mix of barrel aged white balsamic and their new vanilla maple olive oil blend into a light and sweet dressing that compliments the crisp sprouts and cabbage without competing with the barbecue sauce. I added some walnuts for extra crunch and that slight nutty flavor adds just a little interest to the whole experience.

Maple Walnut Brussels Sprouts Slaw {{Baking Bytes}}

Sandwiched between your favorite lightly toasted bun with a spread of (mayo), the jackfruit and slaw combine into a sweet and spicy experience that’s not only delicious, but also pretty healthy. It’s inherently vegetarian and can be easily made vegan by subbing or ditching the mayo, making it appropriate for a wide variety of diet preferences. It’s a lovely cozy fall meal but would also be awesome for those summer potlucks, so keep it handy all year long.

BBQ Jackfruit Sandwiches {{Baking Bytes}}

Whether you try one piece or the whole shebang, I hope you find a new go-to somewhere in the set!

BBQ Jackfruit Sandwiches

Serves 4-6

Ingredients

Smoky Sweet BBQ Sauce
6oz can tomato paste
1/2 cup unsweetened applesauce
1/4 cup tomato sauce
1/4 cup Smoked Balsamic Vinegar
1/2 tsp liquid smoke, optional
2 Tbsp Sweet Smoked Chili Rub
1 Tbsp Applewood Smoked Sea Salt1
15 twists Bourbon Barrel Smoked Black Peppercorns1
1/4 tsp ground chipotle or cayenne pepper, optional

Maple Walnut Brussels Sprouts Slaw
1/2 lb Brussels sprouts, trimmed and shredded (about 3 cups)
1 cup shredded red cabbage
1/2 cup walnuts, chopped

3 Tbsp Barrel Aged White Balsamic Vinegar
3 Tbsp Vanilla Maple Olive Oil
1/2 tsp Vanilla Bean Sea Salt

BBQ Jackfruit
2 Tbsp Caramelized Garlic Olive Oil
3 (14oz) cans young jackfruit in water2
2 Tbsp Sweet Smoked Chili Rub
1 cup smoky sweet barbecue sauce
3/4 cup water

for each sandwich
1 burger bun, toasted
1/2 cup bbq jackfruit
1/4 vanilla maple slaw
mayo (or your favorite vegan substitute), to taste
additional barbecue sauce, to taste

Directions

  1. For the sauce: Blend all sauce ingredients until well combined; store in a pint jar and refrigerate until ready to use, up to 6 weeks.
  2. For the slaw: In a medium bowl, mix together Brussels sprouts, cabbage, and walnuts.
  3. In a pint glass or mason jar, whisk together Barrel Aged White Balsamic, Vanilla Maple Olive Oil, and Vanilla Bean Sea Salt until completely combined.
  4. Stir dressing into Brussels mixture until well mixed. Cover and refrigerate until ready to use, up to 5 days.
  5. For the bbq sandwiches: Drain and thoroughly rinse jackfruit, then pat dry. Set aside.
  6. In a large frying pan or wok, heat the olive oil until shimmering.
  7. Stir in jackfruit and Sweet Smoked Chili Rub and toss until well coated.
  8. Stir in barbecue sauce and water, then reduce heat to medium and simmer until jackfruit is tender and most of the liquid is absorbed.
  9. Spread mayo on bottom half of a toasted bun; top with 1/2 cup jackfruit, 1/4 cup slaw, and additional barbecue sauce, to taste.
  10. Cover with the other half of the bun and enjoy immediately.

Notes

You can substitute plain salt and pepper with minimal taste difference, but the smoky versions add a lovely depth of flavor.

If you prefer meat, I harbor no judgement for substituting normal pulled pork!

Jalapeño Cornbread & Strawberry Jalapeño Lime Chia Jam

Week three, commence! This week brings a super fun cornbread and jam combination that’s been in my head since Olivelle released their Jalapeño Lime Balsamic Vinegar this summer. Strawberry and jalapeño are a really fun combination and cornbread is one of my favorite side dishes. I tweaked my go-to recipe to be lactose-free, included some extra flavors, and behold: a new happiness was born.

Jalapeño Cornbread and Jam {{Baking Bytes}}

Moist and with just the right amount of crumble, this cornbread is excellent on its own or smothered in your favorite condiment. It goes wonderfully with chili or barbecue and is perfect all year round. The jalapeño adds a lovely flavor with as much (or in my case, as little) heat as you like depending on how many seeds you remove. The hint of lime is a fun surprise and ties it into the chia jam with perfection.

Jalapeño Cornbread and Jam {{Baking Bytes}}

Chia jam is something that has intrigued me for awhile but I somehow never got around to making until just now. I realized one of my hesitations was the texture, but using a berry bypasses this since fruits like strawberry and blackberry already result in a more seedy texture than stone fruits.

Strawberry Jalapeño Lime Chia Jam {{Baking Bytes}}

Frozen strawberries from Oregon (mostly to appease M) are readily available and have tons of flavor. A splash of the balsamic and a spoonful of chia seeds and in less than ten minutes you have a truly excellent jam. The fun part about this one is you could easily substitute a different balsamic for a completely different flavor. The Barrel Aged for a more standard pairing, or perhaps Sweet Basil for a fun spring edition. The world is your oyster jam!

Jalapeño Cornbread and Jam {{Baking Bytes}}

Whip up a batch of cornbread and jam and they are sure to brighten any chilly day. Individually both excellent, together these recipes create that perfect sweet and spicy combination without a ton of extra sugar.

Jalapeño Cornbread and Jam {{Baking Bytes}}

But if you want to drizzle honey on top of the whole thing, you won’t be wrong.

Strawberry Jalapeño Lime Chia Jam

Makes about 1 cup

Ingredients

1 cup frozen strawberries1
1 Tbsp chia seeds
1 Tbsp Jalapeño Lime Balsamic Vinegar

Directions

  1. In a small saucepan, simmer strawberries over medium until softened.
  2. Mash or puree berries to desired texture (I like mine chunky), then stir in chia and balsamic.
  3. Let cool briefly before serving; store leftovers in the fridge.

Notes

Why frozen? Unless you live in the Willamette Valley, the flavor is going to be better than fresh berries. Feel free to use fresh if you prefer though!

Jalapeño Honey Cornbread

Makes an 8×8″ baking dish

Ingredients

1 cup yellow cornmeal
3/4 cup white flour
1/4 cup whole wheat flour
1/4 cup sugar
1 Tbsp baking powder
1/4 tsp Lime Fresco Sea Saltoptional

2 large eggs
3/4 cup milk (cow, almond, coconut)
1/3 cup butter, melted
1/4 cup vegetable oil1
2 Tbsp honey, melted
2 Tbsp Jalapeño Lime White Balsamic Vinegar

1 jalapeño, diced (remove seeds for a milder flavor)2

Directions

  1. Preheat oven to 400 degrees Fahrenheit. Lightly coat an 8×8″ baking pan with nonstick spray or oil. Set aside.
  2. In a medium mixing bowl, whisk together dry ingredients until well combined.
  3. In a small mixing bowl, whisk together wet ingredients until well combined.
  4. Fold wet ingredients into dry until just combined, then stir in jalapeño.
  5. Pour into prepared pan and bake 25-30 minutes, or until golden brown along the edges and a toothpick inserted into the center comes out mostly clean.
  6. Let cool briefly, then serve with jam.

Notes

1 For an extra limey flavor, substitute some or all Tahitian Lime Olive Oil.

For a legitimately spicy experience, don’t remove the seeds. I removed most of mine to keep the heat down and the flavor light.

Pineapple Habanero “Ice Cream”

“Ice cream” looks a bit ominous but I promise this is just as delicious. I’ve made more than 30 ice cream recipes over the years on this blog and had yet to try a dairy-free version. As one of my best friends is both exorbitantly lactose-intolerant one of the most generous people I know, I decided this year to try a recipe she can enjoy too. Since sweet and spicy is definitely her jam (and mine too) I set off with that flavor profile in mind.

Pineapple Habanero "Ice Cream" {{Baking Bytes}}

I knew I wanted to use a coconut base because other non-dairy substitutes require some kind of thickener and I prefer my frozen desserts to be as unadulterated as possible. Pondering what goes well with coconut so it would complement rather than fight the base flavor, piña colada original came to mind. Switched up for the spicy aspect, pineapple habanero was clearly the answer.

Pineapple Habanero "Ice Cream" {{Baking Bytes}}

Amusingly I’d never bought a habanero before and 100% texted another friend to make sure I was buying the correct thing. As someone with a Scandinavian spice tolerance (is butter a spice?) even cutting these peppers was quite the ordeal for me. Friendship and stubbornness pulled me through and the end result was so, so worth it.

Pineapple Habanero "Ice Cream" {{Baking Bytes}}

Although slightly less creamy than you know, cream, this frozen dessert is wonderful in its own right. Smooth with a light coconut background, the first flavor you get is a strong presence of pineapple. The habanero follows more slowly, the heat building in your mouth and encouraging you to reach for another bite. This one is almost as addicting last year’s chocolate chili and can be happily enjoyed by your dairy-free friends.

Pineapple Habanero "Ice Cream" {{Baking Bytes}}

The syrup recipe results in more than you need for the ice cream, so you can use it as a topping elsewhere. Extra on the ice cream itself, atop waffles and pancakes, stirred into a margarita, the opportunities are endless. Customize the heat level to your own preference but remember it will be much more mild once mixed with the coconut cream.

If this dessert can appease me, someone who can definitely tell the difference in ice cream made with “diet” 30% heavy whipping cream instead of “proper” 40% heavy whipping cream, I promise it will please anyone. Top off your Taco Tuesday with this sweet and spicy concoction for a perfect summertime meal.

Pineapple Habanero “Ice Cream”

Makes about 6 cups

Ingredients

2 (~14oz) cans unsweetened coconut cream
1/2 cup sugar
1/2 cup egg beaters

2 – 2 1/2 cups pineapple habanero syrup, divided (below)
spoonful of compote, optional

Directions

  1. In a medium saucepan, combine coconut cream, sugar, and egg beaters. Heat over medium, whisking often, until well combined and beginning to thicken.
  2. Stir in one and a half cups pineapple habanero syrup, and a spoonful of reserved compote if you like a little texture.
  3. Chill in refrigerator until completely cooled. (Put a 7-cup freezer-safe bowl in the freezer now too.)
  4. Freeze mixture according to your ice cream maker’s directions.
  5. Retrieve bowl from the freezer and add 1/4 of the ice cream to the bowl. Swirl a spoonful of the pineapple habanero syrup on top and repeat until all the ice cream is in the bowl, finishing with a little more syrup.
  6. Freeze overnight until firm (it takes longer than normal!)

Notes

I’ve not tested it but you should be able to make this recipe vegan by leaving out the egg. This will, however, change the texture as egg lends a smoothness and fullness that is difficult to get without some kind of emulsifier.

Roasted Pineapple Habanero Syrup

Makes about 3 cups

Ingredients

1 ripe pineapple, sliced

2 habanero peppers, to taste
1 1/2 cups sugar

Directions

  1. Preheat oven to 400 degrees.
  2. In a large baking dish, arrange pineapple in a single layer.
  3. Roast until warmed and started to brown, 15-20 minutes.
  4. Meanwhile, slice the habanero peppers, removing as many seeds as you want depending on your desired heat level. I removed about half the seeds for a medium heat.
  5. Use a blender or food processor to completely puree the roasted pineapple (you should have about 3 cups puree.)
  6. In a medium saucepan, combine puree, sugar, and peppers.
  7. Bring to a boil over medium heat then simmer gently until thickened and spicy. Let it go till it’s quite a bit spicier than you want your finished product as it will be greatly mellowed by the cream base.
  8. Strain through a fine mesh sieve, using a whisk to get as much syrup as possible. Set aside to cool (reserve the chunky compote too if you like a little texture!) then store in the fridge until ready to use.

Southwest Salad

Hello friends, I hope you have been enjoying National Ice Cream Month! Here to offset this sugar rush of a month is the part two of July’s salad trio. We’re headed south of the border with one of my favorite salads in Bozeman.

Southwest Salad {{Baking Bytes}}

One of the perks at my place of employment is a company-sponsored team lunch every two weeks. Because my team is fairly large, we have a few staple places that are likely to be able to seat us. Starky’s Authentic Americana is one such restaurant and I’m never sad when it’s the choice of the day. One of my favorite meals there is their southwest salad: a delicious but still light and healthy experience including pineapple black bean salsa and chipotle ranch dressing. I often get it with chicken for a protein boost but it stands on its own just as well.

Southwest Salad {{Baking Bytes}}

Inspired to make my own copycat, I set out to make a pineapple black bean salsa and a chipotle lime crema tailored to my own preferences. With a few modifications, A Hint of Honey helped me out on the salsa front and Isabella Eats inspired my chipotle lime crema. The crema was featured previously on the blog in my chipotle lime tuna-stuffed sweet potatoes, but I actually originally developed it for this recipe over a year ago! Somehow I’m just now getting around to sharing this salad with you, but hopefully it was worth the wait.

Chipotle Lime Crema {{Baking Bytes}}

The salsa is a joyous mix of fresh pineapple and savory black beans, accompanied by a little lime and the bite of fresh red onion. Over time the flavors marry together perfectly so I highly recommend making your salsa in advance. It keeps well in the fridge for at least a week, at which time I’d devoured all of it. The original recipe calls for cilantro, which I do not eat, but I will only judge you a little if you decide to add it to yours.

Pineapple Black Bean Salsa {{Baking Bytes}}

A base of spinach or romaine is topped with (optionally sautéed) bell pepper and zucchini for some extra veggies and color. I like to add pulled venison/elk or grilled chicken here, but it makes for an excellent vegetarian meal without it. Some pineapple black bean salsa, a handful of tortilla strips, and a drizzle of crema round out the dish into a lovely sweet and spicy combination. You can easily make this recipe vegan by using a non-dairy yogurt for the crema, and skipping the meat and cheese, of course.

Southwest Salad {{Baking Bytes}}

Customize to your heart’s content with additional toppings like avocado or diced tomato (if you must) and then serve to adoring fans for a healthy summer meal that comes together super quickly. Make the salsa and meat ahead of time, and you have an easy 15-minute meal almost ready to go.

Southwest Salad (Taco) {{Baking Bytes}}

Additionally, if you’re not a salad person, combine these components into an awesome taco instead!

Southwest Salad

Inspired by Starky’s Authentic Americana
Serves 4-6

Ingredients

1 Tbsp olive oil, optional
1 medium zucchini, julienne cut
1-2 bell peppers, thinly sliced

5-10oz Spinach/Romaine, to taste
1 1/2 cups pineapple black bean salsa (below)
1 – 1 1/2 cup freshly grated cheddar cheese
1 cup tortilla strips, to taste
1/2 – 1 cup chipotle lime crema

optional toppings: avocado, diced tomato, grilled chicken, pulled venison, etc

Directions

  1. (Skip to step 4 if you prefer raw veggies.)
  2. In a medium frying pan, heat the oil over medium-high heat until shimmering.
  3. Add zucchini and bell peppe, then lightly sauté to preferred tenderness.
  4. In your serving bowl(s), add desired amount of greens.
  5. Layer on zucchini and bell pepper (and top with meat, if using.)
  6. Evenly spoon on pineapple black bean salsa then sprinkle with cheese, tortilla chips, and any additional toppings you want to throw on it.
  7. Drizzle with chipotle lime crema (and freshly ground pepper, if desired) and serve promptly.

Notes

These components also make for an excellent taco!

Pineapple Black Bean Salsa

Adapted from A Hint of Honey
Makes about 4 cups

Ingredients

2 cups fresh diced pineapple
1 cup black beans (or just use the whole can if you want)
1/2 cup diced red onion1
1 jalapeño, minced
3 Tbsp lime juice (1-2 limes), to taste
2-3 cloves garlic, minced
1/4 tsp (Roasted Garlic or Lime Fresco) sea salt

Directions

  1. In a medium bowl, stir together all ingredients until thoroughly combined.
  2. Cover and chill about 30 minutes to allow flavors to blend, or until ready to use.
  3. Great with salads, tacos, chips, and a spoon!

Notes

If raw red onion is too strong for you, soak the cut onion in cold water for about 10 minutes, then drain and add to the salsa.