Spicy Maple Roasted Root Vegetables

Welcome to week two, friends. Continuing with the sweet and spicy theme, this time we’re pairing maple with a snazzy piri piri spice blend on some lovely roasted root vegetables perfect for cozy evenings.

Roasted Spicy Maple Veggies {{Baking Bytes}}

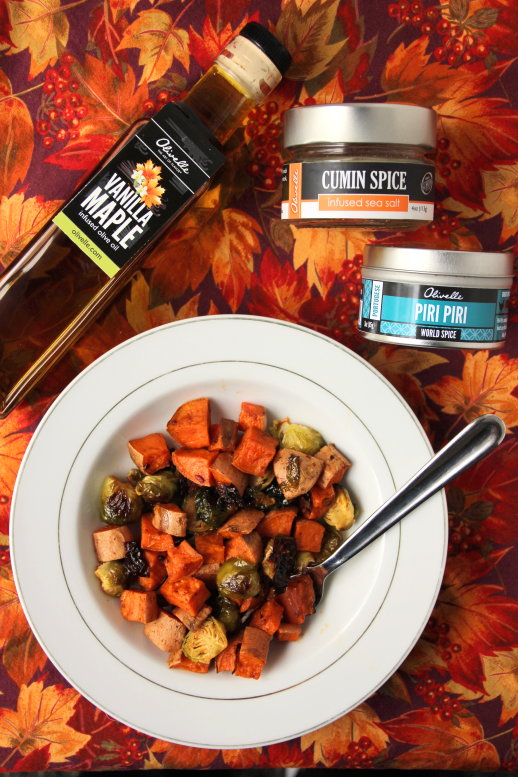
Sweet and spicy is my favorite combination and in my opinion nothing works quite so well on the sweet side as maple syrup. With its own robust flavor, maple is nicely complemented by a number of spicy additions, my own favorite being chipotle. I ventured slightly off my beaten path in favor of using Olivelle’s Piri Piri World Spice blend, featuring a number of different chili peppers and a hint of lemon. It packs quite a bit of heat which means the tin will last other wusses like me quite a long time.

Roasted Spicy Maple Veggies {{Baking Bytes}}

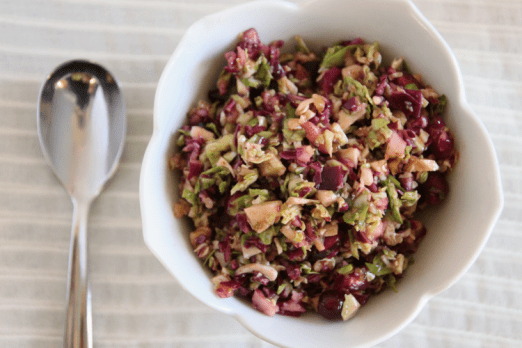
I actually made this recipe a bit differently the first time, and then promptly re-made it after the release of their Vanilla Maple Olive Oil at the end of September. I knew immediately it was perfect for this recipe and round two was even better than the first iteration. (I originally used Caramelized Garlic, which you can see in the round one pictures.)

Roasted Spicy Maple Veggies {{Baking Bytes}}

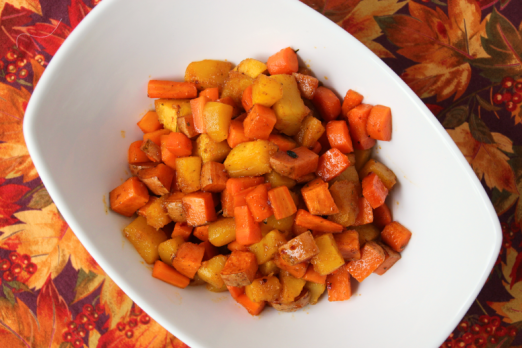
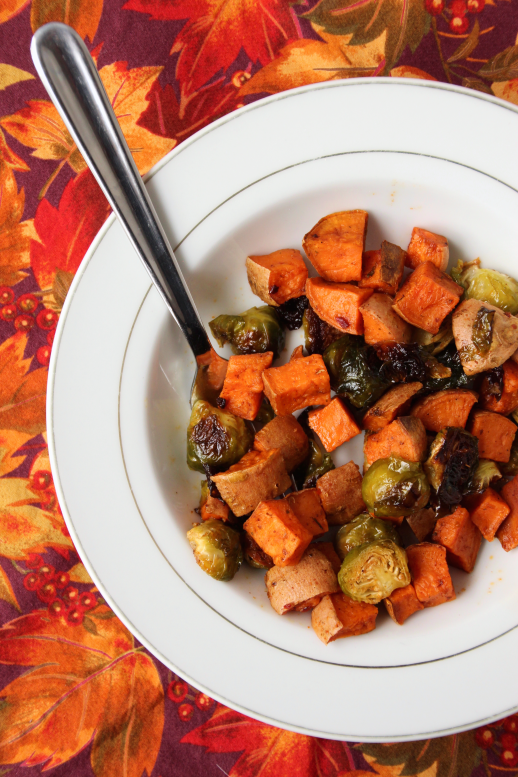
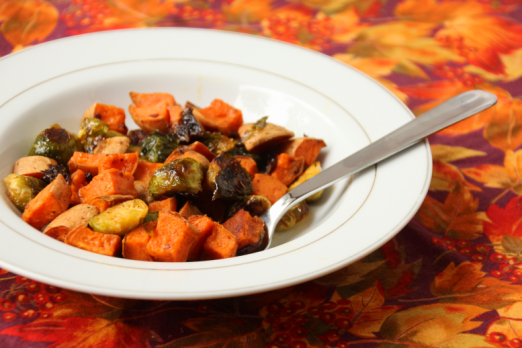
You can use any firm vegetables here, but I chose a mixture of my favorite fall options. Acorn (or butternut) squash are prolific this time of year, and go well with both sweet and savory flavors. Sweet potatoes are a staple in my world and I rounded out the festive orange ensemble with carrot. Pumpkin would also work nicely to keep monochromatic medley, or for some contrasting color add Brussels sprouts as I did in my second batch.

Roasted Spicy Maple Veggies {{Baking Bytes}}

The maple flavor of the olive oil is not sweet, but has an amazing savory profile that works perfectly with the heat of the spice blend. I rounded mine out with a bit of Cumin Spice Sea Salt, to add just a bit more depth to the whole shebang.

For that hint of sweet and a boost of maple flavor, the roasted veggies are lightly drizzled with pure maple syrup and then popped in the oven for a few more minutes to let it caramelize a bit. I kept mine more on the spicy side than the sweet side, but for a more standard glazed carrot experience just up the maple syrup to two or more tablespoons. Sweet, spicy, and cozy, this recipe is definitely going to become a go-to on cold days.

spicy_maple_veggies_4

A perfect complement to any fall dinner, the sweet and spicy combination brings some warmth and fun to any meal. It’s perfect for Thanksgiving too, going beyond those traditional sugar-filled recipes and adding a little something extra to the table. On the off chance you have any leftovers, it’s also perfect atop a spinach salad or underneath a fried egg.

Spicy Maple Roasted Root Vegetables

Serves 4

Ingredients

4 large carrots, peeled and diced1
1 small butternut or acorn squash, peeled and diced
1 medium sweet potato, diced

2 Tbsp Vanilla Maple (or Caramelized Garlic) Olive Oil
3/4 tsp Piri Piri World Spice, to taste2
1/4 tsp Cumin Spice Sea Salt

1-2 Tbsp pure maple syrup, to taste

Directions

  1. Preheat oven to 400 degrees Fahrenheit. Lightly spray a baking sheet with oil or non-stick spray.
  2. Combine all veggies in a medium bowl, and add olive oil and spice blend. Use a rubber scraper to toss until well coated.
  3. Spread veggies evenly on prepared baking sheet (save your bowl), and roast for 15-20 minutes, until just before done.
  4. Return veggies to the bowl and toss with maple syrup. Spread back onto the baking sheet and roast another 3-5 minutes to allow syrup to lightly caramelize.
  5. Serve promptly.

Notes

About 4-6 cups total veggies, so mix and match to your heart’s content.

For a mild experience, use 1/2 teaspoon, or if you like more heat, increase to 1 or 1 1/2 teaspoons.

Advertisement

Thanksgiving Slaw

Coleslaw is something I’ve never enjoyed; it took me until my late twenties to realize I really just didn’t enjoy the mayo-based versions. Shredded cabbage or other veggies in a lighter dressing is just a salad that’s easier to eat, but in my opinion mayo is not intended to be the focal flavor of a dish. (Cue Midwest outcry.) If you disagree, that’s just fine, but I hope you’ll still give this non-mayo coleslaw a try.

Thanksgiving Slaw {{Baking Bytes}}

A few months ago when my mom visited, we took a cooking class from Olivelle. The one that happened to fit with our schedule was a paleo menu, and even though neither of us are paleo I figured the menu sounded great and Olivelle has yet to disappoint me, so we gave it a whirl. As it turned out, it was one of my favorite classes to date (I’ve done…several…) and I loved every single recipe on the menu.

One of those recipes was a Brussels sprouts slaw. I don’t usually care for cruciferous vegetables in their raw state, but somehow after being shredded with cabbage and toasted pecans, folded with blueberries, and lightly coated in a fruity balsamic dressing, I was in love. Not only is this one of the few class recipes I’ve gotten around to making on my own, but I’ve made it three times since August despite having to borrow a food processor eat time.

IMG_7084_Fotor

Since it’s vegan, paleo, gluten-free and pretty much every-diet-ever friendly, this is a wonderful dish to take to potlucks and gatherings. Even better, it’s great chilled but just fine at room temperature, and best when made ahead, giving you all the time to relax and actually enjoy the party. It also makes a great lunch alongside your protein of choice if you’re fortunate enough to have leftovers. As a bonus, the green sprouts contrast nicely with the purple of the cabbage and the red pomegranate seeds, making it aesthetically pleasing in addition to its fantastic flavors.

I made a few tweaks for an autumn version, resulting in a perfect Thanksgiving side that doesn’t need oven space, and/or a healthy addition to Christmas that maybe even the kids will enjoy. (No guarantees, this recipe was not tested on children.) The Brussels and cabbage base remains, but I opted for walnuts since I prefer them over pecans, and pomegranate seeds for their color and tartness. I 100% cheated and bought a container of seeds, but if you want to get in your work out and seed a pomegranate then by all means, please do so.

Thanksgiving Slaw {{Baking Bytes}}

The dressing is a lovely mix of Olivelle products, so if you’ve not jumped on their bandwagon for some reason then now (or actually, Black Friday) is the time to make the leap. If you’re still not ready, a substitution of regular olive oil and white balsamic vinegar with some splashes of blood orange and pomegranate juices might work out, but I have not tested it. (If you go this route and you like the result, share your recipe in the comments!)

Thanksgiving Slaw {{Baking Bytes}}

If you’re in the market for a healthy but different addition to your holiday table, and cannot stomach the thought of putting yet another dish in the oven, this is the recipe for you.

Thanksgiving Slaw

Adapted from Olivelle
Serves 6

Ingredients

1 lbs Brussels sprouts
1/2 small head red cabbage
1 cup walnuts (or nut of choice)
1 cup pomegranate seeds

dressing
1/3 cup Olivelle Harvest Fig or Vanilla Pomegranate Balsamic Vinegar(Or a mix of both!)
1/3 cup Olivelle Blood Orange Olive Oil1
1 Tbsp lime juice
1 tsp Olivelle Vanilla Bean Sea Salt (or regular salt)

Directions

  1. Use a food processor (or a grater and a lot of patience) to shred the sprouts and cabbage. (If you’re a novice at food processing, this works best if you do it in relatively small batches.) Add both to a large mixing bowl.
  2. Coarsely chop walnuts (by hand, or with the food processor). Add to a dry pan and toast lightly over medium heat until fragrant. (Or skip this step if you’re lazy or in a hurry – it’ll still be good just a slightly different nuttiness flavor.)
  3. Combine all dressing ingredients in a jar and shake vigorously until well mixed. Taste for flavor preferences, and adjust if necessary.
  4. Pour over the sprouts and cabbage and stir with a rubber scraper until well coated.
  5. Fold in toasted nuts and pomegranate seeds.
  6. Store in the fridge until ready to serve – overnight is better – then enjoy chilled or at room temperature. Will keep for at least five days in the fridge.

Notes

If you have not purchased the entire Olivelle store, a substitution of 1/4 cup olive oil, 1/4 cup white balsamic vinegar, and pomegranate + blood orange juice to taste might work. This is an untested substitution so let me know if you try it!

Thanksgiving Sliders

My favorite part of Thanksgiving (after friends and pumpkin pie) is the copious leftovers. Turkey isn’t actually my favorite on its own, but it’s one of my favorite sandwich/wrap fillings and I always look forward to a few days of tastiness. My go-to is a wrap with warmed cream cheese, cranberry sauce, and turkey, and then stuffed with some extra leafy greens. All the best flavors of Thanksgiving dinner rolled into one, and even a salad to boot. (Don’t worry, I probably already had the pie for breakfast.)

Last year I made homemade dinner rolls to take to our annual potluck, and ended up with quite a lot left over. It seemed prudent (and delicious) to utilize those instead of my standard tortillas, and as such the Thanksgiving slider was born.

Creamy mashed potatoes, moist turkey, and tart cranberry sauce are cozied up between fluffy bread, and it’s possibly my new favorite “leftovers” meal. A perfect contrast of sweet and savory, and a mouthful of delicious in every bite. I love this recipe because you can quickly make just one or two in the microwave, or you can heat up an entire pan in the oven. Admittedly the oven method is a bit slower, but with a little effort and a bit of patience you can have a meal for the whole family.

An added bonus of this recipe is obviously that you can add basically any leftovers you have around. Extras on the cheese platter? Go for it. Still a tureen of gravy in the fridge? Drizzle that on. A few green beans or carrots taking up space? Add those too. Nearly any Thanksgiving recipe could have a home here, it’s just a matter of your personal taste.

While using homemade rolls is delicious, you can certainly pick up some extras of the store-bought variety to prepare. Add a side salad and you have a perfect (and lighter) day-after lunch or dinner all ready to go. You can probably even convince any leftovers-haters in the house to partake without complaint.

Kick back, avoid the Black Friday crowds, and enjoy your favorite flavors of Thanksgiving in a new twist.

Thanksgiving Sliders

Ingredients

critical leftovers
dinner rolls
mashed potatoes
turkey
cranberry sauce

additional ideas
Brie, cream cheese, goat cheese
gravy
stuffing
green beans
glazed carrots
your favorites!

Directions

  1. Oven directions (for a whole pan): Preheat oven to 350 degrees Fahrenheit
  2. Carefully slice rolls in half (you can do this without separating them if you have a whole pan still).
  3. Layer bottom rolls, mashed potatoes, turkey, cranberry sauce, and any other toppings of choice.
  4. Add top layer of rolls, and cover pan with foil.
  5. Bake for about 30 minutes, or until heated through (easiest to use a thermometer in the center roll).
  6. Serve hot with a tasty beverage.
  7. Microwave directions (for just a couple): Slice rolls in half and lightly toast.
  8. Arrange all fillings in a single layer on a plate and heat 1-2 minutes or until hot.
  9. Assemble rolls with hot ingredients, and enjoy immediately.

Perfect Pumpkin Pie

For years and years I’ve used the pumpkin pie recipe found on the Libby’s cans of pumpkin puree. It always turned out consistently delicious so I never really thought to try another recipe.

This was a mistake.

Perfect Pumpkin Pie {{Baking Bytes}}

Last year my mom linked me this recipe and was like “make this immediately and ditch the usual recipe.” She was quite right! This pumpkin pie is amazingly dense, superbly flavorful, and has zero of that occasionally slightly watery texture I sometimes noticed with the Libby recipe. I don’t often use qualifiers like “best” or “perfect” in my recipes, but trust me when I say Sally definitely figured this one out.

Perfect Pumpkin Pie {{Baking Bytes}}

Deliciously creamy and superbly spiced, this is sure to be your new favorite pumpkin pie recipe and a go-to staple for the upcoming holidays. M is not much of a pumpkin fan, so I’m looking forward to having this whole pie to myself over the upcoming holiday weekend. Don’t worry, I’ll make him a pie he can enjoy too; I’m not a complete monster.

Perfect Pumpkin Pie {{Baking Bytes}}

This is a rich pie but very smooth, and goes best with homemade whipped cream and an extra sprinkle of cinnamon. I like my pumpkin pie cold, but it was also excellent at room temperature if that is your preference. Like every pumpkin pie, it works just as well for breakfast as it does for dessert, and I’m sure after your first piece you’ll already be planning your second.

Perfect Pumpkin Pie {{Baking Bytes}}

It does require some overnight chilling, so make sure you plan your Thanksgiving preparations accordingly. This pie could easily be started Tuesday and finished Wednesday, leaving Thursday free for the items that can’t be made ahead. As long as you have fridge space (or a cold garage) you are good to go. I will say that if you are planning to add the pie crust cutouts (which are super easy and really fun), you should wait until just before serving to do so in order to avoid sogginess.

Perfect Pumpkin Pie {{Baking Bytes}}

Try out your new favorite pumpkin pie recipe this year, and don’t forget to thank Sally.

Perfect Pumpkin Pie

Adapted from Sally’s Baking Addiction
Makes one deep-dish pie

Ingredients

pastry for a double-crust pie (see below)

15 oz (425 g) pumpkin puree
3 large eggs
1 1/4 cups  lightly packed (250 g) dark brown sugar (or light)

1 Tbsp cornstarch
1/2 tsp salt
1 1/2 tsp ground cinnamon
1/2 tsp ground ginger
1/4 tsp ground nutmeg
dash of ground cloves
dash of ground pepper
1 cup (240 ml) heavy cream
1/4 cup (60 ml) milk

Directions

  1. The night before: in a large bowl whisk pumpkin, eggs, and brown sugar until completely combined. Add cornstarch, salt, spices, cream, and milk, and whisk until combined. Cover and chill in the refrigerator overnight.
  2. The next day: if you haven’t already, prepare your favorite pie dough, or use the recipe linked above. Preheat oven to 375 degrees Fahrenheit.
  3. Roll out slightly more than half the dough and gently place into your pie plate. Trim edges to about 1″ then fold over and crimp as desired. Optionally, sprinkle edges of pie crust with cinnamon and sugar.
  4. Briefly whisk filling then pour carefully into the prepared pie plate. If you have extra filling, you can bake it separately in a glass dish (no crust necessary) next to the pie.
  5. Optional: With remaining pie dough, roll out to about 1/8″ thick (or slightly thicker) and cut leaves or other designs. Place on a lined cookie sheet and sprinkle with cinnamon and sugar.
  6. Bake leaves for about 20 minutes, they should be golden in color. Remove from oven and set aside.
  7. Bake pie for one hour. Pie should still be jiggly in the middle but look solid otherwise. To avoid cracking, turn off the oven and open the door but leave the pie in there while it cools down a little. Once it has settled (hopefully without cracks), move it to the counter to cool completely, at least four hours. I prefer pumpkin pie cold, so I placed mine in the fridge after two hours.
  8. Just before serving, decorate with pie crust shapes. (Eat any extra shapes, or serve them in a small bowl next to the pie). Top slices with whipped cream and a sprinkle of cinnamon. Refrigerate leftovers.

No-Fail Pie Crust

Makes 2 deep-dish pie crusts

Ingredients

2 cups (240 g) all-purpose flour
1/2 tsp. salt
2/3 cup + 1 Tbsp (140 g) shortening
5-7 Tbsp ice water

Directions

  1. Measure shortening into a small bowl and place in freezer for 15-20 minutes. Pour water and a few ice cubes into a bowl or cup and set aside. (I typically pour 8 oz of water and then use what I need.)
  2. Mix flour and salt in a larger bowl. Using a pastry blender (or two table knives), cut in the chilled shortening until the pieces are pea-sized.
  3. One tablespoon at a time, add water into mixture and gently mix with your pastry blender (or knives). Repeat until all is moistened and the dough will stick together as one ball, about 6 tablespoons. Divide dough in half and gently roll each half into a ball.
  4. On a lightly floured surface, gently flatten one ball of dough into a disc. Gently roll into a circle large enough for your pie plate. Transfer dough to pie plate, and trim to a half-inch larger than the rim. Fold pastry under itself and crimp, if desired.
  5. Roll out second ball of dough for a second pie, or cut into strips or decorations as desired.

Arugula Sweet Potato Salad with Cinnamon Balsamic Vinaigrette

Lately I’ve been all aboard the sweet potato train, and today’s post will hopefully get you on the bandwagon as well. I love sweet potatoes in pretty much any form, and could happily eat them for several meals a day. Luckily they are great all year round as French fries or a delicious breakfast, and work just as well in salads as they do in soups and chilis.

Arugula Sweet Potato Salad {{Baking Bytes}}

Several months ago my office had a catered lunch that was a bit higher class than our norm. Although all the food was delicious, the one that made the most impact on me was an arugula and spiced sweet potato quinoa salad. Their version was sweet, with heavily candied nuts, sugary dried cranberries, and a sweetened balsamic vinaigrette amongst the quinoa, arugula, and goat cheese. Although I loved this combination, it really was like eating dessert with arugula in it which isn’t necessarily something I want to do very often.

Arugula Sweet Potato Salad {{Baking Bytes}}

Inspired by their concoction, I opted to test out a more savory version for myself. I kept the cinnamon roasted sweet potatoes but only lightly honeyed my walnuts. I also nixed the cranberries and used bacon instead, and adjusted the arugula:quinoa ratio to be more in favor of the former. Originally I was going to use brie as chèvre (goat cheese) can be exorbitantly expensive, but I discovered Costco carries goat cheese at an incredibly reasonable price and so I kept that flavor as well. Feel free to substitute brie or another neutral soft cheese if you prefer.

Arugula Sweet Potato Salad {{Baking Bytes}}

The spiced sweet potatoes, salty bacon, creamy chèvre and lightly sweetened and toasted walnuts come together in that fantastic sweet-and-salty juxtaposition that is so popular these days. Arugula and quinoa make a great base and let salad act either as a light lunch or a great side dish.

To round out the experience, I made a cinnamon balsamic vinaigrette only slightly sweetened with honey to mellow the flavor. The dressing gives the salad more of a punch of flavor, and I highly recommend you make it too. In fact, maybe make extra and use it on your other salads too since it’s just that delicious.

Arugula Sweet Potato Salad {{Baking Bytes}}

Although my original recipe is clearly neither vegetarian nor vegan, it could easily be altered for those diet preferences. Vegetarians can simply ditch the bacon, and a pinch of salt to the dressing, and carry on as normal. Vegans will want to substitute maple syrup in lieu of the honey as well as nix the cheese. You may want to add another ingredient to round it out, dried cranberries or salted almonds would both be great options, depending on which flavor route you want to go.

Full of cinnamon flavor, tasty sweet potatoes and a tinge of sweetness, this would be a superb side dish to grace your Thanksgiving table. Instead of those overly sugary sweet potato and marshmallow concoctions normally served this time of year, this salad would be a healthier and more sophisticated twist for this year. Even better, you can absolutely make it ahead (even a few days!) and store it in the fridge until ready to use. It’s delicious cold, at room temperature, or warmed, so pick your favorite or the most convenient and serve it as such.

Arugula Sweet Potato Salad {{Baking Bytes}}

The dressing makes a fair amount, so start with half of the recipe and stir in more to taste or serve on the side for guests to add as they like. I am personally a light dressing kind of person but many people prefer a stronger flavor, and it’s good to have options.

If you’re not doing the Thanksgiving thing, or don’t want to wait that long, this also make a great lunch. I made a batch on Sunday and got about 4-5 lunches out of it. Stored in the fridge, it reheated beautifully at work for the rest of the week. Additionally, if you’re not a fan of arugula, some kind of baby spring mix would be a great substitution.

Arugula Sweet Potato Salad & Cinnamon Balsamic Vinaigrette

Inspired by Food for Thought and Just a Pinch
Serves 6-8 (side dish) or about 4 (lunch)

Ingredients

Salad
4 cups cubed sweet potatoes
1 Tbsp olive oil
1/2 tsp cinnamon

3/4 cup walnuts, chopped
1 Tbsp honey or maple syrup

6 slices bacon (optional)1

1 cup quinoa
2 cups water

5 oz arugula (or leafy veggie/mix of choice)
~4oz goat cheese (or brie, optional)1

Dressing
1/2 cup olive oil
1/4 cup balsamic vinegar
2 tsp honey or maple syrup
1 tsp cinnamon

Directions

  1. Preheat oven to 425 degrees Fahrenheit. Line two cookie sheets with foil or parchment paper.
  2. In a medium bowl, combine sweet potatoes, olive oil, and cinnamon. Stir with a rubber scraper until potatoes are well coated. Arrange in one layer on half of a cookie sheet.
  3. In the same bowl, combine walnuts and honey and stir until completely coated. (Heat the honey sightly to liquify for easier stirring.) Arrange in one layer on the other half of the cookie sheet.
  4. Arrange bacon in one layer on the other cookie sheet.
  5. Place cookie sheets in oven (I put the potatoes on the middle rung, and the bacon one rung below it) and bake for 8-10 minutes, or until walnuts are lightly toasted.
  6. Remove the walnuts to a plate to cool. Continue baking potatoes and bacon for 15-20 minutes, until potatoes are easily pierced with a fork, and bacon is cooked to desired doneness.
  7. Remove bacon to paper towels to cool, pressing to remove excess grease. Dice bacon and set aside.
  8. Meanwhile, in a medium pot bring quinoa and water to a boil, then cover and simmer until all liquid is soaked up, about 15 minutes. Uncover and set aside.
  9. In a small bowl, whisk together dressing ingredients until completely combined.
  10. In a large bowl, combine arugula and half the dressing, tossing to coat. Add quinoa and sweet potatoes, and stir gently until well combined.
  11. Add walnuts (breaking apart if necessary), diced bacon, and goat cheese, stirring gently to combine.
  12. Serve immediately, later today, or tomorrow since it’s good at pretty much any temperature. Store leftovers in the fridge, or make it ahead the night before. Reheats well with a brief stint in the microwave and is also excellent right out of the fridge.
  13. Add additional dressing just before serving if necessary, or serve it on the side.
  14. Delicious as a side dish (6-8 servings) or for a lighter lunch (4 servings).

Notes

For a vegetarian option, just leave out the bacon, it’s great without it too! To get that added salty flavor, add a pinch to the dressing or include a few chopped salted almonds in its place. Vegans could also use maple syrup and ditch the cheese, although you may want to add another ingredient (maybe dried cranberries?), and follow the same salty suggestion.