Thai Peanut Zoodle Salad

A few months ago my favorite store announced a limited release of a Black Garlic Tamari Soy infused balsamic vinegar. I promptly went to the store for a taste and it quickly became one of my favorite products. The lovely umami flavor of soy paired with the tangy sweetness of balsamic and a light punch of garlic makes every mouthful interesting. I’ve used it in place of soy sauce in numerous dishes, from fried rice to scrambled eggs to this delightful Thai peanut salad I have here to share with you today.

Thai Peanut Zoodle Salad {{Baking Bytes}}

In my never-ending love affair with my spiralizer, I recently meal-prepped a super easy, healthy, and delicious salad for my weekly lunches. With very little knife work required, the vegetable prep happens quickly instead of feeling like you are standing in the kitchen chopping for nine hours. The sauce comes together even faster, made easily in a blender or food processor. Chopping some peanuts are all you have to do by hand, and I promise that takes less than a minute.

Thai Peanut Zoodle Salad {{Baking Bytes}}

Inspired in part by last year’s cashew zoodle salad, I wanted to experiment with a peanut-based version. Peanut is far and above my favorite flavor of nut, and pairing it with soy and spice is nearly always delightful. Olivelle’s introduction of this soy-like balsamic sealed the deal in working on this creation.

Thai Peanut Sauce {{Baking Bytes}}

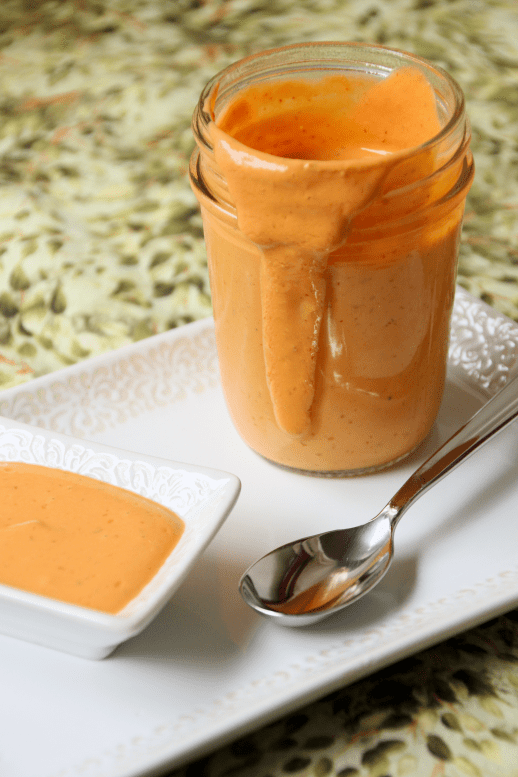
I opted to use peanut butter powder in the sauce because the oils already add plenty of fats, but you can certainly use regular peanut butter too. (Just start with half the amount to begin with as the peanut flavor often comes through much strong.) Complemented with tangy balsamic, nutty sesame oil, a hint of sweet maple, and the heat of crushed red pepper flakes, this sauce covers nearly all the taste profiles in every delicious bite. I made mine quite thick to blend nicely with all the water zoodles tend to release, but to use as a regular salad dressing you can thin it was additional water.

Thai Peanut Zoodle Salad {{Baking Bytes}}

Crispy veggies and tangy dressing topped with crispy peanuts are a perfect summer side dish or entree. Round it out with steak, grilled chicken, or tofu, served either on top or alongside this tasty salad. As its sans lettuce this is a perfect meal prep option, and it keeps well in the fridge for up to a week with your dressing reserved in a separate container until ready to eat. It also lends itself well to additional garnishes, like mandarin orange, sesame seeds, scallions, or just a sprinkle of extra red pepper flakes.

Thai Peanut Zoodle Salad

Serves 4

Ingredients

2 medium zucchini
2 large carrots, peeled

2 medium bell peppers
1 medium red onion
1 small red cabbage
1 large cucumber
1/2 cup peanuts, chopped
garnishes: mandarin, sesame seeds, scallion, red pepper flakes
optional: protein of choice (steak, chicken, tofu, chickpeas)

Thai Peanut Sauce
45g (1/3 cup) peanut butter powder1
60 mL (1/4 cup) (Toasted) sesame oil
60 mL (1/4 cup) water, to taste
30 mL (2 Tbsp) Black Garlic Tamari Balsamic Vinegar2
10 mL (2 tsp) maple syrup3
1/4 tsp (Roasted Garlic) salt
1/4 tsp crushed red pepper flakes, to taste

Directions

  1. Wash and spiralize all veggies: 5mm for zucchini, 2mm for carrot, and the flat blade for the remaining veggies. (Or chop them all, if you don’t have a spiralizer.)
  2. Combine all sauce ingredients in a blender and puree until smooth. Add extra red pepper flakes or water as desired, but remember the zucchini will release a lot of water and thin the sauce substantially.
  3. For meal prep: divide zucchini evenly among four 5-cup containers. Top each with 1/4th of the remaining veggies. Add 2 Tbsp chopped peanuts and 2-4 Tbsp sauce to separate small containers, and tuck them in with the veggies. Refrigerate until ready to eat, up to 1 week.
  4. To serve: layer the zucchini in a large serving dish, then top with remaining veggies. Add 1/2 cup dressing and toss until well coated. Taste and toss with additional dressing if you prefer a more generous coating.
  5. If desired, layer on protein of choice, then drizzle with a small amount of extra sauce.
  6. Top with crushed peanuts, and any other garnishes you like (mandarin orange, extra red pepper flakes, sesame seeds). Serve promptly.

Notes

You could also use regular peanut butter, but start with about 3 tablespoons and adjust after tasting.

If necessary, 1 Tbsp balsamic vinegar and 1 Tbsp low-sodium soy sauce should be an acceptable substitute.

If you use a sweetened peanut butter, like Jif, start without syrup and adjust after tasting.

Advertisement

Southwest Salad

Hello friends, I hope you have been enjoying National Ice Cream Month! Here to offset this sugar rush of a month is the part two of July’s salad trio. We’re headed south of the border with one of my favorite salads in Bozeman.

Southwest Salad {{Baking Bytes}}

One of the perks at my place of employment is a company-sponsored team lunch every two weeks. Because my team is fairly large, we have a few staple places that are likely to be able to seat us. Starky’s Authentic Americana is one such restaurant and I’m never sad when it’s the choice of the day. One of my favorite meals there is their southwest salad: a delicious but still light and healthy experience including pineapple black bean salsa and chipotle ranch dressing. I often get it with chicken for a protein boost but it stands on its own just as well.

Southwest Salad {{Baking Bytes}}

Inspired to make my own copycat, I set out to make a pineapple black bean salsa and a chipotle lime crema tailored to my own preferences. With a few modifications, A Hint of Honey helped me out on the salsa front and Isabella Eats inspired my chipotle lime crema. The crema was featured previously on the blog in my chipotle lime tuna-stuffed sweet potatoes, but I actually originally developed it for this recipe over a year ago! Somehow I’m just now getting around to sharing this salad with you, but hopefully it was worth the wait.

Chipotle Lime Crema {{Baking Bytes}}

The salsa is a joyous mix of fresh pineapple and savory black beans, accompanied by a little lime and the bite of fresh red onion. Over time the flavors marry together perfectly so I highly recommend making your salsa in advance. It keeps well in the fridge for at least a week, at which time I’d devoured all of it. The original recipe calls for cilantro, which I do not eat, but I will only judge you a little if you decide to add it to yours.

Pineapple Black Bean Salsa {{Baking Bytes}}

A base of spinach or romaine is topped with (optionally sautéed) bell pepper and zucchini for some extra veggies and color. I like to add pulled venison/elk or grilled chicken here, but it makes for an excellent vegetarian meal without it. Some pineapple black bean salsa, a handful of tortilla strips, and a drizzle of crema round out the dish into a lovely sweet and spicy combination. You can easily make this recipe vegan by using a non-dairy yogurt for the crema, and skipping the meat and cheese, of course.

Southwest Salad {{Baking Bytes}}

Customize to your heart’s content with additional toppings like avocado or diced tomato (if you must) and then serve to adoring fans for a healthy summer meal that comes together super quickly. Make the salsa and meat ahead of time, and you have an easy 15-minute meal almost ready to go.

Southwest Salad (Taco) {{Baking Bytes}}

Additionally, if you’re not a salad person, combine these components into an awesome taco instead!

Southwest Salad

Inspired by Starky’s Authentic Americana
Serves 4-6

Ingredients

1 Tbsp olive oil, optional
1 medium zucchini, julienne cut
1-2 bell peppers, thinly sliced

5-10oz Spinach/Romaine, to taste
1 1/2 cups pineapple black bean salsa (below)
1 – 1 1/2 cup freshly grated cheddar cheese
1 cup tortilla strips, to taste
1/2 – 1 cup chipotle lime crema

optional toppings: avocado, diced tomato, grilled chicken, pulled venison, etc

Directions

  1. (Skip to step 4 if you prefer raw veggies.)
  2. In a medium frying pan, heat the oil over medium-high heat until shimmering.
  3. Add zucchini and bell peppe, then lightly sauté to preferred tenderness.
  4. In your serving bowl(s), add desired amount of greens.
  5. Layer on zucchini and bell pepper (and top with meat, if using.)
  6. Evenly spoon on pineapple black bean salsa then sprinkle with cheese, tortilla chips, and any additional toppings you want to throw on it.
  7. Drizzle with chipotle lime crema (and freshly ground pepper, if desired) and serve promptly.

Notes

These components also make for an excellent taco!

Pineapple Black Bean Salsa

Adapted from A Hint of Honey
Makes about 4 cups

Ingredients

2 cups fresh diced pineapple
1 cup black beans (or just use the whole can if you want)
1/2 cup diced red onion1
1 jalapeño, minced
3 Tbsp lime juice (1-2 limes), to taste
2-3 cloves garlic, minced
1/4 tsp (Roasted Garlic or Lime Fresco) sea salt

Directions

  1. In a medium bowl, stir together all ingredients until thoroughly combined.
  2. Cover and chill about 30 minutes to allow flavors to blend, or until ready to use.
  3. Great with salads, tacos, chips, and a spoon!

Notes

If raw red onion is too strong for you, soak the cut onion in cold water for about 10 minutes, then drain and add to the salsa.

Red, White, and Blueberry Salad

Happy July, folks! Halfway through the year and super psyched for the last round of posts for National Ice Cream Month! Are you excited? I’m excited. Each Frozen Friday of July will feature a new flavor, and I hope at least one of them leaves you with a new project for the weekend. (I’ll be breaking from the norm and posting the ice cream recipes in the morning, in case you need to make a grocery stop on your way from from work.)

You might be wondering how salad fits in here. For my regularly scheduled Wednesday programming, I’ll be featuring a salad series to balance a decadent month of dessert. Lots of different flavor profiles to look forward to and there should be a little something for everyone.

Beet & Blueberry Salad {{Baking Bytes}}

First up is this red, white, and blueberry salad. This salad is served chilled which makes it easy peasy to make a couple of hours ahead (just pop the whole bowl in the fridge) and you’re all set. With no lettuce to wilt it’s great for potlucks and barbecues and a festive addition to your holiday parties that isn’t completely full of sugar.

Roasted beets are something I love immensely but rarely make because they’re a bit messy. I promise you the the pink hands and counters and bowls are all worth it here. Earthy and sweet, beets are wonderful chilled and warmed alike, which makes them extremely versatile across many dishes, including my favorite breakfast hash and sandwich at Jam. I nearly always order one or the other there, depending on if I want eggs or bread with my beets.

Beet & Blueberry Salad {{Baking Bytes}}

Complementing the beets is some tart apple and fresh blueberry. I love apple in salads for the crunch, and using a green one here is a delightful juxtaposition from the sweetness of the beets and blueberries. A simple white balsamic vinegar adds a lovely tang without the heaviness of a proper vinaigrette and a little bit of mint brings a summery freshness to the whole ordeal. As it stands this recipe is vegan, but if you want to include the creamy factor, goat cheese is always the answer in my world. (For the anti-goat cheese crown, Feta or parmesan are great substitutes.)

Pop some beets in the oven this evening so they’re ready to go tomorrow, and you’ll be all set for a lovely holiday side dish in no time!

Beet & Blueberry Salad {{Baking Bytes}}

PS – If you are one of those people that can’t stand beets, I forgive you. Make it a fun fruit salad by substituting watermelon instead!

Red, White, and Blueberry Salad

Serves 4-6

Ingredients

3 large beets, roasted1, chilled, and spiralized or diced
1 medium green apple, cut into matchsticks
1 cup fresh blueberries
1/4 cup (Barrel Aged) white balsamic vinegar, to taste

4-6 oz goat cheese (or Feta or parmesan), crumbled or shaved
large handful fresh mint leaves, chiffonade cut

Directions

  1. In a medium bowl, toss beets with 2 Tablespoons balsamic vinegar until well coated. Transfer to serving bowl(s).
  2. Rinse bowl (so it’s not pink) and toss apple and blueberries with 1 Tbsp balsamic vinegar until well coated. Spread evenly over the beets.
  3. Crumble cheese and mint atop the salad and drizzle with remaining balsamic vinegar, or more to taste.
  4. Serve promptly or chill until ready to eat.

Notes

If you’ve never roasted beets before, this is the method I use!

Cucumber Basil Hummus

There were a few snow flurries in the air when I drove to the airport this morning, but it’s fully summer in Austin so I’m slightly in climate shock. May is the Juneau month of Bozeman’s year: often overcast, windy, and with varying seasons of precipitation. It’s a test of patience waiting for the skies to clear and the trails to dry, but on the plus side, we can always count on actual summer to find us in June, unlike my hometown.

Cucumber Basil Hummus {{Baking Bytes}}

In anticipation of barbecues and picnic lunches, here’s a nice simple hummus recipe for your repertoire. Last week’s lemon and garlic version is perfect for spring, but for a slightly milder experience today’s recipe is a delicious option.

Cucumber Basil Hummus {{Baking Bytes}}

Crisp cucumber brings a refreshing lightness to the dip while maintain a fairly neutral flavor profile. Basil is my favorite herb to pair with cucumber, and it’s a great way to use up fresh herbs from the store or your garden, especially when you don’t quite have enough for pesto. No basil? Thyme or dill would be excellent here as well depending on the other items around the table.

Cucumber Basil Hummus {{Baking Bytes}}

This hummus is light and creamy, with pleasant flecks of green. Lovely as a standard dip, of course, but also a perfect addition to a wrap or sandwich for a packable lunch. A batch keeps several days in the fridge so make some for appetizers and use up the leftovers for lunches and snacks. It’s perfect as the spread for a dairy-free cucumber sandwich/wrap, paired with your favorite toppings and protein. Vegan? Add spinach and zucchini and some extra chickpeas. Vegetarian? Maybe include some egg or parmesan. Pescatarian? Include smoked salmon too. Omnivorous? Chicken or turkey is the perfect lean protein to use here. Wrap them all in bread or a tortilla rounded with a drizzle of Sweet Basil Balsamic Vinegar from Olivelle and you have a phenomenal lunch at your fingertips.

cucumber_hummus_3

Whether you go for the simple snack or build up a wrap, this hummus is sure to please. Give it a whirl and let me know how you put it to use!

Cucumber Basil Hummus

Adapted from Vegan Family Recipes

Ingredients

1 (15oz) can chickpeas, rinsed and drained
1/2 large cucumber, diced (about 3/4 cup)
2 Tbsp tahini
2 Tbsp fresh lemon juice
1 Tbsp (Caramelized Garlic) olive oil
1/4 rounded tsp (Roasted Garlic) sea salt
1 large clove garlic, to taste
2-4 large basil leaves

Directions

  1. Add all ingredients to a food processor and process until smooth.
  2. Taste and adjust salt/herbs accordingly. If the hummus is too thick, add additional oil or cucumber.
  3. Drizzle with additional oil and serve with sliced veggies, pita, or crackers. (Also excellent in veggie or chicken wraps!)
  4. Store leftovers in the fridge for up to two weeks.

Squash & Lemon Spiral Tart

Springtime means lemon in my brain, so when I saw this spiral tart from Bunsen Burner Bakery I knew I wanted to incorporate that flavor. A lemon hummus seemed the perfect accompaniment to a series of veggies and I set out to test this hypothesis.

Squash & Lemon Spiral Tart {{Baking Bytes}}

The bright flavor of lemon is complimented by a generous amount of garlic. I opted to use my hefty supply Olivelle products but you can use standard varieties if needed. The turmeric lifts the yellow coloring up a notch which isn’t necessary for the tart but it’s beautiful for a party platter. You’ll have plenty of leftover hummus to enjoy on its own, and it provides a lovely creamy base for this tart without any additional sogginess.

Squash & Lemon Spiral Tart {{Baking Bytes}}

My trusty no-fail pie crust recipe is the base for this delicious dish. Since I don’t have a tart pan (something I should probably rectify, pronto) I used a standard 9″ pie plate, which works just fine. I love this pie crust recipe because it never gets over browned, but you can easily substitute your own go-to pastry here if you wish.

Squash & Lemon Spiral Tart {{Baking Bytes}}

The flaky pastry and crisp lemon flavor of the hummus blend beautifully into a base for all your veggies of choice. I chose zucchini, carrot, summer squash, and eggplant, but feel free to use whatever you have laying around the kitchen that you can slice with a mandolin. You’ll want veggies thin enough to bend, but no thinner. On my mandolin I used the thinnest setting for the carrot and the next one up for the rest of the vegetables, but definitely do a test slice to see what makes sense for yours.

spiral_tart_2

Concentric rings of vegetable goodness are pleasing to the eye and the tongue. Finished with a bit of rosemary (or your favorite herb) for a spark of flavor and a pretty garnish, this tart is a prefect addition to your next brunch. This tart is inherently vegan (presuming you use a vegan pie crust) but for the rest of us a sprinkle of goat cheese is the perfect topping for each piece. To round out the meal, I enjoyed mine with a side of eggs and fruit.

spiral_tart_5

This tart would be sure to please at a Mother’s Day brunch, or to brighten any regular day too. If you have any leftovers, they are excellent cold or reheated in the oven, so be sure to enjoy every last bite!

Squash & Lemon Spiral Tart

Inspired by Bunsen Burner Bakery
Makes one 9″ tart

Ingredients

pastry for a single-crust pie

1 medium zucchini
1 small eggplant
1 small yellow squash
3 large carrots
1 Tbsp (Caramelized Garlic ) olive oil

1/2 cup lemon garlic hummus (below)

1-2 tsp fresh rosemary or other herb

lemon garlic hummus (adapted from Well and Full)
1 can chickpeas, rinsed and drained
3 Tbsp (Caramelized Garlic or Sicilian Lemon) olive oil (I used 2 Tbsp Garlic and 1 Tbsp Lemon)
2 Tbsp tahini
1-3 cloves garlic (depending on if you’re using infused oil)
zest and juice from 1 large lemon
1/2 tsp (Garlic) salt
1/4 tsp ground turmeric
freshly ground black pepper, to taste

Directions

  1. Make ahead: add all hummus ingredients to a food processor, starting with half the lemon juice, and process until smooth. Taste and add additional lemon juice (for flavor) or oil (for consistency) as needed. Refrigerate until ready to use.
  2. Gently lay pastry in a 9″ pie plate or tart pan. Trim and crimp the edges, as desired. Refrigerate pastry for 15 minutes.
  3. Preheat oven to 350 degrees Fahrenheit.
  4. Prick pastry generously all over with a fork (or use pie weights if you prefer) and bake for 15 minutes. Set aside to cool while you prepare the veggies.
  5. Use a mandolin to thinly slice all the veggies. (On mine I used setting 2 for the squash and eggplant, and setting 1 for the carrots.) Add all the slices to a large bowl and use your hands to gently toss in olive oil. Don’t add too much oil because the eggplant likes to soak it all up!
  6. Retrieve the pastry and spread 1/2 cup of hummus evenly along the bottom.
  7. Starting from the outside, layer the strips of veggies in whatever order you like; I opted for a repeating pattern of concentric circles but it’s totally up to you.
  8. Spray with olive oil (or lightly brush it on) and sprinkle with rosemary or herb of choice.
  9. Bake for 45 minutes or until vegetables are tender and starting to crisp, and crust is a golden brown. If necessary (it wasn’t for me) you can cover the crust edges with foil if they are browning too quickly.
  10. Serve warm, optionally topped with goat cheese. Goes great with a side of eggs and fruit!
  11. Store leftovers in the fridge. I suspect it’d last about 3 days but I can’t confirm because we ate it all before then. Enjoy chilled or reheat in the [toaster] oven at 300 degrees Fahrenheit for 10 minutes.