Energizing Oatmeal Blueberry Muffins

What? Two healthy recipes in a row? The end is near! Just kidding. I’ve had this one in the backlog awhile but never got around to writing the post. I promise to bring you a proper amount of sugar next week. (Possibly too much, but that’s up to you.)

Energizing Oatmeal Blueberry Muffins {{Baking Bytes}}

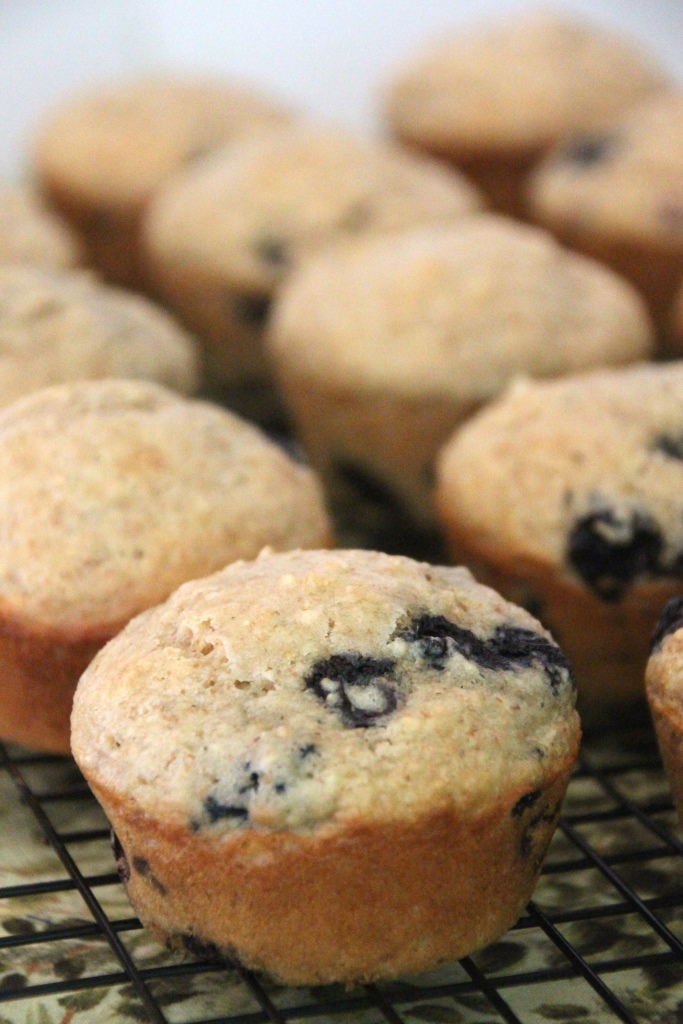
These muffins make an amazing breakfast or snack, and are awesome for pre- or post-run energy. Nice and filling but very flavorful, these are a slightly  healthier alternative to a prepackaged granola bar. They are dense, packed with blueberries, and stick with you. A subtle oatmeal flavor steps them up a notch from your usual blueberry muffin recipe and Greek yogurt adds a little extra protein.

Energizing Oatmeal Blueberry Muffins {{Baking Bytes}}

My new go-to recipe for blueberry muffins has been changed to this one for their amazing flavor, texture, and fillingness. (That’s a technical term.) Warmed and spread with butter, these are delicious all week long (if you haven’t eaten them all before then) any time of the day. Round them out with some scrambled eggs and a cup of coffee and you have an easy breakfast for any day of the week.

Energizing Oatmeal Blueberry Muffins {{Baking Bytes}}

Oatmeal Blueberry Muffins

Adapted from Finger Prickin’ Good
Makes about 15 muffins

Ingredients

2 cups all-purpose (can substitute up to 1/2 cup with whole wheat flour)
1 cup oats
2/3 cup sugar
1 tsp baking powder
1 tsp baking soda
1/2 tsp salt

2 large eggs
1 1/2 cups honey nonfat Greek yogurt (I like Greek Gods)
4 Tbsp unsalted butter, melted and slightly cooled
1 tsp vanilla extract

1 cup fresh or frozen blueberries (if frozen, run under hot water to thaw)
1 Tbsp flour

Directions

  1. Preheat over to 350 degrees Fahrenheit and lightly grease a muffin tin.
  2. If desired, use a blender or food processor to reduce the size of the oats.
  3. Whisk together flour(s), oats, sugar, baking powder, baking soda, and salt in a large bowl until completely combined.
  4. In another bowl, lightly beat eggs, yogurt, butter, and vanilla.
  5. Add wet mixture to the dry mixture and stir until just combined.
  6. Toss blueberries with remaining flour, then gently fold into the muffin batter.
  7. Fill each muffin well with 4-5 Tbsp batter, and bake 20-25 minutes. Tops should be lightly browned and a toothpick should come out clean.
  8. Cool in the pan for a few minutes, then remove to a wire rack to cool completely (or serve them still warm!)

Cinnamon Glazed Pumpkin Donuts {and Halloween}

Much like the rest of the 20-something white girl population, pumpkin is my favorite fall flavor. October is a highly anticipated month as I count the days towards what I officially call “Pumpkin Season.” Granted, this date is completely arbitrary, but since Bozeman summer generally extends well into September anyway, October 1st seemed a good choice.

IMG_1968Cinnamon Glazed Pumpkin Donuts >> Baking Bytes

Since I’ve already posted my favorite pumpkin bread, pumpkin pie, pumpkin cupcakes, and pumpkin milkshake, I sought a new recipe to share this year. A Pinterest post led me to these donuts, which I ever so slightly adapted to fit my preferences. A moist and pleasantly spiced pumpkin donut topped with a cinnamon glaze is the perfect start to a fall morning. As this is a baked donut recipe, it does require a donut pan, but I promise you won’t regret the purchase. My one complaint about my pan is that it only holds six donuts, when all recipes make twelve. (First world problems, haha.)

Cinnamon Glazed Pumpkin Donuts >> Baking Bytes

These would be a great way to kick off Halloween morning, sharing them with family, friends, or coworkers. Like many of you (I’m guessing), I already attended a Halloween party this past weekend, but maybe there’s a day-of party happening Thursday, or you just want to make something easy this fall. Whatever the occasion, these donuts are an easy way to bring the pumpkin flavor to breakfast.

Did you have a costume this year? I dressed up as Donatello (the Ninja Turtle, not the Renaissance artist), using a costume my mom made my older brother when he was five. That makes this costume almost as old as me, but still amazingly awesome.

I hope you hum the theme song for the rest of the day.

Heroes in a half shell – Turtle Power!

Cinnamon Glazed Pumpkin Donuts

Barely adapted from Taste and Tell
Makes 12 donuts

Ingredients

2 cups all-purpose flour
1 1/2 tsp baking powder
1/4 tsp baking soda
1/2 tsp salt
1 1/2 tsp cinnamon
1/2 tsp nutmeg
1/4 tsp ginger

1/2 cup brown sugar (not packed)
1/4 cup butter, room temperature
1 cup pumpkin puree
2 eggs

1 tsp vanilla
2 Tbsp milk

1 1/2 cups powdered sugar
1/2 tsp vanilla extract
1/2 tsp cinnamon
2 Tbsp milk

Directions

  1. Preheat your oven to 350 degrees Fahrenheit. Butter a donut pan and set aside.
  2. In a small bowl, whisk together flour, baking powder, baking soda, salt, cinnamon, nutmeg, and ginger.
  3. Using an electric mixer on medium speed, beat together brown sugar, butter, and pumpkin until thoroughly combined.
  4. Add eggs, mixing well, and then stir in milk and vanilla until completely incorporated.
  5. Stir in the dry ingredients, mixing until just combined.
  6. Spoon batter into a large Ziploc or pastry bag, cut off the tip, and pipe into the buttered donut wells.
  7. Bake for 10 minutes, or until a toothpick comes out clean. Cool in the pan five minutes, then remove to a wire rack to cool completely.
  8. For the glaze, whisk together the remaining ingredients in a small bowl.
  9. Dip cooled donuts in the glaze and return to the wire rack to set.
  10. Enjoy with a glass of milk or a mug of coffee, and a few friends to help you eat them.

IMG_2029Cinnamon Glazed Pumpkin Donuts >> Baking Bytes

Notes

1 These taste great made a day in advance, but the glaze tends to soak into the donut. If you can, glaze them on the day you intend to serve them so they’ll stay nice and pretty.

Easy Cream Cheese Danishes

[Here from Pinterest? Welcome! After you make these danishes, make sure to check out my other Pillsbury recipe: Easy Cinnamon Roll Wreath]

For those of us that are doomed to work in an office lucky enough to have a stable job, we know that the best days often involve surprise homemade treats that a coworker decided to bring in. You, too, can be that coworker. While muffins, cookies or donuts are always a welcome option, this super easy Danish recipe is a great way to switch it up a little. Better yet, they can easily be made the night before, letting you keep to your normal sleeping schedule.

Easy Cream Cheese Danishes {{Baking Bytes}}

Although I don’t typically work from recipes that call for “pre-fab” food, the ones I do like generally involve a Pillsbury product. Pillsbury crescent rolls are incredibly versatile and can be used for everything from breakfast to dessert, or my favorite, a dessert-y breakfast. These Danishes are super easy, super delicious, and make enough to feed a crowd. I brought mine to work and had no trouble giving them all away.

I made mine with cherry pie filling (my favorite), but feel free to substitute any pie filling, preserves or thick jam that you prefer, or leave the fruity part out completely. If you’re a Nutella person (I am not, bleh), I’m sure that would also work nicely alongside the cream cheese filling. If you’re feeling inspired, a quick sauce from fresh fruit would be even more amazing.

Easy Cream Cheese Danishes {{Baking Bytes}}

So next time you want to surprise your coworkers, skip the muffins and pick up some cream cheese and crescent rolls; you’ll be the new office favorite in no time.

If you’re struggling to print this recipe, a PDF copy is available here:  Easy Cream Cheese Danishes | Baking Bytes

Easy Cream Cheese Danishes

Makes 24 pastries

Ingredients

2 cans Pillsbury Grands Crescent Rolls (big & flaky)
1 can pie filling (I like cherry)

8 oz cream cheese
1 tsp vanilla
1/3 cup sugar

powdered sugar
milk

Directions

  1. IMG_1594Place crescent roll cans in the freezer for about 30 minutes.
  2. Preheat the oven to 350 degrees Fahrenheit and line baking sheets with silicon mats or parchment paper.
  3. Beat cream cheese, vanilla and sugar with an electric mixer until smooth and fluffy.
  4. Open the cans and slice each into 12 pieces, approximately 1/2″ slices. (Don’t unroll them, pretend they’re slice and bake cookies.)
  5. Easy Cream Cheese Danishes
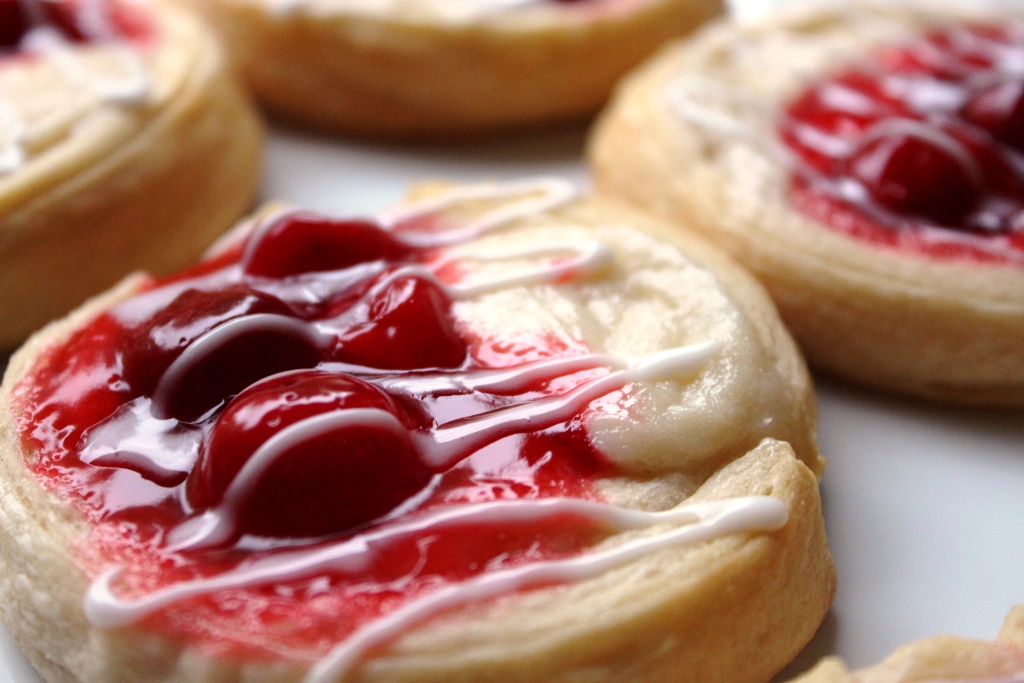
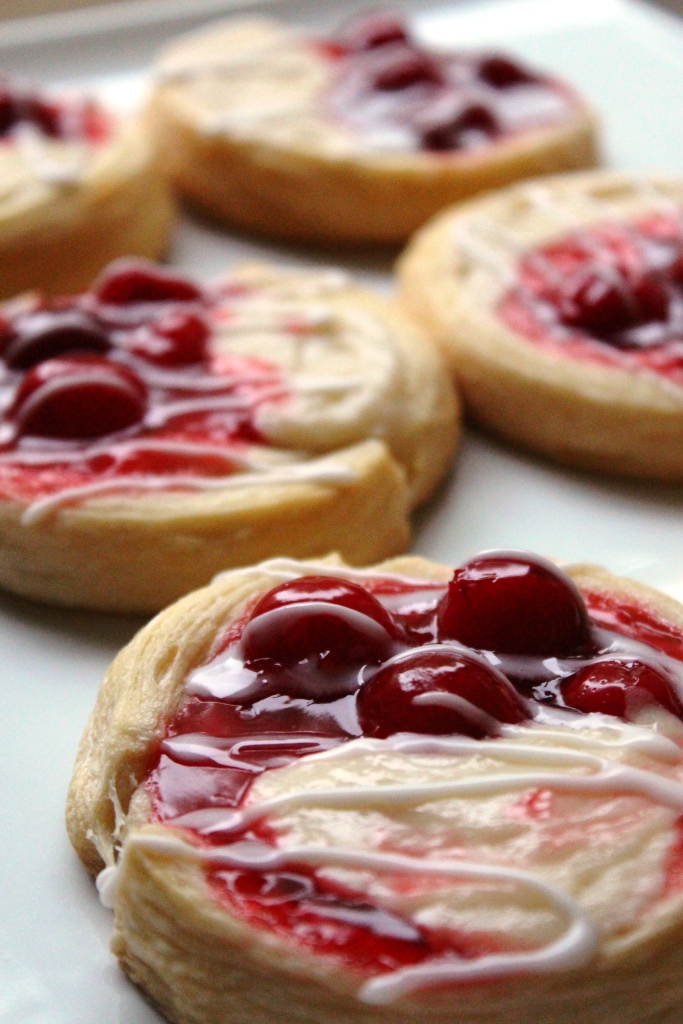
Place six slices on a cookie sheet, flattening the centers to create an indent. (I used a large spice container dipped in flour, plus my fingers for a little extra flattening in the middle.)2
  6. Fill the indent half with the cream cheese mixture and half with the pie filling.
  7. Bake until edges are golden brown, about 15 minutes.
  8. Cool completely on a wire rack.
  9. In a small bowl, mix a large spoonful of powdered sugar with a little milk until liquid but still thick. Spoon into a pastry bag or Ziploc, cut off the tip, and drizzle over the pastries.
  10. Enjoy one (or three, I don’t judge) with a cup of coffee or a tall glass of milk.

Notes

1 I actually think these are best the next day. Bake, cool, frost, and put in airtight containers overnight. For me, they’re always more moist and pastry-like the next morning. (Although they are also fabulous straight out of the oven… but don’t burn your mouth.)
2 These spread a lot during baking, so don’t try to squeeze too many on a pan. Start with 6 and see if you have room for more after the first batch is baked.

Best Belgian Waffles Ever

Breakfast is my favorite meal of the day, and I don’t subscribe to the idea that it can only be eaten in the morning. I often make pancakes or stuffed French toast for dinner because who has the motivation for that kind of thing in the morning?

My favorite breakfast is Belgian waffles. But not just any Belgian waffles. I’ve become a bit of a waffle snob and most just don’t make the cut. Restaurant waffles are generally too heavy and many people make “homemade” waffles from a mix. I almost never make anything from a mix because it kind of feels like cheating. Except with pudding, because you just can’t beat 5 minutes from box to spoon.

The fancy glass makes it classy.

These waffles are light, fluffy, and overall delicious. My favorite way to top them is with fresh berries and homemade whipped cream, although chocolate chips and peanut butter is a close second.

It’s a fairly large recipe, so if you’re just cooking for one or two, you’ll want to cut in half. The batter keeps for a few days in the fridge (just give it a good stir) and will be just as delicious, but they won’t be quite so fluffy after day one. I frequently make a batch and eat one for breakfast (and lunch and dinner…) for the next several days.

Below is my family’s recipe for the best Belgian waffles ever (as named by my mom), as well as one for homemade whipped cream.

I hope you enjoy them as much as I do.

Best Belgium Waffles Ever

Ingredients

5 large eggs, separated
4 1/2 cups flour
1/2 cup oil
2 Tbsp baking powder
4 cups milk
1/2 tsp. salt

Directions

  1. Prepare and preheat your waffle iron according to its instructions.
  2. Separate egg white into a large bowl (the one for your stand mixer, if you have one) and the egg yolks into another large bowl. Beat egg whites on high speed until light and fluffy.
  3. Add oil and milk to egg yolk and beat lightly. Whisk together flour, baking powder and salt and stir gently into wet ingredients until well blended. Let rest for 10 minutes.
  4. Gently fold in egg whites until mostly blended. Some fluffs of egg white should remain.
  5. Add 3/4 cup batter to waffle maker and cook to desired doneness. Garnish with toppings of choice and enjoy!

Vanilla Whipped Cream

Ingredients

1 cup heavy cream
2 tsp. vanilla
1/4 cup sugar (I generally used powdered but granulated works fine)

 Directions

  1. Whip cream on high speed to very slightly less than desired consistency.
  2. Add vanilla and sugar and beat until combined.

Notes: If you want to pipe your whipped cream, whip it slightly longer. Spoon it into a frosting bag with your tip of choice (I like a large star) and twist it shut with a plastic bread clip. I find it easiest to set it in a pint glass to store in the fridge.

Cinnamon Sugar Scones

For my first post, I decided to use a recipe I make all the time, a very delicious diet staple. This is somewhat odd because growing up, I never liked scones. They were always hard and dry and far too crumbly to be able to eat properly.

Then I went on exchange to Scotland and was opened to the wonderful world of properly prepared scones. Light, moist, delicious scones.

Also castles. Castles are awesome.

Although I probably sampled two dozen flavors, I usually liked the simple flavors best. So when I was perusing the fabulous blog of Baked Perfection and found these cinnamon sugar scones, I knew they’d be perfect. I almost never make a recipe immediately after reading it because I’m usually missing at least one ingredient, but with these I had them all on hand already. These scones contain only common ingredients (unless for some reason you don’t always have heavy cream on hand…), and are incredibly easy, fast, and delicious.

Assuming you have everything, you can be eating these, in all their cinnamon sugar glory, in a mere half hour. The original recipe includes a drizzled glaze, which I use when I want a sweeter treat, but they are also excellent plain, or spread with melted butter and sprinkled with cinnamon and sugar.

Below is the recipe with basically no modifications because I think it’s perfect as is. Enjoy!

Miniature Cinnamon Sugar Scones

Recipe adapted from Baked Perfection 

Ingredients

2 cups flour
3 tablespoons sugar
3 teaspoons baking powder
1/2 teaspoon salt
2 teaspoons cinnamon

1 1/4 cups whipping cream (heavy cream)

Directions

  1. Preheat oven to 400 degrees Fahrenheit and line a baking sheet with parchment paper or silicon mats.
  2. Whisk together flour, sugar, baking powder, salt, and cinnamon until completely combined.
  3. Pour in whipping cream. Mix or knead by hand, just until combined. Mix will be sticky.
  4. Flour surface. With floured hands, divide dough into two sections and pat into two rounds, each approximately four inches.
  5. Cut each round into 8ths and place on prepared baking sheet sheet.
  6. Bake 9 to 11 minutes. Let cool at least five minutes, then glaze, butter, or enjoy plain.