Peanut Butter Layer Cake

Happy President’s Day! I hope everyone had a wonderful weekend (and Valentine’s Day, if you’re into that sort of thing.) Friday marked my 5-year anniversary with M, and as usual I baked a cake for the occasion. Each year I use a brand new recipe I’ve never tried, but luckily so far all of them have been delightful. Two years ago was a chocolate raspberry layer cake, and last year was a black forest chocolate cake I haven’t added to this blog yet. Maybe I’ll do a flashback post one of these days.

Peanut Butter Layer Cake {{Baking Bytes}}

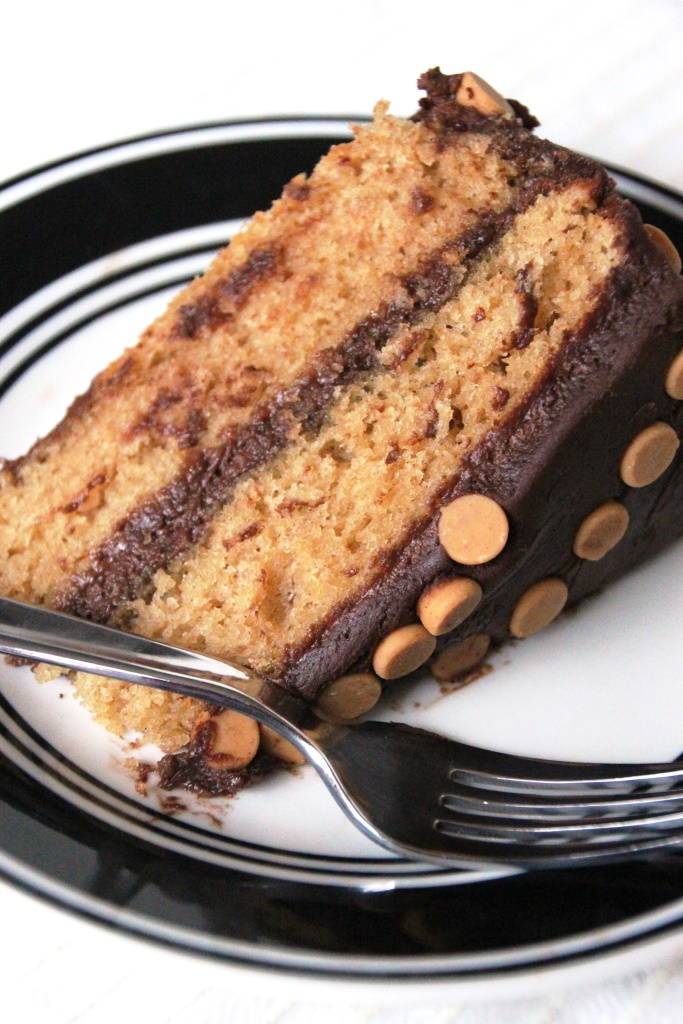
This year, I wanted to hark back to the first cake I ever made: a chocolate cake, cream cheese peanut butter frosting, and chocolate ganache decadence that was amazing, albeit incredibly rich. Chocolate and peanut butter are a mutual favorite and this year I decided to reverse it in anticipation of a slightly less decadent confection. Borrowing a peanut butter cake recipe from The Daring Gourmet and pairing it with the same chocolate buttercream frosting from two years ago resulted the cake version of a Reese’s Peanut Butter Cup.

Peanut Butter Layer Cake {{Baking Bytes}}

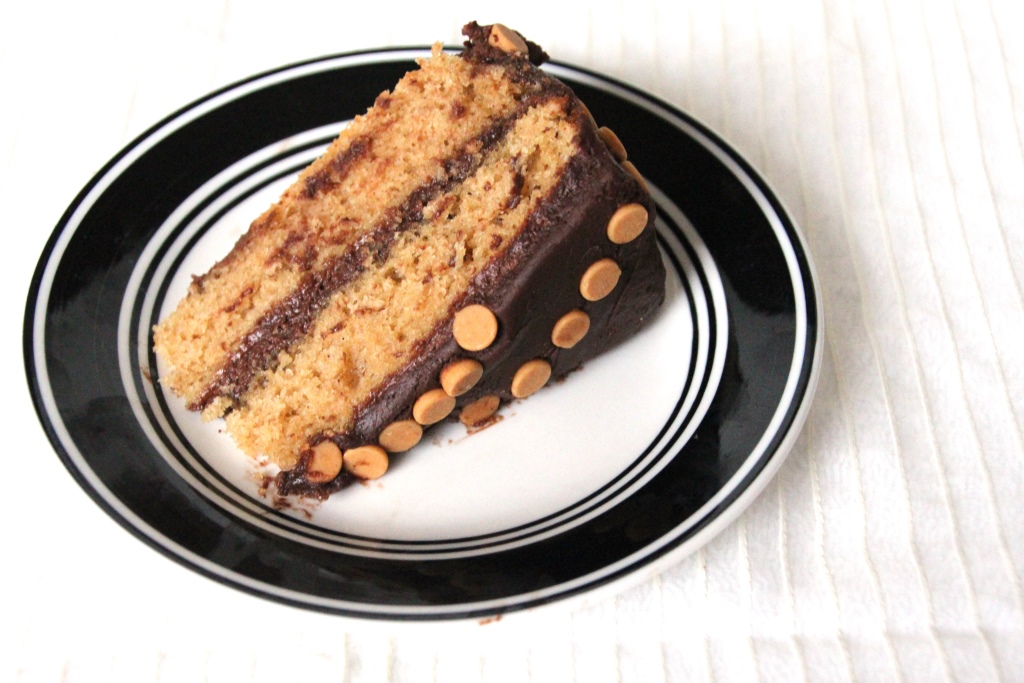
The cake is moist with a fabulous peanut butter flavor, and pairs beautifully with the chocolate buttercream. I opted for just frosting and no extra filling, but for an extra kick some chopped peanut butter cups would be fabulous between the layers.

Peanut Butter Layer Cake {{Baking Bytes}}

Peanut butter chips make a fun polka dot decoration that keeps with the peanut butter theme while being a contrasting color to the frosting. Bonus: they are super easy to decorate with.

Peanut Butter Layer Cake {{Baking Bytes}}

Below find The Daring Gourmet’s peanut butter cake recipe with my minimal changes, followed by a reprint of my chocolate buttercream. The original cake called for baking it all in one layer and cutting the cake in half, but since I don’t have a tall enough cake pan for that I opted to divide it before baking. I actually prefer this method because there’s no cutting involved, but both ways should work equally well.

Peanut Butter Layer Cake {{Baking Bytes}}

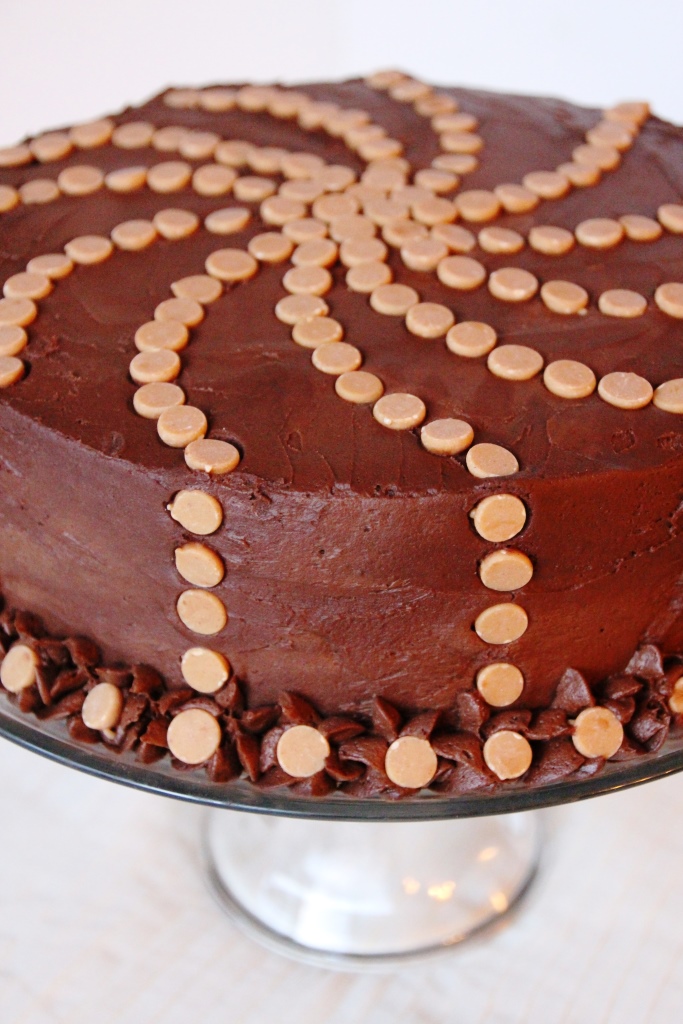
As for the frosting, I used about a tablespoon of dark cocoa and the rest regular to keep with a more traditional Reese’s pairing, but if you’re a dark chocolate kinda person, go ahead and use all dark cocoa. It will be amazing. For assembly, use your favorite method or head on over to my chocolate layer cake for my own method. Just ignore anything that mentions a filling and use peanut butter chips or another topping for some flair.

Peanut Butter Layer Cake {{Baking Bytes}}

So next time you have a peanut butter fanatic to please, this cake will definitely fit the bill. Just be sure to sneak a piece for yourself.

Peanut Butter Layer Cake

Borrowed from The Daring Gourmet
Serves 8-12

Ingredients

1/3 cup vegetable oil
1/3 cup (rounded) creamy peanut butter
1 cup brown sugar (loosely packed)

2 eggs
1 tsp vanilla extract

1 ½ cups flour
2 tsp baking powder
½ tsp baking soda
½ tsp salt

1 cup buttermilk

Directions

  1. Line the bottoms of two 8″ (or 9″) cake pans with parchment paper. Butter and flour the pans, especially the sides.
  2. Preheat oven to 350 degrees Fahrenheit.
  3. In a large mixing bowl (or with a stand mixer), beat the oil, peanut butter, and brown sugar on medium speed until combined and fluffy.
  4. Add the eggs and vanilla, and mix on low until just combined.
  5. In a separate bowl, whisk together dry ingredients.
  6. Starting with the dry mixture, alternately add it with the buttermilk, beat gently with each addition just until combined. Batter will be fairly thick.
  7. Divide batter evenly between prepared cake pans and bake for 18-22 minutes. A toothpick should come out moist but not wet.
  8. Cool cakes in the pan for a few minutes, then turn onto a cooling rack to cool completely (about one hour).
  9. Wrap each layer carefully in plastic wrap, and freeze for 1 hour or until ready to frost.

Peanut Butter Layer Cake {{Baking Bytes}}

Chocolate Buttercream Frosting

From Savory Sweet Life
Makes about 3 cups

Ingredients

1 cup unsalted butter, room temperature

3 ½ cups sifted powdered sugar
½ cup sifted cocoa powder3

½ tsp table salt
2 tsp vanilla extract

¼ cup tablespoons milk, half and half, or heavy cream

Directions

  1. Beat butter on medium speed until light and fluffy, about three minutes.
  2. Add sifted powdered sugar and cocoa, and mix on low (unless you want a blizzard) until combined.
  3. Add vanilla, salt, and milk or cream and beat for 3 minutes on medium speed.
  4. If necessary, thin with milk/cream (1 tablespoon at a time) or stiffen with powdered sugar to desired consistency.

Notes

1 This cake is pretty beginner friendly, just be careful not to over-bake it.
2 It keeps well on the counter for a few days, just be sure to cover it with plastic wrap. (Once the frosting has set it shouldn’t stick much.
3 I used part dark and part regular, but any combination of cocoa powders will do; just make sure it all adds up to a half cup.

White Chocolate Raspberry Cheesecake

I am not entirely sure how it could possibly be February already, but the sudden pinkification of everything in stores and on Pinterest means it must be true. Between work, training, and M finally returning home, January flew by at a rather alarming rate. Nonetheless, 2014 has started off pretty well so far and now that I’ve finally established my goals for the year I am pretty excited to start on them. I’m looking forward to a year of new recipes and new experiences.

White Chocolate Raspberry Cheesecake {{Baking Bytes}}

One of my biggest goals for the year is to run six half marathons; the first is on my birthday, March 15. The main goal of this first race was to keep me running all winter (so far a success) and give me a head start with training. Since I’m hoping for a sub-2:10 in September, I knew there was no way I’d get there if I started in June (as is my habit.) So far so good, but we’ll see where the year takes us.

On the flip side, I’m still baking up loads of sugary delight because that’s clearly going to help me get there. Ha. But be that as it may, this is the month of pink and red heart-shaped boxes of mostly terrible chocolates. Or in layman’s terms, Valentine’s Day. I’ve never been particularly fond of this holiday (shouldn’t you appreciate each other all the time?) but it happens to be the same day as my anniversary with M. (He is quick to point out this was coincidence and there is no “sappy love story” behind it. Silly kid.) This has drastically improved the “holiday” in my eyes, and each year I bake a cake to celebrate. Look for that post in a couple of weeks.

White Chocolate Raspberry Cheesecake {{Baking Bytes}}

In the mean time, here’s a fabulous recipe which would be delightful for any special occasion. Chocolate cookie crust, white chocolate, and a raspberry swirl come together in an amazing and smooth cheesecake sure to impress. Drizzle with chocolate sauce for extra presentation points.  It is very rich so just a small piece will do, but it keeps very well in the freezer if you don’t have eleven best friends to invite over.

White Chocolate Raspberry Cheesecake {{Baking Bytes}}

Fair warning, I’ve never managed to make this cheesecake without it cracking along the swirls, but it is beautiful and delicious just the same. If you’re looking to step it up a notch this year, and you have a spring-form pan1, this cheesecake is a fabulous option. Although a bit time-consuming, none of the steps are difficult as long as you pay attention. Bonus: it’s at least as delicious as it is pretty.

White Chocolate Raspberry Cheesecake

Adapted from CindyAnn
Makes 1 cheesecake

Ingredients

1 1/2 cups chocolate cookie crumbs (about 20 Oreos2)
1/4 cup butter, melted

10 oz frozen raspberries
2 Tbsp sugar
1 Tbsp cornstarch
1/2 cup water

2 cups white chocolate chips3
1/2 cup half and half
3 (8 oz) packages cream cheese, room temp
1/2 cup sugar
3 eggs
1 tsp vanilla extract

White Chocolate Raspberry Cheesecake {{Baking Bytes}}

Directions

  1. In a small bowl, mix together cookie crumbs and melted butter until completely combined.
  2. Pour mixture into the bottom of a 9″ or 10″ spring-form pan, pressing down evenly and thoroughly to form the crust. No need to press it up the sides.
  3. In a small saucepan, combine raspberries, sugar, cornstarch and water, and heat over medium-high until boiling. Continue boiling until sauce has thickened, about five minutes. Strain sauce to remove seeds.
  4. Preheat oven to 325 degrees Fahrenheit.
  5. Using a double boiler (or a metal bowl over simmering water), melt chocolate and half and half, stirring until smooth. Set aside.
  6. Meanwhile, beat the cream cheese and sugar on medium-high speed until smooth and fluffy, about three minutes.
  7. Add eggs one at a time, beating on medium until combined.
  8. Stir in vanilla and white chocolate mixture until mixture is very smooth. It will be somewhat runny.
  9. Carefully pour batter over the crust.
  10. Slowly pour raspberry sauce into batter in a spiral shape. Drag a knife or a toothpick through the mixture to create swirls.
  11. Bake 55-60 minutes for a 9″ pan, or 45-50 minutes for a 10″ pan. Filling should be set but still a little jiggly4.
  12. Turn off the oven and crack the door, leaving the cheesecake to cool in the oven for at least 30 minutes. Remove to counter to cool an additional 30 minutes.
  13. Cover pan with plastic wrap and refrigerate for at least 8 hours, or overnight.
  14. Carefully remove from pan, slice in 12 pieces, and serve to adoring guests5.
  15. If you have leftovers, they keep beautifully in the freezer6.

Notes

1 I love my glass-bottom, handled version M got me.
2 Store-brand chocolate sandwich cookies work just fine for cheesecake crusts. I like to pulse the crumbs in a blender a few times to get them extra fine.
3 I like to use Ghirardelli white chocolate chips for this recipe.
4 Cheesecakes are very easy to overbake. Check it at 5 minutes before the lower end of the range: if it still looks kind of like pudding, keep baking. It should look firm but jiggle as one when you tap the side of the pan with a wooden spoon.
5 To get clean slices, wipe off the knife between each slice with a hot, damp cloth. It is a giant pain but worth the effort.
6 If you decide to freeze it (which I highly recommend!), cut strips of parchment paper and gently press on both sides of each slice. Place the slices in a freezer safe container, cover the top with plastic wrap, and make sure the lid is tightly sealed. Defrost in the fridge if you have time, or in the microwave if you’re impatient like me. =)


Almond Roca

Happy holidays from Australia! I am busy enjoying sun, sand, and surf before I head back to winter for ski season. More updates when I get back. =) But even though though I’m on the opposite side of the world, I made sure to schedule this recipe to share with all of you. This is something my family (and many family friends) make for Christmas every year and I definitely wanted to share it. Although my family has reduced how much we make each year, we still make several batches to share and keep in the freezer. It is a Top Secret recipe that my mom shares with everyone.

Almonda Roca {Baking Bytes}

If you’ve never had homemade almond roca, you are seriously missing out. I encourage you to make some, pronto. I actually don’t like almonds that much and I can’t get enough of it. Sweet and crunchy, it is delightful straight out of the freezer, or at room temp (if you can wait that long.) It makes a beautiful “appetizer” to have out for parties and a fabulous gift. As a kid I always gave some to my teachers, and had several that said the bag never even made it home.

Almond Roca >> Baking Bytes

Although it’s a little time-consuming, and kind of messy, it’s an easy gift for teachers, neighbors, extended family, or just to have on hand in case you forgot someone. Even better, it keeps well in the freezer for a few months so you (or the recipient) can set it aside if there’s a sugar overload or more time-sensitive items to be eaten. Fair warning though, as easy as it is, it’s a bit easy to screw up too; make sure you read the notes at the bottom to help you be successful.

Almond Roca >> Baking Bytes

Buttery toffee, crunchy almonds, and sweet chocolate melt in your mouth in perfect harmony.

Almond Roca >> Baking Bytes

I dare you to eat just one.

Almond RocaAlmond Roca >> Baking Bytes

Makes 1 cookie sheet

Ingredients

2 cups almonds

1 pound good quality salted butter
1 cup sugar
2 T. water

1 (10 oz) package chocolate chips

Directions

  1. Coarsely chop 1 cup of the almonds; set aside.
  2. Finely chop the remaining cup of almonds; set aside.
  3. Line a cookie sheet or jelly roll pan with aluminum foil and lightly oil with vegetable or canola oil.
  4. In a small-medium, heavy, saucepan over medium-low heat, melt butter, sugar and water.
  5. Heat candy to 250 degrees on a candy thermometer, stirring often. It will look kind of marshmallowy. (That’s definitely a technical term.)
  6. Add in the cup of coarsely chopped almonds, and heat to 300 degrees, stirring constantly. (It should be very pale brown and thick but also oily looking.)
  7. Pour immediately onto prepared cookie sheet and spread out as thinly as possible without creating holes.
  8. Melt chocolate chips in microwave for one minute and stir. Repeat until chocolate is completely melted and stir until smooth.
  9. Thinly spread candy with chocolate and sprinkle with about half of the finely chopped nuts.
  10. Transfer entire cookie sheet to freezer for 45 minutes, or until candy is hard.
  11. Remove cookie sheet from freezer, flip over the candy (don’t worry about breaking it), and let it warm up for about 15 minutes.
  12. Melt the remaining chocolate, and repeat the coating on the back. It is easiest to do this is small sections as the chocolate hardens quickly.
  13. Return the cookie sheet to the freezer until chocolate is firm, break the candy into bite-sized pieces and store in resealable bags, or put some in a cellophane candy bag and pass out to adoring fans.

Almond Roca >> Baking Bytes

Notes

1 You must use good quality butter like Tillamook or Darigold; store brands produce inconsistent results and might fail completely. And make sure it’s salted butter!
2 My mom uses a large pullout cutting board. I like to use a lipped cookie sheet because it keeps it a little more contained. Just make sure you use something firm, mobile, and that will fit in your freezer (or outside, if it’s cold enough.) It’s also a good idea to lay down newspaper and/or a silicon trivet to protect your counter from the hot candy (and excess oil runoff if you’re not using something with a rim.)
3 It is best to use a long-handled wooden spoon for stirring, as it doesn’t get hot or damage the pan during your million hours (30 minutes) of stirring.
4 Make sure your candy thermometer gets deep into the mixture; if you use too large a pan you are likely to burn the candy because the thermometer isn’t registering the correct temperature. My best luck has been with a 4-quart Dutch oven.
5 I buy chocolate chips from Costco so I never actually measure how much I use, but I melt about a cup at a time. I like to spread it quite thin, but that’s definitely up to you. I always use semi-sweet (because I buy in bulk) but dark chocolate would be delicious too if you prefer.
6 Even if you’re making a lot of batches, don’t try to cook more than one at a time; it doesn’t seem to go very well. You’ll be much more successful using an assembly line, ideally with extra hands. Pour some eggnog and make it a family or friend activity.
7 If your batches are prone to separation, make sure your heat is not too high! Error on the side of lower, it will take longer but it’s less prone to separating. If the separation occurs when you add the almonds, try adding them in slowly instead of all at once.
8 If you can’t make it work, comment here or email me and I’ll do my best to help you get it right next time. =)

Mini Pumpkin Cheesecakes

Fair warning, I never tire of pumpkin. I’ve already made my 2nd pumpkin pie of the season and I’m sure there will be a 3rd involved at Thanksgiving. As pumpkin pie is equally good for breakfast as it is for dessert, I don’t mind having a whole one to myself and happily eat it for several days in a row. I greatly look forward to Operation: Eat Everything Pumpkin! (which takes place annually between October and December) and do my best to mix in some new recipes along with my old favorites. If you’re looking for a slightly less traditional pumpkin dessert to serve this Thanksgiving, look no further.

Mini Pumpkin Cheesecakes >> Baking Bytes

Traditional pumpkin and classic cheesecake come together in a wonderful dessert sure to please pumpkin lovers and cheesecakes fans alike. Even my boyfriend, who isn’t a huge fan of pumpkin, thinks these are pretty delicious. Smooth, creamy, and rich, it could very well become a new annual favorite. Even better, the mini size makes for ready to go individual servings and lets you enjoy the evening instead of attempting perfect slices with all eyes on you. These pop perfectly from the pan, and are excellent plain or with a swirl of whipped cream.

Mini Pumpkin Cheesecakes >> Baking Bytes

This recipe does require a specialty pan, of course, but if you have room in your cupboards you surely won’t regret the purchase. Mini cheesecakes are great for potlucks, large dinners, and dessert parties because they’re easy to transport, quick to serve, and require no utensils to eat (although I do prefer a fork, myself.) However, if all you have is a regular cheesecake pan, head over to the original recipe to see instructions for a standard 9″ cheesecake. I’ve not made the full version [yet], but I’m sure it’s equally amazing.

So whether you try some new recipes or stick with the tried and true favorites, have a wonderful Thanksgiving weekend. (Or a wonderful regular weekend, for my foreign readers.)

Mini Pumpkin CheesecakesMini Pumpkin Cheesecakes >> Baking Bytes

Adapted from Glorious Eats
Makes 12 mini cheesecakes

Ingredients

Crust
3/4 cup graham cracker crumbs1
1 Tbsp light brown sugar
1/4 tsp cinnamon
2 Tbsp butter, melted

Filling
8 oz cream cheese, at room temp
1/2 cup plus 1 Tbsp canned pumpkin puree
1 egg
2 Tbsp sour cream
1/2 cup white sugar
1/8 tsp ground nutmeg2
pinch of ground cloves

1 Tbsp flour
1/2 tsp vanilla extract

Directions

  1. Preheat oven  to 350 degrees Fahrenheit and lightly spray a mini cheesecake pan.
  2. Using a fork or pastry blender, mix the crust ingredients in a small bowl.
  3. Add a rounded tablespoon of the mix to each well in the pan, and press firmly to form a crust, sealing the edges well.3
  4. Using an electric mixer, beat the cream cheese until fluffy and smooth.
  5. Beat in pumpkin, eggs, sour cream, sugar and spices, then add flour and vanilla and beat until completely combined.
  6. Divide batter among the wells, about 3 Tbsp of filling atop each crust.
  7. Bake for 20 minutes, remove from oven, and cool 15 minutes on the counter.
  8. Cover lightly with plastic wrap and refrigerate 2 hours or until ready to eat.
  9. Top with whipped cream and a sprinkle of cinnamon, if desired, and serve to adoring fans.

Mini Pumpkin Cheesecakes >> Baking Bytes

Notes

About 6 graham crackers.
The original recipe calls for fresh, but dried works just fine.
A flat-bottomed shot glass works nicely for this, but use your fingers to make sure the edges are well sealed.
4 The cheesecakes keep well in the fridge for several days, or in the freezer for up to two months. They’re a great dessert to have on hand! Store in an airtight container.

Cinnamon Glazed Pumpkin Donuts {and Halloween}

Much like the rest of the 20-something white girl population, pumpkin is my favorite fall flavor. October is a highly anticipated month as I count the days towards what I officially call “Pumpkin Season.” Granted, this date is completely arbitrary, but since Bozeman summer generally extends well into September anyway, October 1st seemed a good choice.

IMG_1968Cinnamon Glazed Pumpkin Donuts >> Baking Bytes

Since I’ve already posted my favorite pumpkin bread, pumpkin pie, pumpkin cupcakes, and pumpkin milkshake, I sought a new recipe to share this year. A Pinterest post led me to these donuts, which I ever so slightly adapted to fit my preferences. A moist and pleasantly spiced pumpkin donut topped with a cinnamon glaze is the perfect start to a fall morning. As this is a baked donut recipe, it does require a donut pan, but I promise you won’t regret the purchase. My one complaint about my pan is that it only holds six donuts, when all recipes make twelve. (First world problems, haha.)

Cinnamon Glazed Pumpkin Donuts >> Baking Bytes

These would be a great way to kick off Halloween morning, sharing them with family, friends, or coworkers. Like many of you (I’m guessing), I already attended a Halloween party this past weekend, but maybe there’s a day-of party happening Thursday, or you just want to make something easy this fall. Whatever the occasion, these donuts are an easy way to bring the pumpkin flavor to breakfast.

Did you have a costume this year? I dressed up as Donatello (the Ninja Turtle, not the Renaissance artist), using a costume my mom made my older brother when he was five. That makes this costume almost as old as me, but still amazingly awesome.

I hope you hum the theme song for the rest of the day.

Heroes in a half shell – Turtle Power!

Cinnamon Glazed Pumpkin Donuts

Barely adapted from Taste and Tell
Makes 12 donuts

Ingredients

2 cups all-purpose flour
1 1/2 tsp baking powder
1/4 tsp baking soda
1/2 tsp salt
1 1/2 tsp cinnamon
1/2 tsp nutmeg
1/4 tsp ginger

1/2 cup brown sugar (not packed)
1/4 cup butter, room temperature
1 cup pumpkin puree
2 eggs

1 tsp vanilla
2 Tbsp milk

1 1/2 cups powdered sugar
1/2 tsp vanilla extract
1/2 tsp cinnamon
2 Tbsp milk

Directions

  1. Preheat your oven to 350 degrees Fahrenheit. Butter a donut pan and set aside.
  2. In a small bowl, whisk together flour, baking powder, baking soda, salt, cinnamon, nutmeg, and ginger.
  3. Using an electric mixer on medium speed, beat together brown sugar, butter, and pumpkin until thoroughly combined.
  4. Add eggs, mixing well, and then stir in milk and vanilla until completely incorporated.
  5. Stir in the dry ingredients, mixing until just combined.
  6. Spoon batter into a large Ziploc or pastry bag, cut off the tip, and pipe into the buttered donut wells.
  7. Bake for 10 minutes, or until a toothpick comes out clean. Cool in the pan five minutes, then remove to a wire rack to cool completely.
  8. For the glaze, whisk together the remaining ingredients in a small bowl.
  9. Dip cooled donuts in the glaze and return to the wire rack to set.
  10. Enjoy with a glass of milk or a mug of coffee, and a few friends to help you eat them.

IMG_2029Cinnamon Glazed Pumpkin Donuts >> Baking Bytes

Notes

1 These taste great made a day in advance, but the glaze tends to soak into the donut. If you can, glaze them on the day you intend to serve them so they’ll stay nice and pretty.