Raspberry Cream Cheese Stuffed French Toast

Most of the time I start my days with a bowl of cinnamon-raisin oatmeal or a plate of veggie scrambled eggs. Particularly when M is out of town, I rarely put in the effort to treat myself to pancakes or similar, although I do occasionally have Belgian waffles for dinner. (Waffles are suitable for every meal, and also dessert.)

Stuffed French Toast {{Baking Bytes}}

However, after an incredibly windy 10-mile run last Saturday, I decided to treat myself to something I hadn’t made in a long time: stuffed French toast. French toast is actually one of my favorite breakfasts but I rarely make it for no real reason other than I enjoy having leftover waffle batter for the next few days. Nonetheless, with some delightful potato buttermilk bread sitting on the counter and a dollop of cream cheese in the fridge, it seemed the perfect day for a more decadent confection.

Stuffed French Toast {{Baking Bytes}}

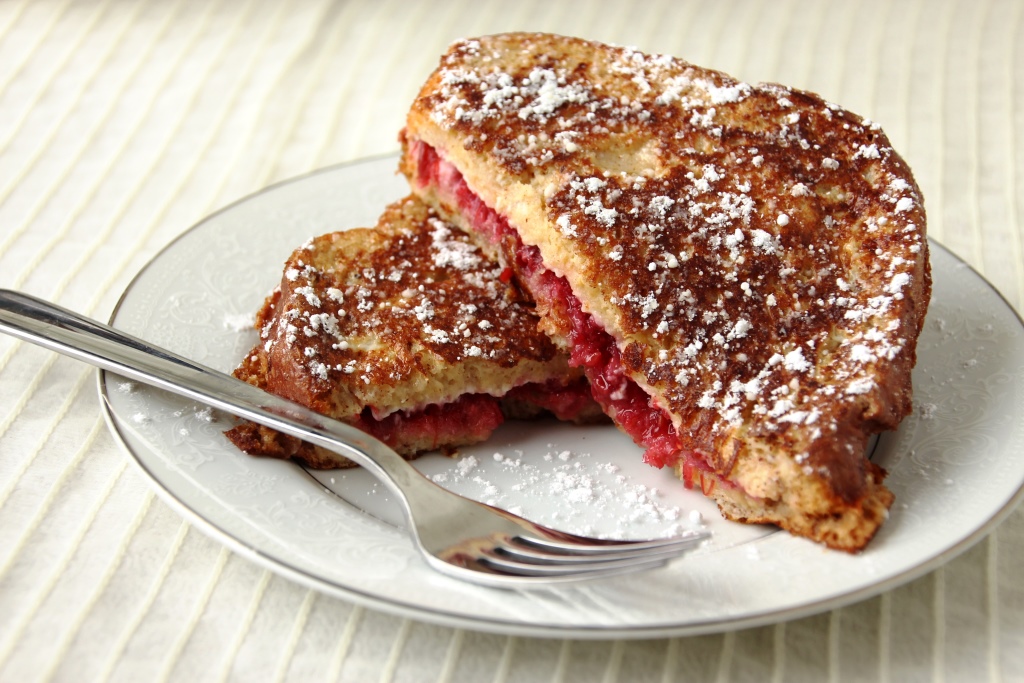
With melty cream cheese and my favorite jam in every bite, a thin spread of butter and a dusting of powdered sugar is all that’s needed to top this delightful creation. Even better, it’s no more difficult than regular French toast since basically you are just making cream cheese and jam sandwiches for your first step. It’s important to make sure your bread gets good and soaked with the egg mixture to ensure it results in a soft but golden brown bread to wrap those sweet insides.

Stuffed French Toast {{Baking Bytes}}

Fry on medium-low to make sure the cream cheese and jam gets nice and warm before the outside is overdone. The extra minutes of cooking is well worth the finished experience, I promise. If you’re looking for an extra rich option, top with a drizzle of maple syrup or homemade whipped cream, but just a little butter and powdered sugar is definitely my favorite.

Stuffed French Toast {{Baking Bytes}}

This is a great option for Sunday brunch (or Tuesday brunch, or any brunch, or dinner, I don’t judge), and sure to please your Valentine. Don’t have a Valentine? Be your own Valentine and please yourself with an amazing breakfast. Your morning cup of coffee is a perfect addition; a side of bacon and/or eggs balances the sweet with some salty protein.

Stuffed French Toast {{Baking Bytes}}

I’ve printed the recipe as a serving for one so you can make it as is or easily scale it up as needed to feed the whole family. It’s best hot off the griddle but if you’re cooking for more people than fits in one batch, you should be able to keep them warm in the oven so you can all eat together.

Whip up a batch of stuffed French toast this weekend for a special treat, then enlist those recipients to clean up your kitchen. It’s really the least they can do.

Raspberry Cream Cheese Stuffed French Toast

Makes 1 serving

Ingredients per serving

2 slices bread (I like to use buttermilk)
1-2 Tbsp cream cheese, softened1
1-2 Tbsp Raspberry Rhubarb jam1

1 egg
2 Tbsp milk
1/4 tsp vanilla
1/4 tsp cinnamon

Directions

  1. Heat griddle or frying pan over medium heat and spray with non-stick cooking spray.
  2. Spread cream cheese on one slice of bread, and jam on the other. Place cream cheese slice (spread sides together) on the jam slice to form a sandwich.
  3. In a shallow bowl large enough to fit your bread, whisk together remaining ingredients until well blended.
  4. Place your bread into the egg mixture for 1-2 minutes each side, until bread looks soaked through. (If you’re just making one serving, it should soak up almost all the liquid.)
  5. Fry until golden brown, 2-4 minutes per side. (I like to put a lid on the frying pan to help keep the heat in, but it’s not strictly necessary.)
  6. Serve immediately topped with butter and powdered sugar, or a drizzle of maple syrup for an extra decadent treat.

Notes

You can use basically any jam or sauce, this one is just my favorite. As for the amounts, I like two tablespoons of each for a decadent filling, but you can certainly use less if you prefer a less rich breakfast. If your cream cheese is hard to spread, soften it in the microwave in ten-second intervals. It’s going to be heated anyway so if you slightly over-melt it that’s no big deal.

Easy Cinnamon Roll Wreath

Hello and Happy Holidays friends! Hope you’re having an appropriately white or warm season depending on your location. I am visiting my family in Alaska for the holidays and it’s been pleasantly snowy here – quite the change from last year’s raining nonsense. Apologies for the late post, time at home always seems to go by much more quickly than real life.

In any case, this morning I have another easy pastry recipe to share. The overwhelming popularity of my Cream Cheese Danishes led me to try another style. A few months ago I saw a braided Nutella bread that looked beautiful. As you may now be aware, I am not a fan of Nutella but I really loved the idea of a twisted bread with a contrasting filling. Filing it away for future reference, several months passed before I took up the project.

Easy Cinnamon Roll Wreath {{Baking Bytes}}

I love cinnamon rolls any time of year but for some reason I always crave them even more around Christmas. The homemade version is quite a bit of work which makes them extra special (and extra tasty) so we don’t make them very often, except sometimes for Thanksgiving or Christmas breakfast. Pillsbury makes actual cinnamon rolls, of course, which are surprisingly good, but feel somewhat commonplace as far as excitement goes.

Easy Cinnamon Roll Wreath {{Baking Bytes}}

The idea for twisted bread returned to me and twisted cinnamon rolls were born. Using an easy cinnamon sugar filling and the pre-made dough makes for a super quick breakfast or pretty dessert without the hassle and tediousness of dealing with yeast and rising times. Small enough for the family or simple enough to make several for the office, these are a pretty way to switch up the traditional and delicious flavors of a cinnamon roll.

Easy Cinnamon Roll Wreath {{Baking Bytes}}

Sure to please both the kids and the coworkers, this is a great holiday option for all the busy people out there.

Easy Cinnamon Roll Wreath

Makes 8 small servings

Ingredients

1 package Pillsbury Crescent Rolls1

2 Tbsp butter, softened
1/4 cup brown sugar
1 1/2 tsp ground cinnamon

2 oz cream cheese, softened
2 Tbsp butter, softened
3/4 cup powdered sugar
1/4 tsp vanilla
1-3 Tbsp milk (optional)

Directions

  1. Preheat oven to 375 degrees Fahrenheit. Line a baking sheet with a silicon baking mat or parchment paper.
  2. On an extra sheet of parchment paper, unroll the dough and pinch the seams together. Put face down on the prepared baking sheet and then gently peel off the parchment paper. Pinch the seams together from this side also.
  3. Spread 2 Tbsp butter over the dough.
  4. Mix together brown sugar and cinnamon until well mixed, then sprinkle evenly over the dough, leaving about 1/2 inch clear on one long end.
  5. From the other long end, gently roll up the dough and then pinch closed.
  6. Carefully cut down longwise down the center of the rolled dough (a plastic pizza cutter works great, and won’t damage your silicon mats or your baking sheet). Gently turn the cut side facing up.
  7. Carefully lift one side and place it over the other dough strip, repeating on the same side to form a twist. Gently move into a circle and pinch the ends together.
  8. Bake for about 18 minutes. It should be browned on the top and not doughy in the middle.
  9. Meanwhile, prepare the frosting: beat together cream cheese and 2 Tbsp butter until fluffy, then beat in powdered sugar and vanilla. Stir in milk 1 tablespoon at a time until it reaches your desired consistency – less milk for spreading, more milk for drizzling.
  10. Let the cinnamon roll cool for a couple of minutes, then transfer to your serving plate and spread/drizzle with the frosting. (You will likely have frosting left over, so feel free to halve the recipe if you don’t like lots of it.)
  11. Serve immediately with coffee for a lovely snack, or eggs and fruit for a more well-rounded breakfast.

Notes

Any of the styles should work, although they may all bake up slightly differently, so watch carefully and adjust the baking time accordingly. For example, the “big and flaky” version would probably need a couple more minutes in the oven.

Grandma’s Chocolate Fudge

Grandma's Chocolate Fudge {{Baking Bytes}}

As we carry on through December, I imagine many people are working on finding holiday gifts. Food is a great gift, especially for people you don’t know very well or just want to give a small token of appreciation (teachers, coworkers, etc). My mom and I often prepared small bags of almond roca or other goodies for my teachers all through middle school, and she still prepares platters of almond roca, spritz, clothespin cookies, or other treats for family friends and business associates.

Grandma's Chocolate Fudge {{Baking Bytes}}

My grandma always made this fudge every Christmas, although she also always put walnuts in it. Delicious chocolatey fudge surrounding silly crunchy walnuts. Clearly I don’t care for nuts in fudge (or really much of anything besides almond roca) and so I have omitted them from this recipe. Feel free to add them back in if that’s your style.

Grandma's Chocolate Fudge {{Baking Bytes}}

Fudge seems to go over well with most people and so is routinely included in our line-up. This recipe is based off my grandmother’s recipe, as is probably obvious by the name. It has taken a little bit of research to get it right as the her recipe specified two packages of this and a package of that, and the size of “packages” have changed quite drastically over the last few decades. Nonetheless, we prevailed and have come up with the one below.

Grandma's Chocolate Fudge {{Baking Bytes}}

Last year we hand-stirred the recipe, as is tradition, and not only was it an immense amount of work but we had to enlist my dad to finish the job. We have changed the proportions a bit so it might be manageable for one of less than Herculean arm strength, but in spite of that I still opted to use my stand mixer. It worked beautifully and is much, much less effort to get that velvety chocolate experience you’re looking for. But if you’re looking for a workout while you make piles of decadent treats this season, feel free to stir by hand.

Grandma's Chocolate Fudge {{Baking Bytes}}

Grandma also used margarine instead of butter, I imagine largely because it was cheaper. I’ve made it both ways and honestly I can’t much tell the difference with regards to flavor, but the batch made with margarine turned out a decent amount softer. I imagine this is mostly because margarine has a lower melting temperature, but beating in an extra couple minutes could help too. I personally don’t like a sticky fudge so I put that batch in the freezer, which makes it perfect in my mind. Choose your own adventure here, or just use whatever you have on hand – it’ll be delicious regardless.

Grandma’s Chocolate Fudge

Adapted from my grandmother’s recipe
Makes a lot

Ingredients

2 cups chocolate chips
2 sticks (1 cup total) salted butter, each cut into fourths
20 large marshmallows
2 T vanilla

4 cups sugar
12 oz can evaporated milk

Directions

  1. Line a baking dish or lipped cookie sheet with aluminum foil. Set aside.2
  2. In the bowl of a stand mixer, add chocolate chips, margarine or butter, marshmallows, and vanilla1. Set aside. You must do this before boiling the milk otherwise it’ll cool down too much and won’t mix completely.
  3. In a medium-large saucepan, whisk together sugar and evaporated milk (make sure you have a fair amount of extra space, it’ll grow).
  4. Over medium-high heat, bring milk mixture to full rolling boil, stirring often.
  5. Continue to boil for 6 minutes (I recommend setting a timer), stirring constantly.
  6. Add hot milk mixture to remaining ingredients (don’t scrape the pot too vigorously or you will end up with sugar crystals in your fudge), and beat on low with the normal beater attachment (or by hand) for at least 5 minutes (again, set a timer), until marshmallows are completely dissolved. Scrape sides every minute or two during this time to ensure an even mix.
  7. Pour into foil-lined pan, smooth out the top, and let cool completely. An unheated garage or porch if you don’t have fridge space is great for speeding up this process.
  8. Remove from foil and cut into cubes. I suggest moving it to a cutting board or you will have many small squares of foil to peel off later.
  9. Package as desired and give as much of it away as possible so you don’t eat it all.

Notes

If you like, you can add up to two cups chopped nuts or hard candy. Personally I do not like uneven texture in fudge or baked goods, but it’s certainly an option if you’re into it.

I like to use a cookie sheet so the fudge is a little thinner, but either will work. It may not fill a whole sheet so line it with foil and make a new edge about halfway, making sure you have extra foil sticking up. After you pour it in and start to spread it, you can adjust the edge to hold more or less fudge as necessary to keep it the right thickness.

Eggnog Ice Cream

Welcome to December! Hope everyone had a wonderful Thanksgiving; I certainly enjoyed my four days of freedom. Lots of baking and craft projects, running and hiking, and maybe a couple of chores off the never-ending list.

Eggnog Ice Cream {{Baking Bytes}}

I decided to start off the month with a delightfully seasonal item: eggnog ice cream. I actually “invented” this recipe last year but never got a chance to post it, so I’m sharing it with you now. It tastes exactly as you’d expect, like extra thick and creamy eggnog. Even by ice cream recipe standards it’s a super easy one with a super delicious outcome.

Eggnog Ice Cream {{Baking Bytes}}

Smooth texture and the eggnog flavor we all know and love (I’m assuming, otherwise you’d probably have stopped reading by now) join together in a slightly non-traditional dessert for the cold months. Personally I eat ice cream all year round, so if you’re like me this is a fantastic option to get your eggnog fix.

Eggnog Ice Cream {{Baking Bytes}}

If you’re a fan of alcoholic eggnog (I’m not, but to each their own) this recipe can easily incorporate that preference by adding a little White Christmas liqueur (or whatever you like) to the mix. Top with freshly grated nutmeg (or a sprinkle of the ground stuff) for a little extra flair.

Eggnog Ice Cream {{Baking Bytes}}

Eggnog Ice Cream
Makes about 1.5 quarts

Ingredients

2 cups full-fat eggnog (it’s the holidays, live it up!)
1 cup heavy cream
1/2 cup sugar
1/2 tsp nutmeg
1-2 oz White Christmas liqueur (optional)

Directions

  1. Whisk together all ingredients until completely combined; refrigerate overnight.
  2. Place a glass, lidded bowl in the freezer.
  3. Freeze eggnog mixture according to your ice cream maker’s directions.
  4. Pour directly into chilled bowl, then return to freezer to chill at least another 4 hours, or overnight.
  5. Serve with a dash of freshly grated nutmeg, if desired.

Pumpkin Pie Jack-o-lanterns

Fall actually hit Montana while I was gone so I woke up to frost this morning for my bike ride to work. It was glorious. I just returned from my whirlwind half marathon tour yesterday so I am pretty tired, but very glad to be home. Three great races and lots of fun seeing new places and old faces in all four Lower 48 timezones. This week I have a bonus post for you! I actually thought of this idea last year, but never got around to implementing it, so I decided I should definitely get it done this year.

Pumpkin Jack-o-lantern Mini Pies {{Baking Bytes}}

Pumpkin pie is one of my favorite pies and I will happily eat it all year round. Unfortunately M doesn’t super care for it so mostly I just make it in the fall when I don’t mind having it for breakfast all week (yum). It’s a traditional dessert this time of year, which can be boring (according to some) so I thought I’d try giving it a new package.

Pumpkin Jack-o-lantern Mini Pies {{Baking Bytes}}

I used my normal pie crust recipe and pie filling recipe, and then used mason jar rings to form little pies. The jack-o-lantern faces make them great for Halloween but with a different decoration (like the leaf cutouts below) they’d be great for any fall potluck. They are way easier to serve and eat which makes them great for when you aren’t having a sit down dinner. They do have a high crust to filling ratio, so make sure you use a crust recipe that you like; I have mine linked below if you don’t already have a favorite.

Pumpkin Jack-o-lantern Mini Pies {{Baking Bytes}}

They are a little time consuming, especially if you cut out faces, but not difficult and I’d say pretty beginner friendly. I got 9 out of my recipe but that could vary based on how thin you roll your crust and how many times you are able to reuse the scraps. (I wouldn’t recommend more than once or twice as the dough gets very tough the more you handle it. Tip: you can drip a little extra water to help the scraps stick together again to re-roll.)

Pumpkin Jack-o-lantern Mini Pies {{Baking Bytes}}

Your usual pumpkin filling, yummy pie crust, and a dusting of cinnamon sugar makes a great treat that’s easy to portion control and is a wonderful whipped cream vessel. The cuteness is an added perk. =)

If you need a dessert for your Halloween parties this weekend, give these a try.

Pumpkin Pie Jack-o-lanterns

Makes about 8 double-crust handpies

Ingredients

Pastry for double-crust pie

1/3 cup sugar
1/2 tsp ground cinnamon
1/4 tsp salt
pinch ground cloves

1 egg
1 cup pumpkin puree
1/4 cup heavy whipping cream

cinnamon & sugar mixture (optional)

Other Supplies

8+ wide-mouth jar rings
1 small-mouth jar ring with lid
1/4 cup of water or one egg white

Directions

  1. Line a cookie sheet with a silicon mat or parchment paper. Preheat your oven to 350 degrees Fahrenheit (or wait a bit since some of these steps can be time-consuming.)
  2. Whisk together sugar, spices, and salt in a medium bowl.
  3. Stir in egg, pumpkin, and whipping cream until combined. Set aside.
  4. Take half of your crust pastry and roll it out slightly thinner than you normally would. Use a 4″ biscuit cutter to cut out as many rounds as possible. Repeat with remaining pastry.
  5. For jack-o-lanterns, cut faces into half of the unbaked pie crust circles. (Totally optional, of course.)
  6. Place appropriate number of wide-mouth jar rings (not lids!) upside-down on your prepared baking sheet and spray with cooking spray. Set aside. (Preheat your oven to 350 degrees Fahrenheit if you haven’t already.)
  7. Using the small jar ring with lid inside, gently place one pie crust circle on top of it (yes it will hang over the sides, that’s important.)
  8. Carefully spoon about 3 tablespoons of the pumpkin mixture into the center of the pie crust, such that it is contained by the jar lid ring.
  9. Brush the circumference of the circle with water or egg white, and top with one of your jack-o-lantern faces, pressing the edges together to seal completely.
  10. Gently remove the sealed pie from the small ring/lid and transfer to one of the wide-mouth rings such that it is centered and the edges are supported by the ring. Your pumpkin may overflow a little, but with practice you’ll get better.
  11. Repeat steps 7-11 with remaining pastry and pumpkin mixture. If you have a decent amount of pumpkin mixture remaining, pour it into a (sprayed) ramekin or small glass baking dish and bake the same as the pies.
  12. If desired, sprinkle cinnamon & sugar mixture over the pies (I do this with pretty much all my pies), then bake for 30-40 minutes, or until a small knife inserted into the pumpkin mixture comes out clean.
  13. Let cool completely, then serve with whipped cream.