Chocolate Ice Cream

Even though it’s just the two of us, making ice cream is a weekly occurrence. I have the recipe to our favorite French vanilla memorized so it takes no time at all to mix up, but after week after week of vanilla, I decided we needed another staple. I set my sites on a strong chocolate flavor without resulting in a hard or grainy ice cream. Three iterations later, it turns out that the easiest change is also the best one. I learned a lot about how changing ingredients affects the end result, and I’m excited to try new flavors throughout the summer.

Chocolate Ice Cream

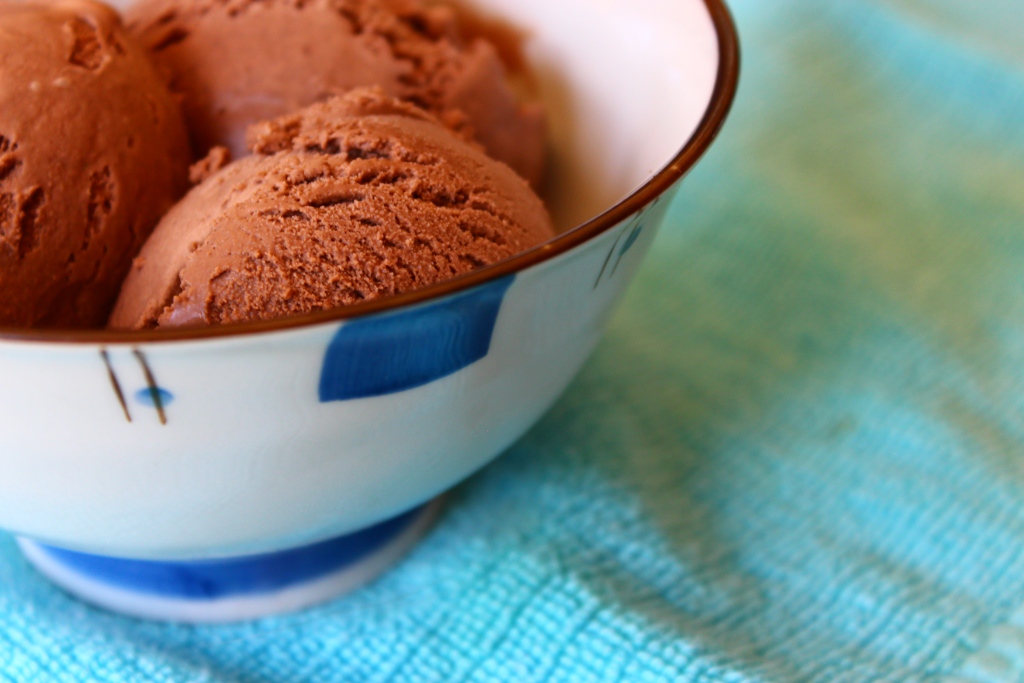
This ice cream is perfectly chocolatey, smooth and doesn’t freeze too hard (at least not in my freezer.) Observant readers might notice this is exactly the same as my French vanilla ice cream recipe, with the addition of cocoa powder. A bit more time-consuming than the standard vanilla, but worth the extra few minutes for a decadent treat.
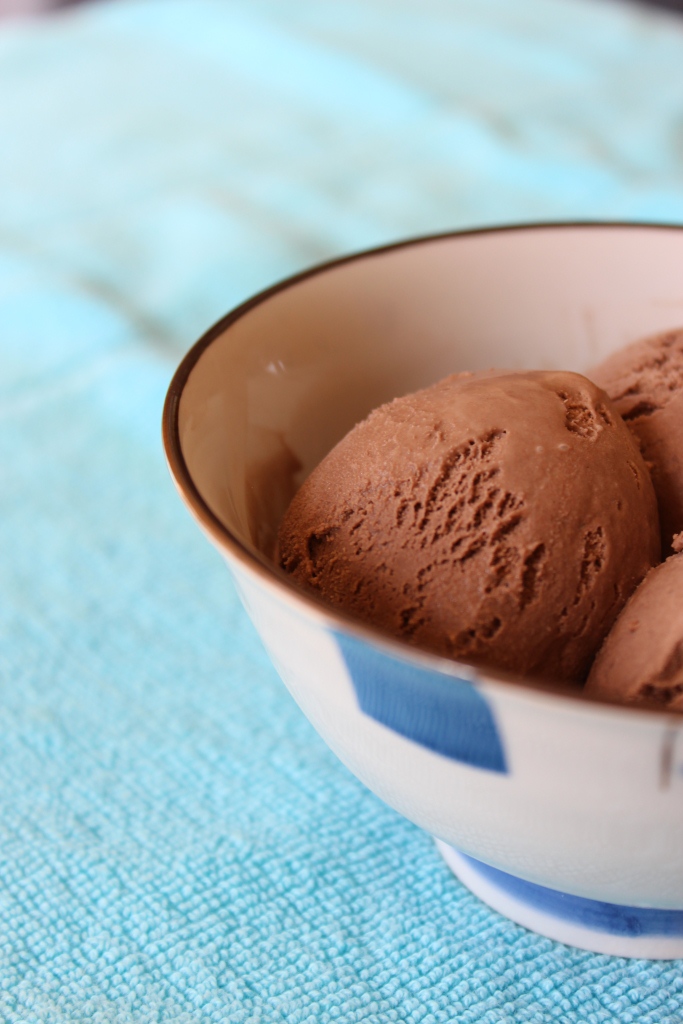
Chocolate Ice cream 2

Chocolate Ice Cream

Makes approximately 6 cups

Ingredients

1 cup half and half
2 cups heavy cream
1/2 cup egg substitute
1 cup white sugar
1/3 cup unsweetened cocoa powder
2 tsp vanilla

Directions

  1. Blend all ingredients in a blender or food processor until smooth.
  2. Cool mixture in the fridge until completely chilled, or over night.
  3. Freeze according to your ice cream maker’s directions.
  4. Enjoy alone or with your favorite toppings; I like a generous squirt of whipped cream.

Chocolate Ice Cream 3

Notes

  • I like to use about half of each regular and dark cocoa powder, leaning more towards dark, but any combination will do.
  • For chilling the ice cream, I like a 2-quart glass batter bowl. Plenty of room for whisking and a spout for pouring into the ice cream maker. Mine is from Anchor.
  • Place your freezer-safe storage bowl in the freezer (no lid!) while the ice cream is churning so the ice cream doesn’t melt along the edges when you pour it in.
  • For freezer storage, these glass, lidded, 7-cup round bowls by Pyrex are the perfect size for a 6-cup recipe. (Plus they’re stackable!)

Pumpkin Mudslide Milkshake

On this last weekend in November, before eggnog season (December 1 for me) officially starts, you may find yourself wanting a sweet treat in which to indulge. Perhaps, like me, you had that last bit of extra pumpkin to use up, and not quite all of the ice cream has been eaten.

The Cupcake Project designated this to be a Halloween drink, with which I fully agree, but I also think it makes an excellent post-Thanksgiving indulgence for that awkward weekend between cider and eggnog. (Or maybe I just over think the seasons too much…)

My version, inspired by CP, is tailored to my own personal preferences for an alcoholic milkshake, with a less boozy taste. Feel free to customize the alcoholic proportions to fit your own individual tastes. Due to the alcohol, these milkshakes are not particularly thick, but taste delicious. The recipe below is for one serving, so multiply as necessary to fit your needs.

Alcohol not your style? Too early in the day for vodka? Want to make a virgin adaptation for your kids? No problem! Simply substitute 2-3 oz milk for the liquor and you’re good to go. As a plus, this will result in a thicker milkshake.

And don’t worry, this should be my last pumpkin recipe for a while.

Pumpkin Mudslide Milkshake

Inspired by the Cupcake Project
Makes 1 milkshake

Ingredients

1/2 oz. whipped cream vodka (I use Pinnacle Whipped)
1/2 oz. Kahlúa
1/2 oz. Irish cream liqueur
1/3 cup pumpkin puree
1 dash* ground cinnamon
1 pinch* ground ginger
1 smidgeon* ground cloves
3 scoops vanilla ice cream
Chocolate sauce, to taste
Whipped cream, to taste

* I have this fun set of measuring spoons my mom got me for these measurements. If you don’t (honestly they’re pretty silly, but fun) just give a small shake of each from your spice jar. Just aim for more cinnamon than ginger, more ginger than cloves, and not very much of each. Having precise measurements is not really important.

Directions

  1. Swirl chocolate sauce on the inside of your glass; set aside.
  2. Place liquor, pumpkin and spices in a blender, and pulse a few times to smooth out the pumpkin.
  3. Add ice cream and blend until smooth. Pour into prepared glasses and top with whipped cream. Some mini chocolate chips would also add a nice touch to the top. (I just didn’t have any on hand.)

Notes: Serving these at a party and concerned about the chocolate blurring into the milkshake? Place your glass in the freezer for about 15 minutes, swirl the chocolate, and return to the freezer for 30 minutes. Even better: use Magic Shell chocolate sauce (or similar product.)

French Vanilla Ice Cream

Even more than cookies, I love ice cream. Pretty much any flavor is delicious assuming it doesn’t have nuts in it (or isn’t completely disgusting, like bubblegum.) The flavor I make most often, however, is vanilla because it goes with pie, or is good with toppings or simply plain. It’s also incredibly fast to make (excluding chilling time) since there are only five ingredients and no mix-ins.

This recipe is from the book that came with my ice cream maker. After my mom got the Kitchen-Aid attachment, she and my dad cleaned and fixed her previous ice cream maker and sent it to me. Best Easter present ever.

This particular recipe has been made so often that the book naturally falls open to its page. Notes are penciled in and the pages are slightly wrinkled from use.

I always use Egg Beaters in lieu of actual eggs because they have been pasteurized and don’t require cooking. This far lessens the work involved in making ice cream and so far I haven’t had any trouble substituting it for real eggs in any recipe.

Below is the recipe I follow for French vanilla ice cream. It never lasts long in my family, and I doubt it will in yours either.

French Vanilla Ice Cream

Adapted from Scoop Factory
Makes approximately 1 quart

Ingredients

2 cups heavy cream
1 cup half & half or milk
1 cup sugar
2 tsp. vanilla
1/2 cup egg substitute, such as Egg Beaters

Directions

  1. Thoroughly whisk all ingredients in a large glass bowl with a lid.
  2. Cover and chill in refrigerator for at least 3 hours, or overnight.
  3. Freeze according to your ice cream maker instructions. While the ice cream is churning in the machine, place the bowl in the freezer.
  4. Transfer ice cream back into the bowl and freeze until ready to serve.

Notes: Half & half or milk both work fine, but half & half will result in a slightly creamier texture. I find ice cream needs at least 2 hours in the freezer before it is hard enough, but that’s totally up to you. Also, my favorite container to use for making ice cream is my 8-cup batter bowl by Anchor. (I believe Pyrex makes a similar one.) The spout makes it easy to pour into the ice cream machine and the lid is handy for freezer storage.

Flourless Chocolate Cookies

Cookies are one of my favorite things to bake. Unless your oven bakes 100 degrees too hot (not that I’m speaking from experience or anything…) they are pretty easy and generally turn out well. They are great for snacks, lunches, dessert, breakfast, lunch, dinner… maybe I like cookies too much…

But be that as it may be, I would be very sad if I couldn’t have cookies anymore. So when my friend found out she has a wheat allergy, I decided to try out some recipes for gluten-free cookies. I perused several recipes but when I came across the gorgeous pictures at Kumquat, I knew it was the recipe for me.

Despite having a mere half dozen ingredients, these cookies are actually quite delicious. Not a substitute for my favorite chocolate cookie recipe, but a new one to enjoy. They are extremely chocolatey with a crunchy outside and a chewy inside. Although their texture is a little different, their taste more than makes up for it.

When I made these, I was hesitant to add more sugar (3 cups already seemed like a lot) but don’t be afraid. If the batter spreads too much go ahead and dump some more in there. Trust me, it’s necessary.

This is too runny.

It will look more like brownie batter than cookie dough in the bowl, but that’s okay. Just make sure it’s nice and thick.

Flourless Chocolate Cookies

From Kumquat
Makes approximately 2 dozen cookies

Ingredients

3 cups powdered sugar
2/3 cup cocoa powder (I like dark chocolate)
1/4 teaspoon salt
1 1/4 cups semi-sweet chocolate chips
4 large egg whites
2 teaspoons vanilla

Directions

  1. Preheat oven to 350°F and line baking sheets with parchment paper.
  2. Combine powdered sugar, cocoa powder, salt, and chocolate chips in a medium bowl. Add egg whites and vanilla; stir until well-combined. (Batter should be about the consistency of school glue… not too runny. if it’s runny, add more powdered sugar to achieve correct consistency.)
  3. Spoon batter onto parchment-lined baking sheets in mounds of 1-2 tablespoons. (Mine spread a lot so I was never able to fit more than 6 per sheet.)
  4. Bake for 12-14 minutes or until tops are cracked and glossy, and edges look done. Cool slightly on pan, then peel carefully off parchment and cool completely on wire rack.

Note: I was baking at a friend’s place (my oven was broken) so I ended up using aluminum foil. This worked well enough, but I’m sure parchment paper would be a lot better. If you do use foil, I recommend spraying it very lightly with cooking spray.

Pumpkin Ginger Cupcakes

Although they are not my greatest strength, I really enjoy making cupcakes. Or more accurately, I enjoy frosting cupcakes. Also sprinkles – they’re just so fun!

You may recognize this recipe from my blog header. These cupcakes are really easy, delicious, and one of the few recipes I didn’t have to modify for baking at 4500 feet. The addition of ginger is a nice distinction to a normal pumpkin cupcake, and the cinnamon frosting blends perfectly.

Just look how perfectly they rise.

I got this recipe from my friend Amanda, and it’s already become one of my favorites. I’m sure I’ll be making these every year. I decided to use the spider-web design from the recipe for half, and the fall leaf sprinkles I had for the other half. Unless you are an incredibly generous with frosting, you can probably cut the frosting recipe in half.

Spider-web Pumpkin Ginger Cupcakes

From the kitchen of Amanda
Makes 12-18 cupcakes

Ingredients

1 1/2 cups unbleached all-purpose flour
3/4 teaspoon baking powder
3/4 teaspoon baking soda
1/4 teaspoon salt
1 teaspoon ground cinnamon
1 teaspoon ground ginger
1/2 cup (1 stick) unsalted butter, melted and slightly cooled
1 cup sugar
1 cup canned pumpkin (not pumpkin pie filling)
3 large eggs
1/4 cup (about 1 1/4 ounces) crystallized ginger cut into 1/8- to 1/4-inch pieces (unless you really like chunks of candied ginger, make sure these pieces are small)

Directions

  1. Position rack in the middle of the oven and preheat the oven to 325°F. Line muffin tin cups with paper liner.
  2. Sift the flour, baking powder, baking soda, salt, cinnamon, and ginger into a medium bowl and set aside. In a large bowl, using an electric mixer on low-medium speed, beat the melted butter, sugar and pumpkin until smoothly blended.
  3. Mix in the eggs and crystallized ginger. On low speed, mix in the flour mixture until it is incorporated. The batter will be thick.
  4. Fill each paper liner with a generous 1/4 cup of batter, to about 1/2 inch below the top of the liner. Bake just until the tops feel firm and a toothpick inserted in the center comes out clean, about 20-25 minutes. Cool the cupcakes for at least 10 minutes in the pan on a wire rack, then remove and cool completely.

Cinnamon Cream Cheese Frosting

Ingredients

1/2 cup (1 stick) unsalted butter, at room temperature
6 ounces of cream cheese, at room temperature
1 teaspoon vanilla
3 cups powdered sugar
1/2 to 1 teaspoon cinnamon
1 to 2 teaspoons whole milk

Directions

  1. In a large bowl, beat the butter, cream cheese, and vanilla on low speed until smooth and thoroughly blended. Stop the mixer and scrape the sides of the bowl as needed during mixing.
  2. Add the powdered sugar and continue to mix until smooth, then beat on medium speed for 1 minute to lighten the frosting.
  3. Transfer about 1/4 cup of the frosting to a small bowl, and stir in enough cinnamon to make the frosting a light brown color and enough milk to make a thick but pourable frosting. Set aside to use for the spider-web decoration.
  4. Use a knife or a small spatula to spread the remaining frosting on top of each cupcake in a smooth even layer. Cleaning the utensil often against the side of the bowl (or with a paper towel) will help you spread the frosting smoothly.
  5. Spoon the reserved cinnamon frosting into a small self-sealing freezer bag. Press out the excess air and seal the bag. Cut a tiny hole in one corner of the bag, about 1/8 inch in diameter.
  6. To form the web pattern, hold tip about 1/2 inch above a cupcake and slowly pipe two circles, one inside the other, on the frosting. Pipe a dot of the frosting in the center. Drag a toothpick gently from the center of the cupcake to its edge, and repeat at each 90° interval.
  7. In between the previous lines, draw the toothpick from the edge of the cupcake towards the center. You should have 8 lines alternating in directions to form a spider-web. It may be necessary to add a new dot in the center.

    Try not to eat them all at once. =)