Baked Beef & Bean Taquitos

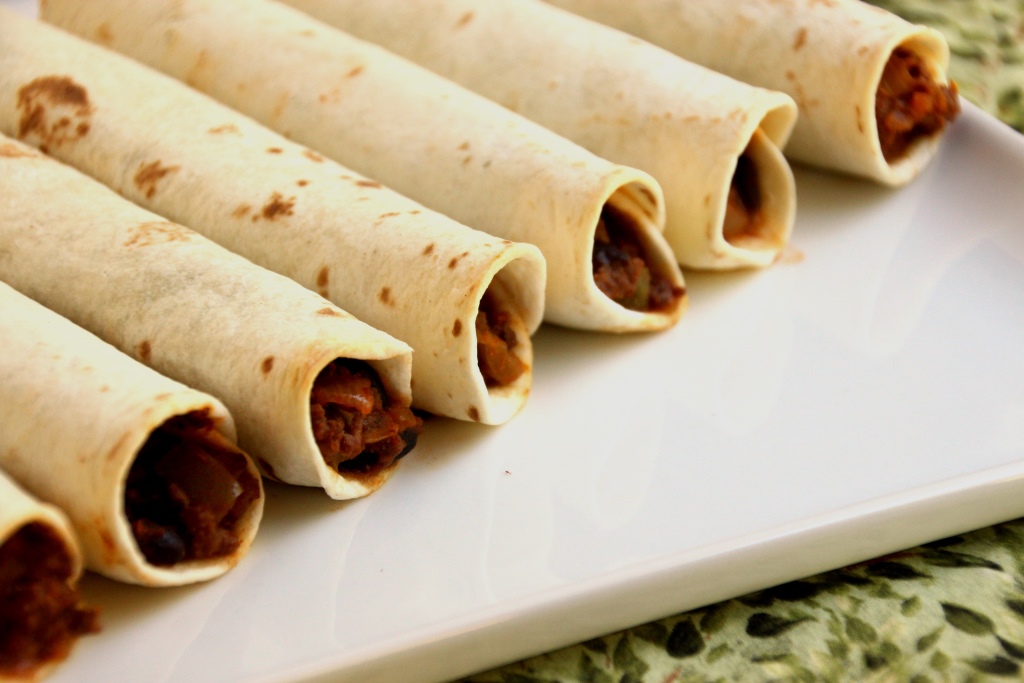
Hi friends, hope your September is going well. I’ve got an easy entrée here for you today so I’ll get right to it. Taquitos are something we ate fairly regularly when I was a kid, although they were usually the kind out of a box because I wasn’t much into cooking back then. This recipe is an easy dinner as well as a delicious one, and you can easily tailor the filling and the tortilla texture to suit your preferences.

Baked Beef & Bean Taquitos {{Baking Bytes}}

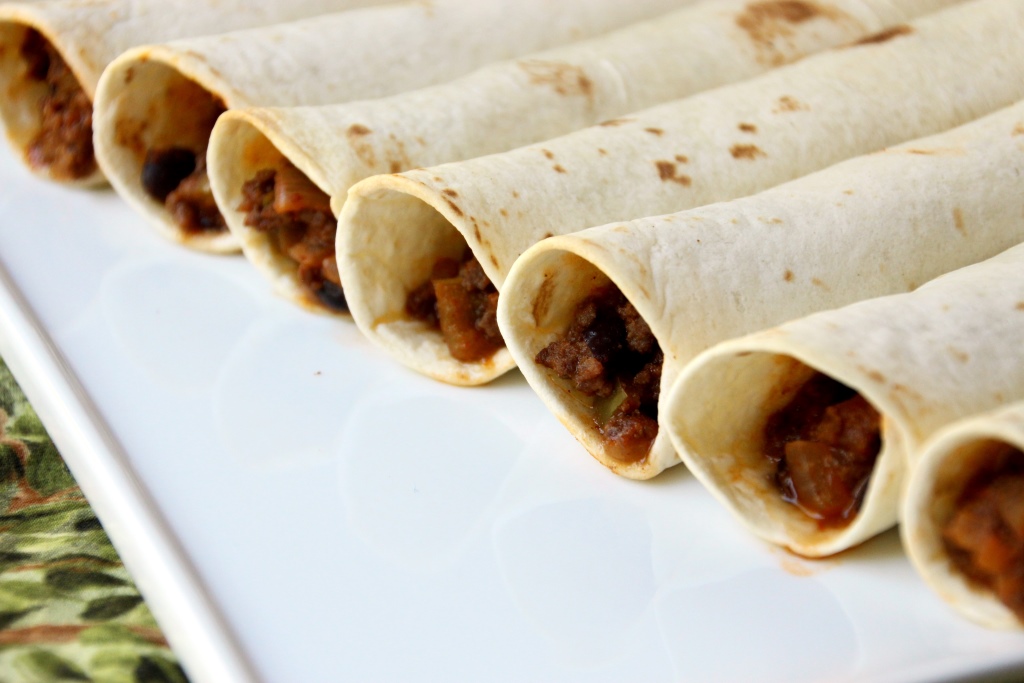
Ground beef (or deer, in my case) seasoned with salsa and chili powder and mixed with black beans and bell pepper includes some extra vegetables while being a very filling and rounded meal. Goes great with a side salad and/or fruit or they’re excellent just on their own. Tailor the heat by using a hotter salsa in the filling or let people dip their own if you have vastly different spice tolerances in the family. You could also chop up a jalapeno in there if you’re in to that sort of thing.

Baked Beef & Bean Taquitos {{Baking Bytes}}

As for the outside, you only need bake them until they’re as crunchy as you prefer. Since the filling is already cooked the only oven goal is to bake the tortilla slightly. I did mine about 15 minutes because they cook a little slower on a silicon mat and I was aiming for them to be firm enough to pick up and dip, without getting too brown on the outside.

Baked Beef & Bean Taquitos {{Baking Bytes}}

These are a great way to switch it up without a ton of extra work, and much easier to eat than tacos. They also work great as leftovers for an easily packable lunch or a convenient dinner. Heat them in the microwave if you’re in a hurry and don’t mind a soft tortilla, or over medium-low heat on the stove if you’re looking for the crunchy exterior.

Baked Beef & Bean Taquitos {{Baking Bytes}}

If you’re wanting a quick meal for mid-week, you could probably do everything except bake them the night before, and then just pop them in the oven when you get home. Keep in mind they will probably need a little longer to bake in order to make sure they are heated all the way through. It also works well to only make the filling ahead of time, and then heat it slightly and fill the taquitos while the oven is preheating.

Baked Beef & Bean Taquitos {{Baking Bytes}}

I’m sure these will become a new staple in our house, and I hope you enjoy them too. If you have any variations, I’d love to hear about them!

Baked Beef & Bean Taquitos

Adapted from Just a Pinch
Makes about 15

Ingredients

1 small onion, chopped finely
1 Tbsp canola oil
1 clove garlic, minced

1 lb ground beef (or deer, or whatever)

1 bell pepper, diced

1 can (15 oz) black beans, rinsed
1 cup salsa
2-3 tsp chili powder
salt and pepper, to taste

1 package (about 20) 6″ flour (or corn) tortillas, room temperature2

Directions

  1. In a large frying pan, combine oil, onion, and garlic. Saute over medium heat for 3-5 minutes, or until onion starts to soften.
  2. Add the ground meat and continue to saute until it’s nearly all browned.
  3. Add bell pepper and saute until the meat is completed cooked.
  4. Add remaining ingredients, reduce heat to low, and simmer gently for about ten minutes, or until mixture is hot.
  5. Meanwhile, heat oven to 400 degrees Fahrenheit and line a baking sheet with parchment paper or a silicon mat.
  6. When filling is hot, place about 1/4 cup in a tortilla and roll it up as tightly as you can without burning your fingertips. Place seam-side down on prepared baking sheet. Repeat until you run out of filling or tortillas.
  7. Brush lightly with canola oil (optional) and bake for 8-20 minutes, until desired level of crunchiness is met.
  8. Serve immediately with your favorite sour cream and salsa.

Notes

The salsa flavor is fairly prominent so make sure you use one you like!

I prefer flour tortillas but corn would work just fine. They will be much easier to roll if they are room temp, so if you normally keep yours in the refrigerator be sure to put them on the counter that morning, or heat them briefly in the microwave or on the stove before you start.

I doubled the batch so I’d have lots and it worked great to have leftovers.

Zucchini Boats

Hello my lovely readers, hope your August is off to a splendid start. I am heading for a trip home to Alaska on Friday but I wanted to make sure and share with you this fantastic entrée. Perhaps, like me, you’re a bit sugared-out after five straight weeks of ice cream and are looking to “detox” with something sans sugar completely. Well, look no further! A couple of weeks ago I saw a recipe for lasagna zucchini boats on Pinterest, which I thought sounded delicious but also like way too much work. If you’re new here, I am pretty lazy when it comes to making things that don’t qualify as dessert or occasionally breakfast. In any case, I liked the idea of a zucchini base but otherwise similar to my stuffed peppers that I have made previously. I threw together some filling and filled up my zucchini, topping them with cheese of course, and ended up with a pretty fabulous meal.

Zucchini Boats {{Baking Bytes}}

Wild rice, onion, peppers, zucchini, Italian sausage and various spices come together in a lovely blend, complemented perfectly by a zucchini base. The filling is cooked beforehand, so baking them is mainly to soften the zucchini and melt the cheese, if you add it. This recipe is superbly easy to tailor, so you can pump up the heat with more red pepper flakes, or go a completely different route depending on what you have in your cupboard. It also has the pleasant attribute of being able to taste the filling before you finish up the entrée, so you can play with the flavors as you make them.

Zucchini Boats {{Baking Bytes}}

Furthermore, you can easily make them vegetarian by leaving out the meat, and vegan by also ditching the cheese. If you’re a mushroom person (gross), they would also go well in addition to or in lieu of the sausage. And, of course, any other ground meat could be substituted just fine, although you may want to add some additional spices.

Zucchini Boats {{Baking Bytes}}

They also reheat splendidly in the microwave, so it makes for great leftovers if you don’t eat them all the first night, so go buy some zucchini and make these for dinner.

Zucchini Boats
Makes 6 servings

Ingredients

1 cup uncooked rice (I used a wild rice blend)

3 large uniform zucchini
1 bell pepper, diced
1 medium onion, diced

1/2 lb Italian sausage (optional)

1 Tbsp Oregano, to taste
1 tsp red pepper flakes, to taste
1 tsp garlic powder, to taste
salt and pepper, to taste

1/2 cup grated cheese (optional, I used cheddar)

Directions

  1. Cook rice according to directions, set aside.
  2. Trim zucchini to fit in a 9×13″ baking dish (if necessary), then cut lengthwise in half. Hollow out the inside leaving about 1/4″ of zucchini as an edge. (An ice cream scoop works well for this.) Place zucchini in the baking dish and set aside.
  3. Dice zucchini guts, set aside.
  4. Preheat oven to 350 degrees Fahrenheit.
  5. In a large frying pan or wok, cook sausage over medium heat until almost done.
  6. Add diced zucchini, bell pepper and onion, and cook an additional few minutes or until the veggies are warmed and a bit softened.
  7. Add spices and stir to combine.
  8. In a large bowl, combine cooked rice and veggies.
  9. Spoon filling into hollowed zucchini (you will likely have leftover filling), then bake for 25 minutes, or until zucchini are easily pierced with a fork.1
  10. Top with grated cheese, if desired, and bake for an addition 3-5 minutes until the cheese is melted, then serve hot.

Notes

I had about 2 cups of filling left over. It is great reheated in a tortilla like a burrito, or on its own. Or use it to stuff a couple additional bell peppers.

Peanut Butter Banana Green Smoothie

Has summer hit your area yet? It’s been hit or miss here but we did have a lovely hailstorm the other day. And I say that with great sincerity, storms are fun so long as they don’t happen constantly.

The recipe I have for you today (although “recipe” might be kind of a generous term for a smoothie, if I’m honest) is great for those hot days when you want a healthy and filling meal but it’s too hot to make anything. It may not seem like much but I’m always surprised just how full I am at the end. Great for lunch (or dinner, if you’re as lazy as I am) and it is awesome for refueling after a long run.

Peanut Butter Banana Green Smoothie {{Baking Bytes}}

I’ll admit the green color can be a bit off-putting, but it tastes like a peanut butter banana milkshake. If you’re extra afraid of vegetables, like I was when I first started making this, just add a little bit more peanut butter or yogurt until you can’t taste the green. Maybe even put it in an opaque cup if that helps you come to terms with it.

Peanut Butter Banana Green Smoothie {{Baking Bytes}}

Cold, creamy, and sweet, it drinks like dessert but is a protein- and vitamin-packed meal replacement perfect for any day, but especially great on hot ones. A few years ago we had an extremely hot summer here in Montana (especially by Alaskan standards) and there were a couple weeks where I had one of these for dinner while I sat in front of the air conditioner pretty much every day after work. Five minutes to make and no heat to add to already scorching 98 degrees inside and out. Perfect.

Peanut Butter Banana Green Smoothie {{Baking Bytes}}

If you’re looking for a quick, cold, and healthy meal (or very large snack), this is the one you want. Go forth and blend!

Note: I like to blend the spinach and milk first to make sure it is well puréed. If you have a really nice blender and/or are not as averse to larger bits of leaf in your smoothie, you can definitely just blend it all at once instead of in two steps. Also! You can totally buy one of those giant containers of baby spinach (like Costco sells), blend it all up at once with some milk (or water if you prefer), and freeze it in to smoothie-sized portions. I used a muffin tin because that’s what I had on hand, and then I use two frozen portions per smoothie. Works great and there’s no risk of your spinach going bad (although I’ll admit getting them out of the muffin tin was somewhat annoying. In the future I will line it with foil or plastic wrap or something.)

Peanut Butter Banana Green Smoothie {{Baking Bytes}}

Peanut Butter Banana Green Smoothie

Adapted from Iowa Girl Eats
Makes one ~16oz smoothie

Ingredients

1/2 – 1 cup milk (I use 2% but any milk or plant wannabe will work)
1+ cups baby spinach, to taste1

1 ripe banana (peeled, sliced, and frozen)2
1/4 cup yogurt (I use vanilla honey Greek yogurt)
2 Tbsp peanut butter

Directions

  1. Blend spinach and 1/2 cup milk until reasonably smooth (no large pieces).
  2. Add remaining ingredients and blend until completely mixed (this could take a minute or so). If it’s too thick, blend in additional milk 2 tablespoons at a time until desired consistency is reached.
  3. Enjoy immediately with a straw and a sunny day.

Notes

1  I use one or two cups depending what fits, but you can add up to around four cups if you’re a big spinach fan. You likely want to use more yogurt and milk if you add much more than two cups of spinach.

I typically slice mine into roughly fourths as they fit into my single-serving blender cup better that way. You can slice yours more or less to suit your needs.

Tortellini Tomato Soup

Guys. Guys. It’s not summer anymore! I need gloves and a hat for my bike ride to work! It’s a miracle! And very convenient because I happened across this soup recipe and it sounded so delightful I made it the next day. I would have made it that same day but I had a Halloween party to attend. I went as two-eyed Leela from Futurama this year.

Leela

Aaaand it’s winter. I wrote this last week and then left for my 6th and final half marathon of the year in Nevada. I got back last night and this morning I woke up to snow. A far cry from the 84 degrees at the finish line. But I got first in my age group! First time ever placing, so that’s fun.

In any case, soup. This one has a chunky tomato base with a hearty dose of tortellini and spinach to switch it up a bit from your average tomato soup recipe. Don’t get me wrong, Pacific Food Roasted Red Pepper & Tomato soup with a side of grilled cheese is one of my go to meals any time of year, but it’s nice to have a homemade option to add to the mix. Even better, this soup has great flavor, is very filling, and is easy to make vegetarian so long as you pick a package of tortellini without meat.

Tortellini Tomato Soup {{Baking Bytes}}

Spaghetti sauce is a key ingredient and flavor in this soup so make sure you pick one you like (or make your own if you’re into that sort of thing.) Adding diced tomatoes, onion, and garlic step it up a notch while the vegetable broth takes it into soup territory. I added a diced red bell pepper as well but that is totally optional. Add several big handfuls of baby spinach and a package of tortellini and you’ve got a quick healthy meal to add to your repertoire.

Tortellini Tomato Soup {{Baking Bytes}}

If you’re in need of a nice warm meal, this one is perfect. Serve with a side of bread (like whole wheat beer bread) or grilled cheese sandwiches for an extra hearty meal. It would also be great topped with a little shredded cheese.

Tortellini Tomato Soup {{Baking Bytes}}

Tortellini Tomato Soup

Adapted from DietHood
Makes about 3.5 quarts

Ingredients

2 Tbsp olive oil
1 Tbsp butter
1 small-medium yellow onion, diced
1 red bell pepper, diced
3 cloves garlic, minced

2 (14.5oz) cans Italian Diced Tomatoes
4 cups spaghetti sauce

4 cups vegetable broth
salt and pepper, to taste

1 package frozen tortellini1
10 oz fresh baby spinach2

Directions

  1. Over medium heat, heat oil and butter in a large pot until butter is melted.
  2. Add onions, garlic, and bell pepper, and cook for a few minutes, or until onions are soft.
  3. Increase heat to medium-high and add tomatoes and sauce. Bring to a boil, stirring occasionally.
  4. Stir in vegetable broth and return to a boil.
  5. Add salt and pepper to taste, if desired.
  6. Add tortellini and spinach and continue cooking until tortellini is done (check your package instructions), about 10 minutes.
  7. Serve hot and refrigerate or freeze any leftovers.3

Notes

The original recipe called for 10 oz of tortellini, but I like a lot of pasta and the package I on hand was 20 oz so that’s what I used. Anything in that range would be great.

I buy spinach at Costco in the giant containers so I just added several large handfuls. Add more or less to suit your tastes.

It reheats great but it’s definitely thicker the next day (especially if you put in lots of pasta like I did because that is what soaks up the liquid.) If it doesn’t seem soupy enough, add a little water when you microwave it.

Stuffed Peppers

[First things first…I am so sorry for the ridiculous semi-accidental hiatus. September was M’s last month in town before he headed back to Antarctica (yes, you read that right) for three months, so I let the blog fall by the wayside. My apologies. But there’s good news! I’m going to post something every Monday in October to make up for it.]

In other news, Montana refuses to legitimately enter autumn and insists on holding onto summer as long as possible. It is in the high 60s as I write this, which personally I think is just ridiculous for October. Maybe it’s just me but I am definitely ready for cooler temperatures. Mainly because I want to run in like 40 degrees rather than almost 70 and then come home to a steaming bowl of soup, but until I get that weather machine working I’ll just be staring forlornly at the weather forecast. Shorts and tank top weather will be over soon enough (I hope) just in time for everyone to complain it’s too cold. In preparation for that glorious time of year, here is a fabulous and easy dinner recipe that’s great for a chilly fall day and conveniently includes almost all of the food groups.

Stuffed Peppers {{Baking Bytes}}

As a kid I was not big on the bell peppers thing. I still don’t really care for them raw, but I love them cooked in things. Stir fry, tacos, pizza, soup, stew, etc are all improved by the addition of a bell pepper or three. Bonus: veggies are healthy. I saw a picture of stuffed peppers on Pinterest a few months ago and thought to myself “that looks like something I could maybe handle” and then promptly never made it because it was 85 degrees outside and I didn’t want to turn on the oven.

Stuffed Peppers {{Baking Bytes}}

Fortunately it has cooled down a bit since then and my hypothesis was correct: they are delicious. Wild rice, Italian sausage, cheese, and a smattering of other flavors come together in a delightfully simple recipe. Although it’s not super quick, particularly if (like me) you’re not practiced at cutting things, it’s incredibly easy and hard to mess up. You could cut down on the time by preparing them the night before and popping them in the oven when you get home from work. They may need a bit longer in the oven to warm through so make sure you check that the center isn’t cold.

I did not add a lot of spices to mine because I was using hot Italian sausage and that was enough for me, but the addition of some red pepper flakes, cayenne pepper, curry powder, or whatever you’re feeling that day would work beautifully. Conveniently you can taste the filling before you finish them up in the oven, so it’s easy to play around with the flavors before you stuff the peppers. Try adding zucchini or spinach for an extra veggie boost.

Stuffed Peppers {{Baking Bytes}}

Bake these up, serve with homemade applesauce and a glass of milk and you’ve got all the food groups covered in a healthy and delicious meal.

Note: They reheat pretty well in the microwave but I find it works better if you cut them in half beforehand.

Stuffed Peppers

Inspired by Kalyn’s Kitchen
Makes 4 peppers

Ingredients

1 cup (uncooked) wild rice
4 large green bell peppers

12 oz Italian sausage (or ground meat of choice)
olive oil (for sauteing)

1 bell pepper (any color, I used orange)
1 small-medium onion
1-2 cloves garlic
1/2 cup grated Parmesan
salt and pepper, to taste

1/2 cup grated mozzarella

Directions

  1. Preheat oven to 375 degrees Fahrenheit and lightly grease an 8″x8″ glass baking dish (or any glass baking dish that your peppers will all fit into.)
  2. Cook rice according to directions and set aside.
  3. Meanwhile, cut the tops off the peppers, hollow out the inside, and slice a bit off the bottom so they sit flat (if necessary).
  4. Dice the tops of the peppers (minus the stem of course), onion, garlic, and remaining pepper into small pieces.
  5. Saute meat and a little olive oil in a large pan over medium heat for a few minutes.
  6. When meat is about halfway done, add the diced veggies and continue sauteing until meat is cooked through and veggies are heated.
  7. In a large bowl, combine rice, cooked sausage mixture, and Parmesan cheese, stirring to combine thoroughly. (I found it easiest to use my hands.)
  8. Add spices to taste and stir to combine.
  9. Firmly stuff mixture into the hollowed-out peppers, filling them full and using a spoon to aid in packing it tightly. (You may have a little extra filling, I saved it and used it like a taco filling.)
  10. Bake about 30 minutes, then sprinkle (or pile) mozzarella onto the tops of the peppers and bake an additional 15-20 minutes, until cheese is melted and beginning to brown.
  11. Serve hot and refrigerate leftovers for up to one week.