Almond Roca

Happy holidays from Australia! I am busy enjoying sun, sand, and surf before I head back to winter for ski season. More updates when I get back. =) But even though though I’m on the opposite side of the world, I made sure to schedule this recipe to share with all of you. This is something my family (and many family friends) make for Christmas every year and I definitely wanted to share it. Although my family has reduced how much we make each year, we still make several batches to share and keep in the freezer. It is a Top Secret recipe that my mom shares with everyone.

Almonda Roca {Baking Bytes}

If you’ve never had homemade almond roca, you are seriously missing out. I encourage you to make some, pronto. I actually don’t like almonds that much and I can’t get enough of it. Sweet and crunchy, it is delightful straight out of the freezer, or at room temp (if you can wait that long.) It makes a beautiful “appetizer” to have out for parties and a fabulous gift. As a kid I always gave some to my teachers, and had several that said the bag never even made it home.

Almond Roca >> Baking Bytes

Although it’s a little time-consuming, and kind of messy, it’s an easy gift for teachers, neighbors, extended family, or just to have on hand in case you forgot someone. Even better, it keeps well in the freezer for a few months so you (or the recipient) can set it aside if there’s a sugar overload or more time-sensitive items to be eaten. Fair warning though, as easy as it is, it’s a bit easy to screw up too; make sure you read the notes at the bottom to help you be successful.

Almond Roca >> Baking Bytes

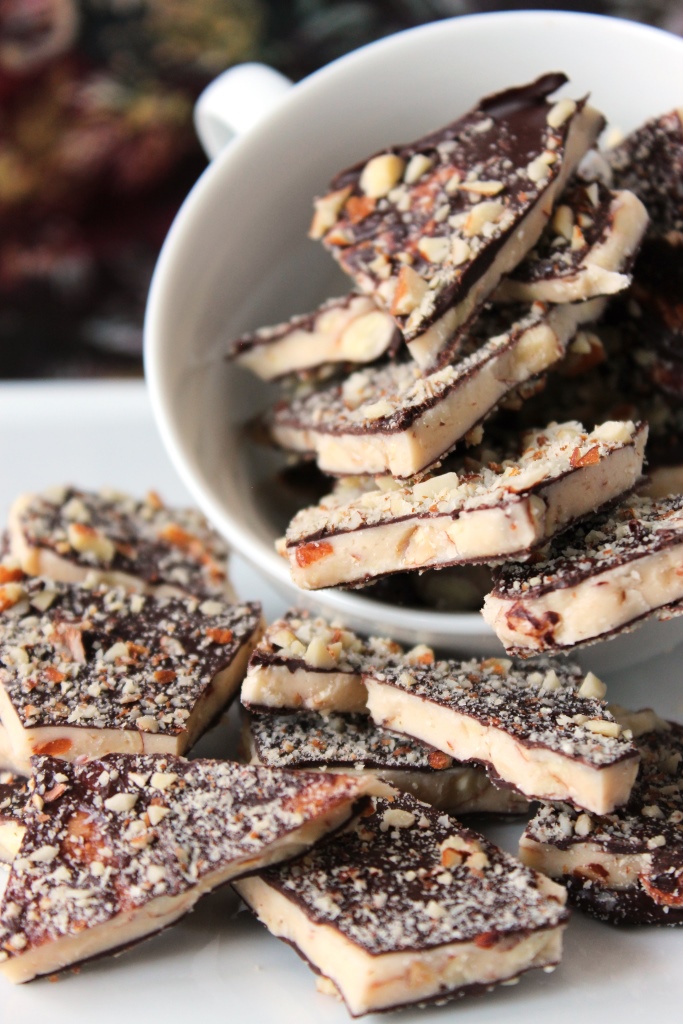
Buttery toffee, crunchy almonds, and sweet chocolate melt in your mouth in perfect harmony.

Almond Roca >> Baking Bytes

I dare you to eat just one.

Almond RocaAlmond Roca >> Baking Bytes

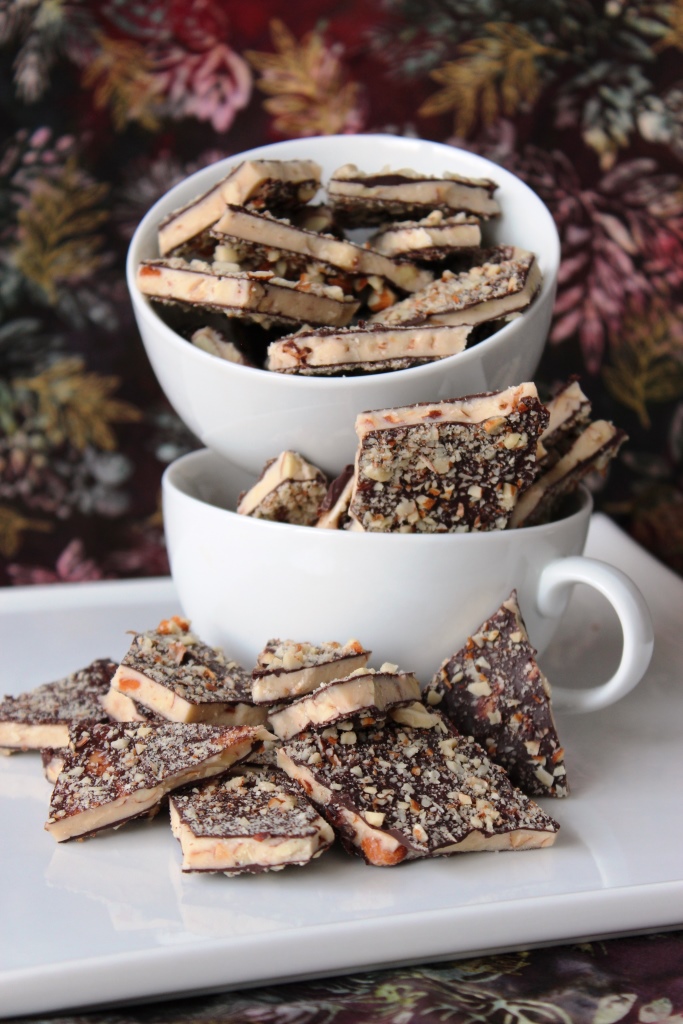
Makes 1 cookie sheet

Ingredients

2 cups almonds

1 pound good quality salted butter
1 cup sugar
2 T. water

1 (10 oz) package chocolate chips

Directions

  1. Coarsely chop 1 cup of the almonds; set aside.
  2. Finely chop the remaining cup of almonds; set aside.
  3. Line a cookie sheet or jelly roll pan with aluminum foil and lightly oil with vegetable or canola oil.
  4. In a small-medium, heavy, saucepan over medium-low heat, melt butter, sugar and water.
  5. Heat candy to 250 degrees on a candy thermometer, stirring often. It will look kind of marshmallowy. (That’s definitely a technical term.)
  6. Add in the cup of coarsely chopped almonds, and heat to 300 degrees, stirring constantly. (It should be very pale brown and thick but also oily looking.)
  7. Pour immediately onto prepared cookie sheet and spread out as thinly as possible without creating holes.
  8. Melt chocolate chips in microwave for one minute and stir. Repeat until chocolate is completely melted and stir until smooth.
  9. Thinly spread candy with chocolate and sprinkle with about half of the finely chopped nuts.
  10. Transfer entire cookie sheet to freezer for 45 minutes, or until candy is hard.
  11. Remove cookie sheet from freezer, flip over the candy (don’t worry about breaking it), and let it warm up for about 15 minutes.
  12. Melt the remaining chocolate, and repeat the coating on the back. It is easiest to do this is small sections as the chocolate hardens quickly.
  13. Return the cookie sheet to the freezer until chocolate is firm, break the candy into bite-sized pieces and store in resealable bags, or put some in a cellophane candy bag and pass out to adoring fans.

Almond Roca >> Baking Bytes

Notes

1 You must use good quality butter like Tillamook or Darigold; store brands produce inconsistent results and might fail completely. And make sure it’s salted butter!
2 My mom uses a large pullout cutting board. I like to use a lipped cookie sheet because it keeps it a little more contained. Just make sure you use something firm, mobile, and that will fit in your freezer (or outside, if it’s cold enough.) It’s also a good idea to lay down newspaper and/or a silicon trivet to protect your counter from the hot candy (and excess oil runoff if you’re not using something with a rim.)
3 It is best to use a long-handled wooden spoon for stirring, as it doesn’t get hot or damage the pan during your million hours (30 minutes) of stirring.
4 Make sure your candy thermometer gets deep into the mixture; if you use too large a pan you are likely to burn the candy because the thermometer isn’t registering the correct temperature. My best luck has been with a 4-quart Dutch oven.
5 I buy chocolate chips from Costco so I never actually measure how much I use, but I melt about a cup at a time. I like to spread it quite thin, but that’s definitely up to you. I always use semi-sweet (because I buy in bulk) but dark chocolate would be delicious too if you prefer.
6 Even if you’re making a lot of batches, don’t try to cook more than one at a time; it doesn’t seem to go very well. You’ll be much more successful using an assembly line, ideally with extra hands. Pour some eggnog and make it a family or friend activity.
7 If your batches are prone to separation, make sure your heat is not too high! Error on the side of lower, it will take longer but it’s less prone to separating. If the separation occurs when you add the almonds, try adding them in slowly instead of all at once.
8 If you can’t make it work, comment here or email me and I’ll do my best to help you get it right next time. =)

Tuna Noodle Casserole

Good news, everyone! Winter has finally arrived here in Montana, although perhaps a bit more aggressively than most people care for. The temps have been below zero (or just barely above it) for several days now. Personally, I love a good cold snap. It was -2 F when I went on a short run this afternoon which really makes you appreciate quality winter running gear. And also fireplaces. And hot showers. But I digress.

Hopefully you all had a lovely Thanksgiving. My parents were able to visit me for the long weekend which was wonderful. My mom and I made cinnamon rolls and I am planning to give them a try on my own; watch for the recipe next month. However, amidst the plethora of sugary holiday treats, we still need dinner. This super easy and filling casserole is quick to throw together while you’re in between batches of cookies and candies and will give your taste buds a nice break from all the taste-testing and eating of broken cookies.

Tuna Noodle Casserole >> Baking Bytes

A creamy sauce, thick egg noodles and delicious tuna come together for a filling but simple meal. Leftovers reheat nicely; I often eat this for lunch and dinner several days following. If you have a small family and don’t want leftovers, you can cut the recipe in half and use an 8×8 baking dish instead. Cut everything in two except the cream soup so you’re not stuck with half a can of soup lying around.

Personal notes: I don’t actually measure the noodles in ounces because I buy the giant Costco bags and I don’t have a cooking scale. Instead, before spraying my baking dish, I fill the pan about halfway with noodles, and cook that amount. Comes out perfect every time. Also, I don’t usually add the cracker crumb topping, but if you like a bit of crunch to your casserole then go for it. I like Saltines because they add good flavor without competing with the rest of the casserole, but use whatever kind you like.

Tuna Noodle Casserole >> Baking Bytes

If you need a break from sweets, put this casserole in the oven and enjoy a cozy dinner. If you’re still all about the sugar rush, check back in two weeks for the candy recipe my family makes every year. I will be out of the country for a few weeks starting this Friday, but I have one of my favorite recipes scheduled for you while I’m gone. Enjoy!

Tuna Noodle Casserole

Adapted from Country Pasta
Makes one 9″x
13″ pan

Ingredients

15 oz Country Pasta (approx.) 1

1 can cream soup of choice 2
1  cup milk
1/2 cup sour cream
1/2 cup mayonnaise
1 cup grated cheddar cheese
1/2 cup finely chopped onion
1/2 tsp salt
1/2 tsp pepper
1 Tbsp lemon juice

2 (7 oz) cans albacore tuna
1 cup frozen peas

1/2 cup grated cheese (optional)
1 cup Saltine cracker crumbs (optional)

2Tuna Noodle Casserole >> Baking Bytes

Directions

  1. Preheat oven to 350 degrees Fahrenheit and spray a 9″x13″ baking dish with cooking spray.
  2. Cook pasta according to directions, drain, and set aside.
  3. In a large bowl, stir together soup, milk, sour cream, mayo, 1 cup cheese, onion, salt, pepper and lemon juice until well combined.
  4. Gently fold in the noodles, tuna, and peas and pour into prepared baking dish. Top with additional grated cheese and/or cracker crumbs, if desired.
  5. Bake 30-40 minutes, until sauce is bubbly and top noodles are beginning to crisp. Serve hot.

Notes

1 As previously mentioned, I just fill my pan halfway with noodles instead of using a scale. 15 oz is somewhat of a guess.
2 I usually use cream of mushroom.


Mini Pumpkin Cheesecakes

Fair warning, I never tire of pumpkin. I’ve already made my 2nd pumpkin pie of the season and I’m sure there will be a 3rd involved at Thanksgiving. As pumpkin pie is equally good for breakfast as it is for dessert, I don’t mind having a whole one to myself and happily eat it for several days in a row. I greatly look forward to Operation: Eat Everything Pumpkin! (which takes place annually between October and December) and do my best to mix in some new recipes along with my old favorites. If you’re looking for a slightly less traditional pumpkin dessert to serve this Thanksgiving, look no further.

Mini Pumpkin Cheesecakes >> Baking Bytes

Traditional pumpkin and classic cheesecake come together in a wonderful dessert sure to please pumpkin lovers and cheesecakes fans alike. Even my boyfriend, who isn’t a huge fan of pumpkin, thinks these are pretty delicious. Smooth, creamy, and rich, it could very well become a new annual favorite. Even better, the mini size makes for ready to go individual servings and lets you enjoy the evening instead of attempting perfect slices with all eyes on you. These pop perfectly from the pan, and are excellent plain or with a swirl of whipped cream.

Mini Pumpkin Cheesecakes >> Baking Bytes

This recipe does require a specialty pan, of course, but if you have room in your cupboards you surely won’t regret the purchase. Mini cheesecakes are great for potlucks, large dinners, and dessert parties because they’re easy to transport, quick to serve, and require no utensils to eat (although I do prefer a fork, myself.) However, if all you have is a regular cheesecake pan, head over to the original recipe to see instructions for a standard 9″ cheesecake. I’ve not made the full version [yet], but I’m sure it’s equally amazing.

So whether you try some new recipes or stick with the tried and true favorites, have a wonderful Thanksgiving weekend. (Or a wonderful regular weekend, for my foreign readers.)

Mini Pumpkin CheesecakesMini Pumpkin Cheesecakes >> Baking Bytes

Adapted from Glorious Eats
Makes 12 mini cheesecakes

Ingredients

Crust
3/4 cup graham cracker crumbs1
1 Tbsp light brown sugar
1/4 tsp cinnamon
2 Tbsp butter, melted

Filling
8 oz cream cheese, at room temp
1/2 cup plus 1 Tbsp canned pumpkin puree
1 egg
2 Tbsp sour cream
1/2 cup white sugar
1/8 tsp ground nutmeg2
pinch of ground cloves

1 Tbsp flour
1/2 tsp vanilla extract

Directions

  1. Preheat oven  to 350 degrees Fahrenheit and lightly spray a mini cheesecake pan.
  2. Using a fork or pastry blender, mix the crust ingredients in a small bowl.
  3. Add a rounded tablespoon of the mix to each well in the pan, and press firmly to form a crust, sealing the edges well.3
  4. Using an electric mixer, beat the cream cheese until fluffy and smooth.
  5. Beat in pumpkin, eggs, sour cream, sugar and spices, then add flour and vanilla and beat until completely combined.
  6. Divide batter among the wells, about 3 Tbsp of filling atop each crust.
  7. Bake for 20 minutes, remove from oven, and cool 15 minutes on the counter.
  8. Cover lightly with plastic wrap and refrigerate 2 hours or until ready to eat.
  9. Top with whipped cream and a sprinkle of cinnamon, if desired, and serve to adoring fans.

Mini Pumpkin Cheesecakes >> Baking Bytes

Notes

About 6 graham crackers.
The original recipe calls for fresh, but dried works just fine.
A flat-bottomed shot glass works nicely for this, but use your fingers to make sure the edges are well sealed.
4 The cheesecakes keep well in the fridge for several days, or in the freezer for up to two months. They’re a great dessert to have on hand! Store in an airtight container.

[Slow Cooker] Enchilada Soup

Bozeman has been slow to head towards winter which makes it difficult to dive into fall cooking. The weather is a little bipolar, often jumping between 20’s one week and high 50’s the next. As someone who loves cold weather, the latter of the two makes me very upset inside. Recently, however, we had a short bout of 30’s, which led me to making this wonderful slow cooker soup.

[Slow Cooker] Enchilada Soup >> Baking Bytes

In addition to being incredibly fast to assemble (not including cooking time, of course) this soup is delicious and perfect for a chilly fall day. A little spicy, this soup version of a Mexican dinner is warm and hearty and goes great with a side of cornbread. (Or if you’re me, cornbread goes great with a side of this soup.) M is a hunter so I used deer steak we had in the freezer, but use whatever meat or poultry you prefer. Corn, black beans, and green beans come together for a healthy and filling meal with the spiciness of chili peppers and enchilada sauce.

As with most slow cooker recipes, this one is very easy to modify to fit your personal preferences. Add and subtract canned/frozen veggies as you like, but be mindful of the overall volume as my small crock pot barely fit this recipe. It’s also easy to tailor towards your own spice tolerance; choose mild or hot enchilada sauce and peppers as you prefer. I’m fairly wussy so I tend towards medium and mild, respectively.

[Slow Cooker] Enchilada Soup >> Baking Bytes

This recipe makes enough to feed a decent crowd, or an average family with leftovers for later. If your weather is guiding you to soup cravings, this one is sure to satiate you.

Enchilada Soup

Adapted from SnarkRecipes
Makes 3 quarts

Ingredients

1 lb meat/poultry of choice1

1 (15 oz) can diced tomatoes, drained
1 (10 oz) can enchilada sauce
1 (4 oz) can diced green chili peppers
1 (10 oz) package frozen corn2
1 can green beans (optional)
1 can black beans, rinsed

1 medium onion, chopped
2 cloves garlic, minced
1 tsp cumin
1/4 tsp black pepper

2 cans chicken broth3

cheddar cheese, grated (optional garnish)

Directions

  1. Dice meat into bite-sized cubes and brown in a skillet over medium heat. Drain and add to slow cooker.
  2. Stir in onions and garlic to distribute evenly.
  3. Layer remaining ingredients except chicken broth.
  4. Gently pour in the chicken broth, being careful not to overflow, and stir gently.
  5. Cover and cook on low for about 6 hours, or on high for about 3 hours.
  6. Serve garnished with shredded cheese.

[Slow Cooker] Enchilada Soup >> Baking Bytes

Notes

Again, I used deer steak but use whatever you prefer. Chicken or beef would both be great.
If you buy frozen corn in bulk like I do, 10 oz is about two cups.
If you have a larger slow cooker and would prefer a more brothy soup, you may want to add an additional can of chicken broth.
If you want to come home to a lovely dinner already made, cooking this a few extra hours won’t hurt it. Throw it together the night before, store it in the fridge overnight, turn it on “low” in the morning, and have dinner ready to go when you walk in the door.

Cinnamon Glazed Pumpkin Donuts {and Halloween}

Much like the rest of the 20-something white girl population, pumpkin is my favorite fall flavor. October is a highly anticipated month as I count the days towards what I officially call “Pumpkin Season.” Granted, this date is completely arbitrary, but since Bozeman summer generally extends well into September anyway, October 1st seemed a good choice.

IMG_1968Cinnamon Glazed Pumpkin Donuts >> Baking Bytes

Since I’ve already posted my favorite pumpkin bread, pumpkin pie, pumpkin cupcakes, and pumpkin milkshake, I sought a new recipe to share this year. A Pinterest post led me to these donuts, which I ever so slightly adapted to fit my preferences. A moist and pleasantly spiced pumpkin donut topped with a cinnamon glaze is the perfect start to a fall morning. As this is a baked donut recipe, it does require a donut pan, but I promise you won’t regret the purchase. My one complaint about my pan is that it only holds six donuts, when all recipes make twelve. (First world problems, haha.)

Cinnamon Glazed Pumpkin Donuts >> Baking Bytes

These would be a great way to kick off Halloween morning, sharing them with family, friends, or coworkers. Like many of you (I’m guessing), I already attended a Halloween party this past weekend, but maybe there’s a day-of party happening Thursday, or you just want to make something easy this fall. Whatever the occasion, these donuts are an easy way to bring the pumpkin flavor to breakfast.

Did you have a costume this year? I dressed up as Donatello (the Ninja Turtle, not the Renaissance artist), using a costume my mom made my older brother when he was five. That makes this costume almost as old as me, but still amazingly awesome.

I hope you hum the theme song for the rest of the day.

Heroes in a half shell – Turtle Power!

Cinnamon Glazed Pumpkin Donuts

Barely adapted from Taste and Tell
Makes 12 donuts

Ingredients

2 cups all-purpose flour
1 1/2 tsp baking powder
1/4 tsp baking soda
1/2 tsp salt
1 1/2 tsp cinnamon
1/2 tsp nutmeg
1/4 tsp ginger

1/2 cup brown sugar (not packed)
1/4 cup butter, room temperature
1 cup pumpkin puree
2 eggs

1 tsp vanilla
2 Tbsp milk

1 1/2 cups powdered sugar
1/2 tsp vanilla extract
1/2 tsp cinnamon
2 Tbsp milk

Directions

  1. Preheat your oven to 350 degrees Fahrenheit. Butter a donut pan and set aside.
  2. In a small bowl, whisk together flour, baking powder, baking soda, salt, cinnamon, nutmeg, and ginger.
  3. Using an electric mixer on medium speed, beat together brown sugar, butter, and pumpkin until thoroughly combined.
  4. Add eggs, mixing well, and then stir in milk and vanilla until completely incorporated.
  5. Stir in the dry ingredients, mixing until just combined.
  6. Spoon batter into a large Ziploc or pastry bag, cut off the tip, and pipe into the buttered donut wells.
  7. Bake for 10 minutes, or until a toothpick comes out clean. Cool in the pan five minutes, then remove to a wire rack to cool completely.
  8. For the glaze, whisk together the remaining ingredients in a small bowl.
  9. Dip cooled donuts in the glaze and return to the wire rack to set.
  10. Enjoy with a glass of milk or a mug of coffee, and a few friends to help you eat them.

IMG_2029Cinnamon Glazed Pumpkin Donuts >> Baking Bytes

Notes

1 These taste great made a day in advance, but the glaze tends to soak into the donut. If you can, glaze them on the day you intend to serve them so they’ll stay nice and pretty.