Easy Cream Cheese Danishes

[Here from Pinterest? Welcome! After you make these danishes, make sure to check out my other Pillsbury recipe: Easy Cinnamon Roll Wreath]

For those of us that are doomed to work in an office lucky enough to have a stable job, we know that the best days often involve surprise homemade treats that a coworker decided to bring in. You, too, can be that coworker. While muffins, cookies or donuts are always a welcome option, this super easy Danish recipe is a great way to switch it up a little. Better yet, they can easily be made the night before, letting you keep to your normal sleeping schedule.

Easy Cream Cheese Danishes {{Baking Bytes}}

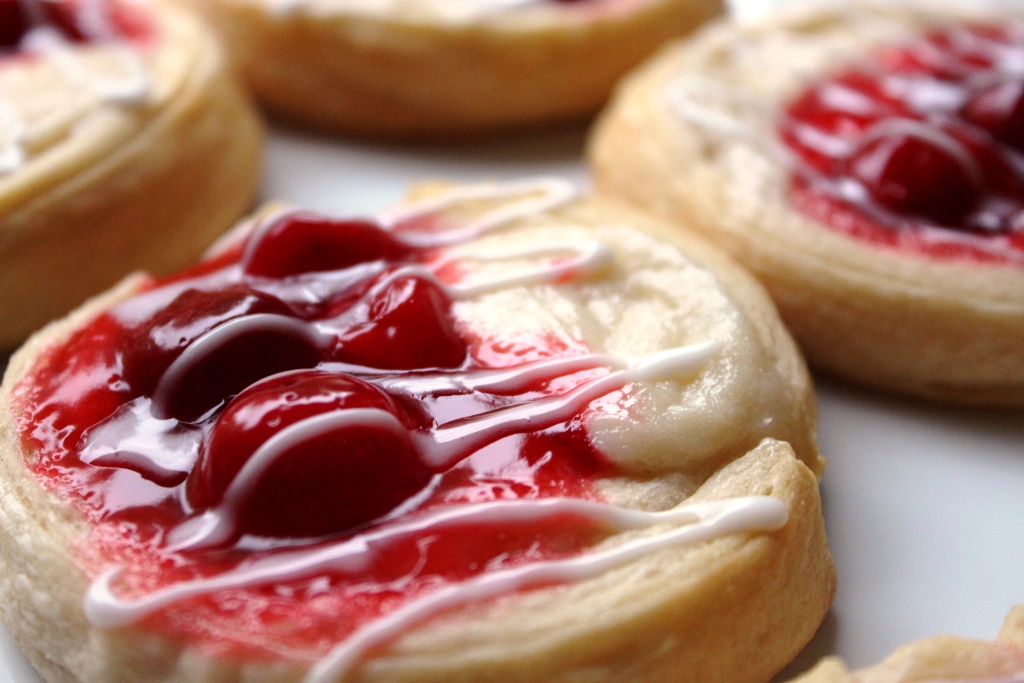
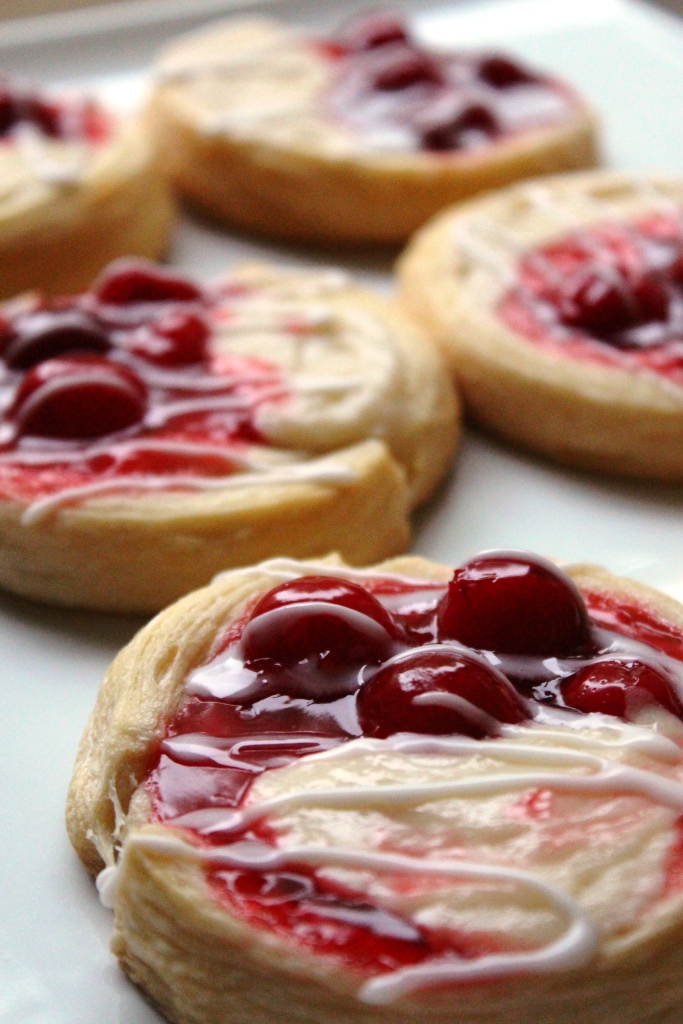
Although I don’t typically work from recipes that call for “pre-fab” food, the ones I do like generally involve a Pillsbury product. Pillsbury crescent rolls are incredibly versatile and can be used for everything from breakfast to dessert, or my favorite, a dessert-y breakfast. These Danishes are super easy, super delicious, and make enough to feed a crowd. I brought mine to work and had no trouble giving them all away.

I made mine with cherry pie filling (my favorite), but feel free to substitute any pie filling, preserves or thick jam that you prefer, or leave the fruity part out completely. If you’re a Nutella person (I am not, bleh), I’m sure that would also work nicely alongside the cream cheese filling. If you’re feeling inspired, a quick sauce from fresh fruit would be even more amazing.

Easy Cream Cheese Danishes {{Baking Bytes}}

So next time you want to surprise your coworkers, skip the muffins and pick up some cream cheese and crescent rolls; you’ll be the new office favorite in no time.

If you’re struggling to print this recipe, a PDF copy is available here:  Easy Cream Cheese Danishes | Baking Bytes

Easy Cream Cheese Danishes

Makes 24 pastries

Ingredients

2 cans Pillsbury Grands Crescent Rolls (big & flaky)
1 can pie filling (I like cherry)

8 oz cream cheese
1 tsp vanilla
1/3 cup sugar

powdered sugar
milk

Directions

  1. IMG_1594Place crescent roll cans in the freezer for about 30 minutes.
  2. Preheat the oven to 350 degrees Fahrenheit and line baking sheets with silicon mats or parchment paper.
  3. Beat cream cheese, vanilla and sugar with an electric mixer until smooth and fluffy.
  4. Open the cans and slice each into 12 pieces, approximately 1/2″ slices. (Don’t unroll them, pretend they’re slice and bake cookies.)
  5. Easy Cream Cheese DanishesPlace six slices on a cookie sheet, flattening the centers to create an indent. (I used a large spice container dipped in flour, plus my fingers for a little extra flattening in the middle.)2
  6. Fill the indent half with the cream cheese mixture and half with the pie filling.
  7. Bake until edges are golden brown, about 15 minutes.
  8. Cool completely on a wire rack.
  9. In a small bowl, mix a large spoonful of powdered sugar with a little milk until liquid but still thick. Spoon into a pastry bag or Ziploc, cut off the tip, and drizzle over the pastries.
  10. Enjoy one (or three, I don’t judge) with a cup of coffee or a tall glass of milk.

Notes

1 I actually think these are best the next day. Bake, cool, frost, and put in airtight containers overnight. For me, they’re always more moist and pastry-like the next morning. (Although they are also fabulous straight out of the oven… but don’t burn your mouth.)
2 These spread a lot during baking, so don’t try to squeeze too many on a pan. Start with 6 and see if you have room for more after the first batch is baked.

Sweet & Spicy Honey Baked Chicken

M and I don’t normally eat a lot of chicken, mainly because our freezers (yes, plural) are always full of elk and venison. While I love having lean, wild meat at my disposal, every once in a while chicken just sounds perfect. To satiate my most recent craving, I pulled out a recipe I hadn’t made since 2009, during my exchange in Scotland. I figured if 2009-Lindsey could handle it, 2013-Lindsey definitely could. (The 2009 version was substantially less domestically inclined.)

Sweet & Spicy Honey Baked Chicken

2009-Lindsey had mad skills. And ugly plates.

I love this recipe because in addition to being ridiculously easy and super delicious, I always have everything on hand (except maybe chicken.) Honey, mustard, and curry powder come together in a delightful sauce in which chicken breasts are baked to perfection. It goes perfectly with rice and a side of vegetables. Whether there is any chicken leftover or not, extra sauce and rice heat up well for a quick and tasty lunch the next day.Sweet & Spicy Honey Baked Chicken - Baking Bytes

Boneless, skinless chicken breasts from the boneless, skinless chicken breast farm (joking) are my preferred cut of choice, but it should work with thighs or whatever is more your style; you might just have to adjust the cooking time a little bit.

Although the baking duration doesn’t make this a quick dinner, there’s not a lot of active cooking time. It also works really well to prepare everything in the morning (or the night before), stick it in the fridge, and throw the dish in the oven whenever you get home. This doesn’t save a ton of time, but if, like me, you don’t like to do a lot of dinner preparation after you get home from work, it gives you more time to relax without resorting to cold cereal for dinner. (This is something I may or may not do on a semi-regular basis…)

If you’re feeling the sweet & spicy flavor, throw this recipe together and let me know how it goes. Be sure to taste the sauce and adjust it to your preferences. I have a super low spice tolerance so maybe you want to up the curry powder. Maybe you don’t love sugar as much as I do and you want to decrease the honey. Or maybe you’re in a sugary mood and you want to up the honey. Play with it: I don’t think you can mess it up. (That is not a challenge.)

Sweet & Spicy Honey Baked Chicken - Baking Bytes

Sweet & Spicy Honey Baked Chicken

Adapted from Gretchen
Makes 4 chicken breasts and lots of sauce

Ingredients

4 boneless, skinless chicken breasts

8 Tbsp (1 stick) butter, melted1
3/4 cup honey
1/2 cup mustard (I like Dijon)
1 tsp salt
1 – 1.5 tsp curry powder

Directions

  1. Preheat oven to 350 degrees Fahrenheit.
  2. In a small bowl, whisk remaining ingredients until thoroughly combined.
  3. Pour a small amount of the sauce in an 8″x8″ or 9″x9″ baking dish and squeeze in your chicken on top; cover with remaining sauce.
  4. Bake for 50-60 minutes, or until chicken reaches 165 degrees internally.
  5. Let cool for a few minutes, then serve with rice and a green vegetable.2

Notes

1 You could easily cut back the butter on this recipe, probably to 1/2 a stick (1/4 cup). I plan to do so next time I make it.
I think this recipe would also be great with noodles. I’d probably cut up the chicken into bite-sized pieces and mix everything together before serving.


[Slow Cooker] Hawaiian Meatballs

Although my KitchenAid stand mixer will probably always be my favorite counter-top appliance, the slow cooker M found for free is quickly becoming my second. In hot weather no one likes to turn on the oven, and I’m looking forward to coming home from work to hot soups and stews this winter.

[Slow Cooker] Hawaiian Meatballs

I came across this recipe on Pinterest a few months ago, and although I loved the taste, I definitely felt it needed some tweaking. Even M commented on the meat to not meat ratio, and he usually adds more than the average cook. Third time’s the charm, so today I’m sharing my version with you. Frozen meatballs make it quick and easy, while pineapples and peppers keep it summery. The sauce is amazing; just the right balance of sweet and sour. I like to serve it over Jasmine rice, but it would be great over any kind you prefer.

[Slow Cooker] Hawaiian Meatballs

I like green bell peppers best, but mix and match to your heart’s content – I’m sure they’d all be fabulous. If you have a bigger slow cooker, you can always fill up some extra space with more peppers, more pineapple, or whatever else you can dream up. This is a fun recipe to play with, and I look forward to hearing about everyone’s variations!

Slow cooker recipes are great for keeping the oven free for dessert without affecting dinner plans. I currently have a rhubarb pie in the oven, and I might throw together some cookies soon too. A quick pot of rice and dinner is ready to go whenever we’re ready to eat. As an added bonus, this recipe reheats very well; great for lunches or dinners for another day (or in my case, the rest of the week.)

[Slow Cooker] Hawaiian Meatballs[Slow Cooker] Hawaiian Meatballs

Adapted from Six Sister’s Stuff
Makes 3+ quarts

Ingredients

22 oz frozen meatballs1
2 medium-large bell peppers2
2 (20 oz) cans pineapple chunks

reserved pineapple juice
1 1/2 cups brown sugar (do not pack!)3
1 cup white vinegar
3 Tbsp soy sauce
4 heaping Tbsp cornstarch

Directions

  1. Slice the peppers and cut into approximately 1″ pieces; set aside.
  2. Drain the pineapple juice into a medium bowl and set aside the pineapple.
  3. Add sugar, vinegar, soy sauce and cornstarch to the juice, whisking vigorously until well mixed.
  4. In your slow cooker, layer the meatballs, pineapple chunks and green peppers.4
  5. Carefully pour in the sauce and cover with the lid.
  6. Cook on low for about 8 hours.
  7. Serve with a side of rice, and maybe some pie for dessert.

Notes

1 If you have a large slow cooker, feel free to use a larger package of meatballs. If you have a little one like me, try to get as close to 22 oz as possible or the recipe won’t fit.
2 Again, I like green best, but play around with red and yellow if you want!
3 If you pack the brown sugar, it’ll be way, way too sweet. Just lightly scoop it in and level it off like you would with white sugar.
If it’s convenient, you can wait and add the peppers during the last hour or two. This way they’ll retain a little crunch and a more vibrant green color.

Fresh Peach Pie

Despite the huge amount of effort involved, peach pie is one of my favorites. It’s a summery flavor that’s delicious all year round, and is a great way to use those large trays of peaches I can’t seem to help buying from Costco. The hint of cinnamon present is always a welcome flavor in my book, and a dash of nutmeg adds a little something. As one of the sweeter pies, it’s definitely a dessert pie to me, but I’d never turn it down for breakfast.

Peach Pie

Fresh peaches are admittedly a pain to work with, but it’s oh so worth it in the end. If you’re on top of things, peel and slice enough peaches for several pies and freeze them in pie quantities for later use. Just make sure you let them thaw before you use them, and maybe add a little extra flour.

Peach Pie

Never peeled peaches before? You’re in luck – there’s an easy way! Set a large pot of water to boil (not a rolling boil, more like a strong simmer) on the stove, and place a bowl of ice water nearby. I like to put a colander in the sink as well but that’s up to you. For each peach, submerge in the boiling water for about 30 seconds, then immediately dunk in the ice water for another 20 seconds. With a paring knife, cut the peach (around the pit!) into 8-10 sections. The skin should just slide off the fruit during this process, but if it’s still sticking you can redo the boiling/ice water baths. Keep in mind, however, this will only work if your peaches are ripe enough. Throw the slices in the colander, the skins in the disposal, and the pit in the trash, and you’re good to go! Repeat for all your vast trays of peaches as you revel in how easy it is while wasting no delicious peach. You can definitely take the skin off before slicing the peach, but skinned peaches are ridiculous slippery, so I prefer the extra grip while I hold it.

As summer winds down, this is a wonderful pie for a “last hurrah”; saying farewell to summer with fresh peaches, and welcoming fall with that hint of cinnamon.

Peach Pie

Fresh Peach Pie

Adapted from Better Homes & Gardens
Makes one 9″ pie

Ingredients

Pastry for a double-crust pie

6-8 large peaches, peeled and thinly sliced
1 Tbsp lemon juice

1/2 – 3/4 cup sugar (I usually use the lesser amount)
1/3 cup flour
1/2 tsp cinnamon
a sprinkle of nutmeg (optional)

Directions

  1. Preheat the oven to 375 degrees Fahrenheit.
  2. Layer the bottom crust in the pie plate, and trim the edges to 1″ larger than the rim.
  3. Gently toss the peaches with the lemon juice, and set aside.
  4. Whisk dry ingredients in a large bowl until well combined, and gently fold in the peaches.
  5. Layer the peach mixture in the pie plate, and cover with the second crust, either with a lattice top or cutting vents for steam to escape. Seal the edges and crimp as desired.
  6. Bake until the crust is golden brown and the juices are bubbling, about 50 minutes.
  7. Let cool completely before enjoying with whipped cream, vanilla ice cream, or both.

Macaroni Shrimp Salad

With Labor Day Weekend a thing of the past, summer is slowly winding down. We are still having warm weather here in Montana, but you can definitely tell the season is shifting. It was just barely getting light at 6:30am when I left for my half marathon yesterday (new PR of 2:25:45!) which means fall is just around the corner. But don’t fret, there’s still time for a few more summer recipes before the onset of Pumpkin Season (I consider this to be October 1st.)

Macaroni Shrimp Salad

A summer family favorite is a macaroni shrimp salad. Perfect as a side dish, it’s a crowd-pleaser as well as an easy dinner recipe. I often eat the leftovers for lunch in the subsequent days. It does require a couple hours in the fridge, but takes minimal active effort beyond measuring and a bit of chopping. Plenty of shrimp and macaroni in a creamy sauce, dotted with bright green peas, and flavored with a little Dijon, this salad is fairly mild and tastes great even to people that don’t like mustard (like me.)

If you’re in charge of a side dish for a last summer barbecue, this is a great option. Keep it in the fridge until you’re ready to eat, and if it’s going to be sitting out in the heat, consider surrounding the bowl with some ice.

Macaroni Shrimp Salad

Macaroni Shrimp Salad

Inspired by Krazykhat (allrecipes.com)
Makes about 8 cups 

Ingredients

8 oz shell macaroni pasta

1 cup mayonnaise
1/4 cup sour cream
1 1/2 Tbsp lemon juice
2 (scant) Tbsp Dijon mustard
1/4 tsp pepper
3 Tbsp shallots, minced2
1/4 cup chopped fresh dill weed3

3 cups frozen, cooked tail-off shrimp (thawed and drained)
1 1/2 cups frozen peas

Directions

  1. Cook pasta according to package instructions. Drain and rinse under cold running water to cool. Set aside.
  2. In a medium serving bowl, combine all remaining ingredients except peas and shrimp. Stir until well combined and smooth.
  3. Using a large spatula (rubber scraper), gently fold in the macaroni, shrimp and peas until completely mixed.
  4. Chill in the refrigerator until ready to serve, at least two hours.

Notes

I like Kirkland’s frozen shrimp (Costco’s brand)
If you don’t have shallots, you can substitute the following: 1/4 minced onion, 1 clove garlic (minced)
The dill adds a great flavor to the dish, but if you don’t like dill or forget to buy it (as I did), it’s just fine to leave it out