Meyer Lemon Raspberry Spinach Salad

I feel a little silly even posting this as a recipe, and I don’t normally post recipes that require possibly hard-to-find ingredients, but I love this so much I just have to share it.

Last week I took a cooking class at Olivelle, a local store in Bozeman that sells olive oils, vinegars, salts, and spices. I’d never actually been in the store before I took the class on making crepes, and I’m guessing that was a solid financial decision as it’s very easy to spend a lot of money there.

Lemon Raspberry Spinach Salad {{Baking Bytes}}

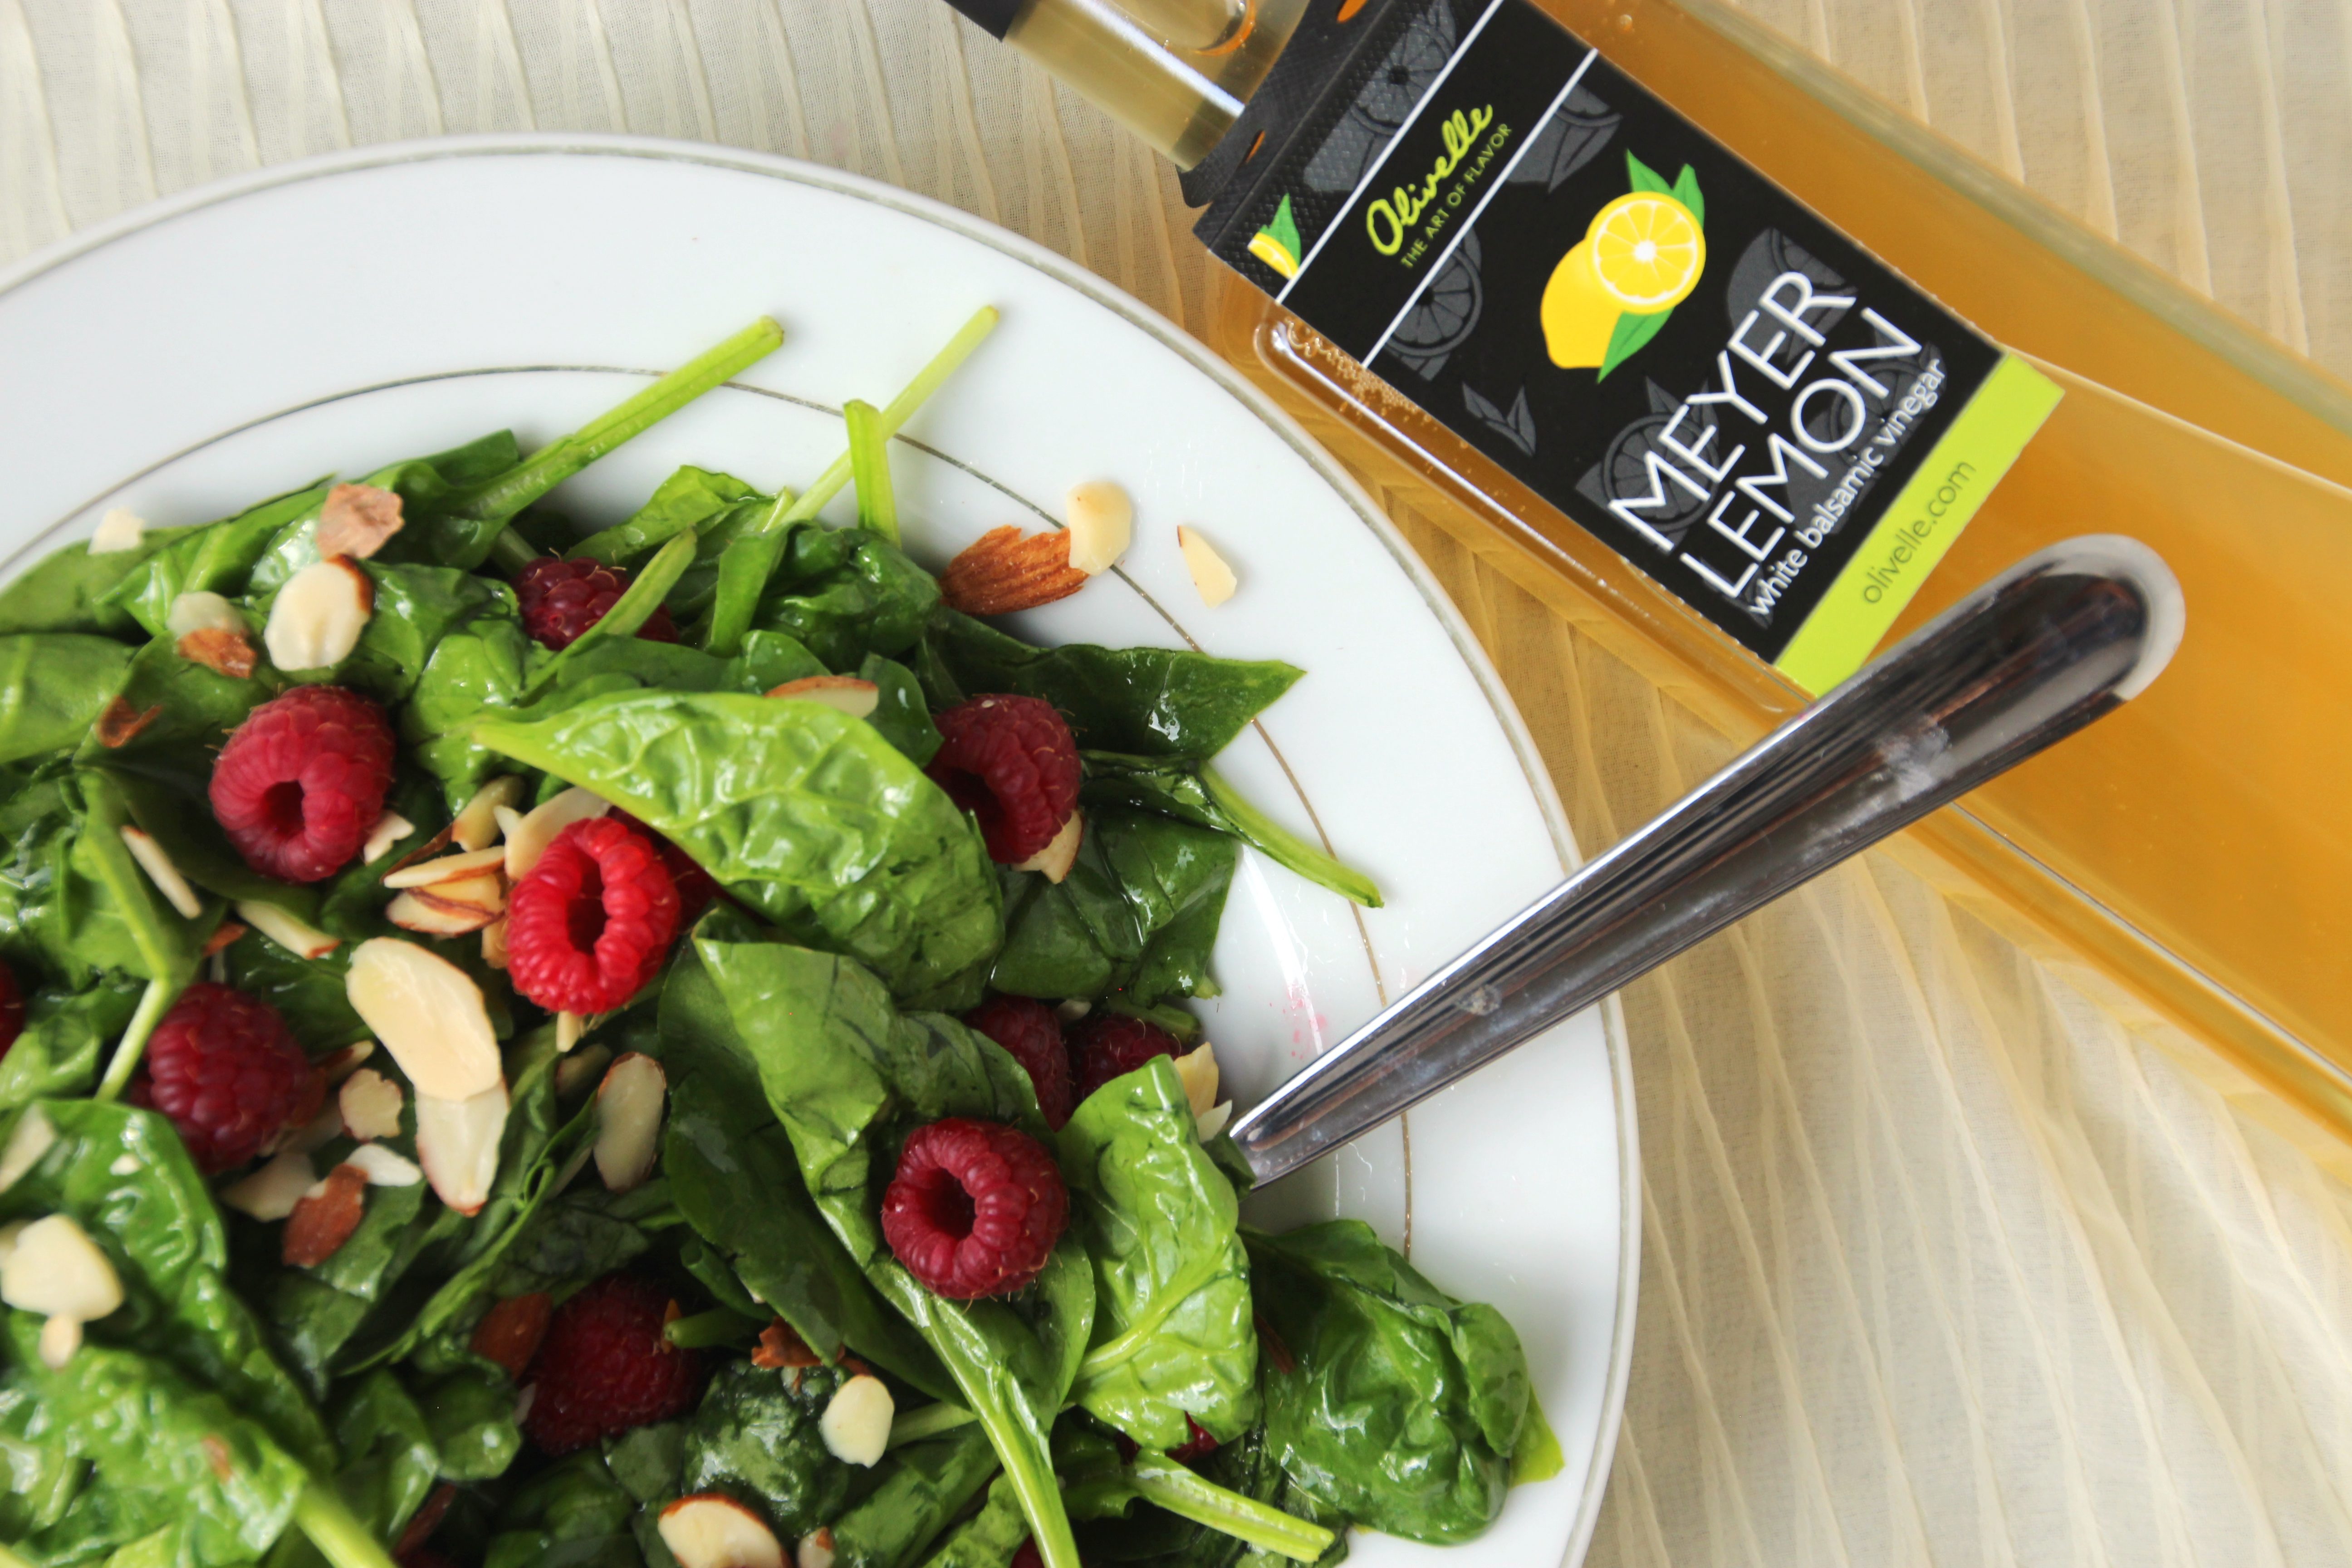
One of the recipes in the class used a Meyer lemon balsamic vinegar, and it is possibly one of the most amazing things I’ve ever tried. Sweet and tangy, I knew it would be delicious all on its own as a salad dressing. Although I managed not to buy the crepe pan (yet), I did walk out with this Meyer lemon vinegar and a caramelized garlic olive oil.

Lemon Raspberry Spinach Salad {{Baking Bytes}}

I always buy giant bags of spinach for my breakfast smoothies, and I recently discovered Costco carries pretty reasonably priced sliced almonds as well, which are perfect for salad toppings. All that wonderful flavor and crunch without the giant pieces or the tedious chopping.

As my raspberry bushes are finally producing in abundance this year, I can’t just eat them all straight off the bush before they get overripe. Although I will probably freeze some, mostly I enjoy them fresh as a topping on salad, yogurt, ice cream, and probably soon, waffles. They add a wonderful burst of color and flavor to a salad, and change it up from my normal mandarin oranges or strawberries.

Lemon Raspberry Spinach Salad {{Baking Bytes}}

This salad is bright and tangy, and would go great as a side dish for almost any summer meal. I wrote out measurements for one, as that’s what I am usually making, but you can obviously increase it to feed several people at once. Make sure your spinach and your raspberries are reasonably dry and you are good to go for whatever quantities you like.

If you’re looking to make this into an entree, I think some chopped chicken or fish would be an excellent addition. I’ve eaten it as a side dish most days since I bought it, but if I ever bought chicken I’d certainly give the entree a try. If you do, let me know what you think!

And if you’re a local Bozemanite, get thee to Olivelle, pronto.

Lemon Raspberry Spinach salad
Serves 1

Ingredients

2 cups spinach, rinsed and dry
2-3 tsp Meyer Lemon balsamic vinegar

1/4 cup fresh raspberries, rinsed and dry
1 Tbsp sliced almonds

Directions

  1. In a medium bowl, combine spinach and vinegar, and use a rubber spatula to gently stir until spinach is well coated.
  2. Gently fold in raspberries and almonds (or add them after it’s plated if you want to make sure they are visible.)
  3. Enjoy immediately.

Advertisement

Vanilla Cinnamon Granola

Ah, spring. Sunny skies and reading books in the yard are definitely in my near future. Although, given Montana’s weather snow could possibly (probably) be in my near future as well, but I like to focus on the positive.

Vanilla Cinnamon Granola {{Baking Bytes}}

In the warmer months I often start my days with yogurt and granola instead of hot oatmeal. High protein and filling, with fresh fruit for color and flavor, it’s always makes for a pleasant morning. However, given the high sugar content of most yogurt and granola, it can easily turn into more of a dessert than a healthy breakfast. I’ve solved the yogurt problem by buying the plain kind and adding a small dollop of homemade jam, which takes those sugar grams down to a much more reasonable level without sacrificing flavor, since I don’t particularly care for the taste of unflavored yogurt.

Vanilla Cinnamon Granola {{Baking Bytes}}

However, after trying and failing (and trying and failing, and trying and failing) to find a granola with more grams of protein than sugar in each serving, I decided I should probably just make my own. Unfortunately, even most of the online recipes add a bunch of sugar!

Vanilla Cinnamon Granola {{Baking Bytes}}

(By the way, does it annoy anyone else when a recipe is touted as being sugar-free and then adds honey? This drives me insane. Honey is still sugar, people.)

I eventually found a recipe that legitimately doesn’t add any sugar, modified it slightly to fit my preferences (not a fan of cashews), and made a batch to try. It turned out pretty close to what I was looking for on the first attempt, which is always extra fantastic when trying new recipes. I later used inspiration from a very delicious but much more sugary recipe and took the best of both worlds to meet my needs.

Vanilla Cinnamon Granola {{Baking Bytes}}

Crunchy, nutty, and full of great cinnamon flavor, this recipe is easy to tailor to suit your tastes and needs, or just to mix it up a little with every batch. I used almonds, walnuts, sunflower seeds, chia seeds, and quinoa but you can certainly use any nuts or seeds of your choice, just try to keep it between 1.5 and 2 cups total. I think macadamia nuts would be fantastic, as well as pumpkin seeds. If you like dried fruits or chocolate in your granola, definitely add some (after it’s completely cooled!), just bear in mind this can quickly increase the sugar content. Additionally, if you’re not sold on the no-sugar-added idea, throw some honey or brown sugar in there too.

Vanilla Cinnamon Granola {{Baking Bytes}}

Vanilla Cinnamon Granola

Inspired by Super Healthy Kids and Pastry Affair
Makes 4+ cups

Ingredients

4 egg whites
1 Tablespoon vanilla
up to 1/2 cup packed brown sugar or honey (optional)1

2 cups old-fashioned oats
1/2 cup chopped raw almonds
1/2 cup chopped raw walnuts
1/4 cup hulled sunflower seeds
1/4 cup chia seeds
1/4 cup uncooked quinoa
1 Tablespoon cinnamon2

Directions

  1. Preheat oven to 325 degrees Fahrenheit. Line an edged baking sheet with parchment paper and set aside.
  2. Add egg whites to a large bowl and whip with an electric mixer until fluffy and opaque.
  3. Stir in vanilla and sugar (if using).
  4. Add oatmeal, nuts, seeds, quinoa, and cinnamon and stir until mixture is completely combined and moistened.
  5. Spread evenly on prepared baking sheet, ideally not more than 1/4″ thick.
  6. Bake for about 25 minutes, until granola is golden and crisp. If you like a loose granola, stir it every 10 minutes or so.
  7. Let cool completely on the counter, then break into pieces and store in an airtight container.

Notes

I used no sugar since that’s what I was looking for. As a topping on yogurt or fruit, I don’t miss it a bit, but it does results in a somewhat less chunky granola in the end. If you like it to stay in larger pieces, add 2 tablespoons packed brown sugar; if you eat it more as a cereal and/or are looking for a traditional flavor, I would add about 1/4 cup packed. If you are adding 1/4 cup or more of sugar, you can probably omit half the egg white, or all of it to maintain a looser granola.

If this seems like an absurd amount of cinnamon, feel free to cut it in half. It’s way easier to add more than it is to take it away.

Roasted Cinnamon Almonds

Today’s recipe is inspired by Costco. Costco is one of my favorite stores to peruse because they have awesome stuff in all categories from housewares to clothing to food. The samples are also a pretty fantastic perk, although M and I don’t often go to Costco during sample time so we can avoid the crowds. A few weeks ago I made a quick stop in the afternoon to pick up one of the fake orchids they have (which I’m still psyched about) and made the sample rounds while I was there. One of the things I came across was roasted cinnamon sugar almonds.

Normally I’m not a big nut person (the notable exception being almond roca) but I thought I’d give these a try on a whim, and holy crap they are amazing. To be fair, I’m pretty sure they are like 75% sugar so basically it’s cinnamon almond candy, but nonetheless they were fantastic. It gave me the idea to make my own, less candy-like version at home.

Roasted Cinnamon Almonds {{Baking Bytes}}

Doing my usual Pinterest perusal came up with mostly very similar recipes, which I modified to fit my own needs. I wasn’t really looking for a sugary snack this time around, but if you’re wanting a sweeter recipe, like for holiday gifts, I give a range of sugar amounts in my notes below the recipe.

Crunchy roasted almonds coated with cinnamon and sugar are a high-protein and tasty option for any time of day. Make them without sugar for a healthy snack, or add the sugar for a sweet treat. I personally like both options, although the latter is probably more of a crowd pleaser. (They also turn out shinier, and ergo prettier, like the ones pictured.)

Roasted Cinnamon Almonds {{Baking Bytes}}

They do take a while to bake, but the process is pretty low maintenance and makes your house smell lovely. You could also definitely make two batches at a time if you have two lipped cookie sheets – the almonds will keep for at least a couple of weeks.

Roasted Cinnamon Almonds

Adapted from the Internet
Makes 4 cups

Ingredients

1 egg white
1 tsp water
1 tsp vanilla
1.5 tsp cinnamon
up to 1/2 cup brown sugar, to taste

4 cups raw almonds

Directions

  1. Preheat oven to 250 degrees Fahrenheit. Line an edged baking sheet with a silicon mat (or parchment paper) and set aside.
  2. In a large bowl, whisk together all ingredients except almonds.
  3. Add almonds, and stir until they are well coated with the cinnamon mixture.
  4. Spread evenly on prepared baking sheet. It’s okay if they touch but you don’t want a pile.
  5. Bake for 60-90 minutes, stirring them once or twice. I like mine more roasted so I went closer to 90 minutes, but they are great after an hour also. Give one a taste (carefully) and see what you think.
  6. Let cool completely, then store in an airtight container.

Notes

Using no sugar is still delicious and a healthier treat, or 1/4 cup gives a relatively mild sweet flavor. If you’re looking for something really sugary (more along the lines of Costco’s version), add up to 1/2 cup of sugar, feeling free to use up to half white sugar if you prefer.

Almond Roca

Happy holidays from Australia! I am busy enjoying sun, sand, and surf before I head back to winter for ski season. More updates when I get back. =) But even though though I’m on the opposite side of the world, I made sure to schedule this recipe to share with all of you. This is something my family (and many family friends) make for Christmas every year and I definitely wanted to share it. Although my family has reduced how much we make each year, we still make several batches to share and keep in the freezer. It is a Top Secret recipe that my mom shares with everyone.

Almonda Roca {Baking Bytes}

If you’ve never had homemade almond roca, you are seriously missing out. I encourage you to make some, pronto. I actually don’t like almonds that much and I can’t get enough of it. Sweet and crunchy, it is delightful straight out of the freezer, or at room temp (if you can wait that long.) It makes a beautiful “appetizer” to have out for parties and a fabulous gift. As a kid I always gave some to my teachers, and had several that said the bag never even made it home.

Almond Roca >> Baking Bytes

Although it’s a little time-consuming, and kind of messy, it’s an easy gift for teachers, neighbors, extended family, or just to have on hand in case you forgot someone. Even better, it keeps well in the freezer for a few months so you (or the recipient) can set it aside if there’s a sugar overload or more time-sensitive items to be eaten. Fair warning though, as easy as it is, it’s a bit easy to screw up too; make sure you read the notes at the bottom to help you be successful.

Almond Roca >> Baking Bytes

Buttery toffee, crunchy almonds, and sweet chocolate melt in your mouth in perfect harmony.

Almond Roca >> Baking Bytes

I dare you to eat just one.

Almond RocaAlmond Roca >> Baking Bytes

Makes 1 cookie sheet

Ingredients

2 cups almonds

1 pound good quality salted butter
1 cup sugar
2 T. water

1 (10 oz) package chocolate chips

Directions

  1. Coarsely chop 1 cup of the almonds; set aside.
  2. Finely chop the remaining cup of almonds; set aside.
  3. Line a cookie sheet or jelly roll pan with aluminum foil and lightly oil with vegetable or canola oil.
  4. In a small-medium, heavy, saucepan over medium-low heat, melt butter, sugar and water.
  5. Heat candy to 250 degrees on a candy thermometer, stirring often. It will look kind of marshmallowy. (That’s definitely a technical term.)
  6. Add in the cup of coarsely chopped almonds, and heat to 300 degrees, stirring constantly. (It should be very pale brown and thick but also oily looking.)
  7. Pour immediately onto prepared cookie sheet and spread out as thinly as possible without creating holes.
  8. Melt chocolate chips in microwave for one minute and stir. Repeat until chocolate is completely melted and stir until smooth.
  9. Thinly spread candy with chocolate and sprinkle with about half of the finely chopped nuts.
  10. Transfer entire cookie sheet to freezer for 45 minutes, or until candy is hard.
  11. Remove cookie sheet from freezer, flip over the candy (don’t worry about breaking it), and let it warm up for about 15 minutes.
  12. Melt the remaining chocolate, and repeat the coating on the back. It is easiest to do this is small sections as the chocolate hardens quickly.
  13. Return the cookie sheet to the freezer until chocolate is firm, break the candy into bite-sized pieces and store in resealable bags, or put some in a cellophane candy bag and pass out to adoring fans.

Almond Roca >> Baking Bytes

Notes

1 You must use good quality butter like Tillamook or Darigold; store brands produce inconsistent results and might fail completely. And make sure it’s salted butter!
2 My mom uses a large pullout cutting board. I like to use a lipped cookie sheet because it keeps it a little more contained. Just make sure you use something firm, mobile, and that will fit in your freezer (or outside, if it’s cold enough.) It’s also a good idea to lay down newspaper and/or a silicon trivet to protect your counter from the hot candy (and excess oil runoff if you’re not using something with a rim.)
3 It is best to use a long-handled wooden spoon for stirring, as it doesn’t get hot or damage the pan during your million hours (30 minutes) of stirring.
4 Make sure your candy thermometer gets deep into the mixture; if you use too large a pan you are likely to burn the candy because the thermometer isn’t registering the correct temperature. My best luck has been with a 4-quart Dutch oven.
5 I buy chocolate chips from Costco so I never actually measure how much I use, but I melt about a cup at a time. I like to spread it quite thin, but that’s definitely up to you. I always use semi-sweet (because I buy in bulk) but dark chocolate would be delicious too if you prefer.
6 Even if you’re making a lot of batches, don’t try to cook more than one at a time; it doesn’t seem to go very well. You’ll be much more successful using an assembly line, ideally with extra hands. Pour some eggnog and make it a family or friend activity.
7 If your batches are prone to separation, make sure your heat is not too high! Error on the side of lower, it will take longer but it’s less prone to separating. If the separation occurs when you add the almonds, try adding them in slowly instead of all at once.
8 If you can’t make it work, comment here or email me and I’ll do my best to help you get it right next time. =)