Peanut Butter Oreo Overload Brownies

Phew. Okay kids, I promised you sugar and here it is. All of it. So much.

The other week Pinterest lit up with these brownie Oreo peanut butter cupcake delights. The ones I happened across didn’t lead to a recipe, but it looked pretty straightforward. All I needed was a reason to make them because I certainly wasn’t going to eat 18 of these babies. Luckily, my work had a charity bake sale and these immediately came to mind as something I could donate.

Peanut Butter Oreo Overload Brownies {{Baking Bytes}}

Due to the brownie mix (which is one of the few things I’m okay using a mix for), these come together simply with relatively little time commitment and are easy to transport for parties. But let me warn you, they are rich! I am not normally one of those people who thinks thing are too sweet (I can eat chocolate pudding pie for daaaays) but these take it to a whole new level. I also don’t typically eat packaged candy (which is probably part of why it’s a bit overwhelming to me) but I made an exception for these.

Peanut Butter Oreo Overload Brownies {{Baking Bytes}}Peanut Butter Oreo Overload Brownies {{Baking Bytes}}

With a glob of peanut butter sandwiched between two Oreos and surrounded by brownie, these things do not mess around. Maybe you only want half of one, maybe you want five, I don’t judge. The fudgy-ness of a brownie, the crunchy-ness of an Oreo, and a smooth peanut butter filling give you all the textures you could want in one chocolatey bite.

Peanut Butter Oreo Overload Brownies {{Baking Bytes}}

I topped mine with some Reese’s peanut butter chips for some added flair, and because I always have them on hand anyway. Totally not necessary but they do look prettier that way, and as we all know: you do eat prettiness.

Peanut Butter Oreo Overload Brownies {{Baking Bytes}}

These would be great for an upcoming Halloween party (maybe cut them in half for kids) if you want to get away from all the pumpkin flavors. (If you don’t, my pumpkin ginger cupcakes are amazing, not that I’m biased.)

Peanut Butter Oreo Overload Brownies

Inspired by various Pinterest pins
Makes ~18

Ingredients

1 box brownie mix (for 8×8 pan)1
–> plus any ingredients called for on package

1 package Oreos (or knockoffs)
peanut butter
Reese’s peanut butter chips (optional)

Directions

  1. Preheat oven to 325 degrees Fahrenheit. Line muffin pans with cupcake liners and lightly grease with cooking spray.
  2. Mix the brownie batter according to package directions and set aside.
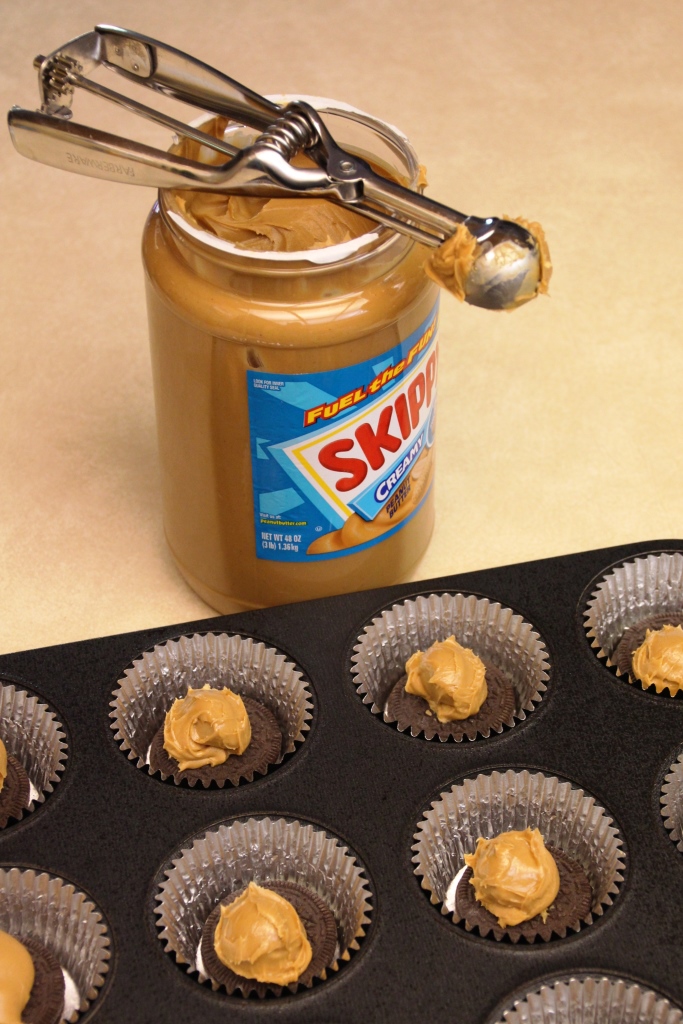
  3. Place an Oreo (or knockoff) in the bottom of each muffin liner and top with one teaspoon of peanut butter (using a cookie scoop will greatly speed up this process.)
  4. Gently press a second cookie on top of the peanut butter, pressing down till the peanut butter is spread evenly across the cookie.
  5. Add two rounded tablespoons of brownie batter on top of the Oreos, using a toothpick to spread it evenly down the sides and across the top. Liners should be almost completely full.
  6. Top with Reese’s peanut butter chips (optional).
  7. Bake 20-25 minutes (the tops should be matte).
  8. Let cool completely in the pan, then store in an airtight container.

Notes

1 I used the Ghirardelli brownie mix that Costco sells, but it would be much easier to use a mix that doesn’t have chocolate chips/chunks in the batter.

You may have a little leftover brownie batter, just bake it in additional liners, filling each about 2/3 full. Great for brownie sundaes after you’ve given all these away.

Cookies & Cream Ice Cream {National Ice Cream Month}

[Welcome! In case you missed it, this month is National Ice Cream month. Each Tuesday I’ll be sharing a new ice cream recipe for the entire month of July. If you want to see the rest of month’s recipes, they can be found at the following links: orange creamsicle Dixie cups, Baileys, peanut butter fudge ripple,  Kahlúa chocolate.]

And just like that, July is nearly over, making this our last week of National Ice Cream Month; I hope you enjoyed it! Did it go by crazy fast for you, too? I thought the month just flew by. On Saturday I completed my third half marathon for the year, making me halfway through my goal of six. It was a very small race (fewer than 20 for the half distance) but the course was well supported and beautiful. It was not a PR, but I finished about 10 minutes faster than I thought I was going, and given the hellacious side cramp I had for about 6 miles, I’m pleased with my ~2:19 finish. The only way to make my side cramp bearable was to run with my hand on my side and apply constant pressure, and I kept thinking to myself “I’m a little teapot…” Fortunately my fourth thirteener is not until September so I am hoping to get this side cramp nonsense figured out before then. I’m also planning to squeeze in a 5k or two because I figure compared to a half marathon it will be over before I realize I’ve starting running. Haven’t run a proper 5k in over a year, so I’m curious if I’ve improved my time. We shall see!

Cookies & Cream Ice Cream {{Baking Bytes}}

We’re going to round out the month with a classic American flavor: cookies & cream. A staple at ice cream shops and grocery store aisles, this flavor remains one of the best-selling flavors in America since it gained popularity in the ’80s. Personally, I’m a big fan as well. The lightness of vanilla with the added bonus flavor and texture of chocolate wafer cookies.

Cookies & Cream Ice Cream {{Baking Bytes}}

Nowadays Oreos (or a similar style) are often used, and I’m not one to argue with the pros. However, given I’m a DIY kinda girl, I opted to make a homemade version of the cookies. You can obviously substitute a store-bought variety if you don’t want to make your own, but this is a quick and easy recipe you can whip up while you’re waiting for the ice cream to chill in the fridge. I used most of the recipe in my ice cream because I like a lot of cookie. If you like less, you may just need half of the cookie recipe. I prefer a coarse grind for even distribution plus some bigger chunks of cookie, but feel free to customize these steps to your own preferences. You could use all coarse powder, or all big chunks, or whatever combination you like best.

Cookies & Cream Ice Cream {{Baking Bytes}}

One of the best parts of cookies and cream is how versatile it’s gotten over the years. Traditionally it uses a base of vanilla ice cream, but these days you can find tons of variations with chocolate, mint, and multitudes of other flavors. If you’re not feeling vanilla today, try it with chocolate or one of the flavors from this month’s lineup. This week I didn’t feel the need to mess with a classic, so below find instructions for homemade Oreo cookies as well as vanilla cookies and cream ice cream. A crowd-pleaser for kids and adults alike, this is sure to become a staple in the house of Baking Bytes.

Homemade Oreos (Cookie only)1

Adapted from Cupcake Project
Makes ~5 dozen cookies

Ingredients

1 1/4 cups all-purpose flour
1 cup sugar
1/2 cup unsweetened cocoa powder
1 tsp baking soda
1/4 tsp baking powder
1/4 tsp salt

2/3 cup butter, room temp
1 large egg

Directions

  1. Preheat over to 375 degrees Fahrenheit and line two cookie sheets with silicon mats or parchment paper.
  2. In the bowl of a stand mixer, whisk together by hand the dry ingredients (flour, sugar, cocoa, baking soda and powder, and salt).
  3. And butter and egg, and beat on medium speed until well combined and dough comes together.
  4. Use a 1 tsp cookie scoop and place dough 2″ apart on a lined cookie sheet.
  5. Bake for 9 minutes2, then remove to wire rack to cool completely.

Notes

I only include the recipe for the cookie part of the Oreos since that’s all I needed for the ice cream. If you want the filling also, head on over to the Cupcake Project for full instructions. The only thing I changed was the amount of butter, mainly because I’m lazy about measuring. They seemed to work great with 2/3 cup instead of the original, but it’s totally up to you. I also did not bother flattening my cookies and they seemed to get plenty thin enough, and were perhaps a bit larger than traditional Oreos. Bake a test cookie or two to see what works best for you.

If you are using a dark pan and/or parchment paper instead of mats, you may need to bake them less. Start with 7 minutes and taste one after it’s cooled a few minutes: it should be crunchy but not taste burned.

Cookies & Cream Ice Cream

Makes ~6 cups

Ingredients

1 recipe chocolate wafer cookies (above) OR 2-3 dozen Oreos

1 cup sugar
2 cups heavy whipping cream
1 cup half and half (or milk)
1/2 cup egg substitute
1 1/2 tsp vanilla

Directions

  1. Crush about half to three-fourths of the cookies into a very course powder1, and chop the remainder into desired chunky size (optional). Set aside.
  2. Whisk together all ingredients except cookies until completely combined.
  3. Cover bowl and chill in the refrigerator at least 4 hours, or overnight.
  4. Freeze according to your ice cream maker’s directions
  5. During the last few minutes of churning, add crushed cookies (you may not want all of them. I added about 1/3 cup at a time.)
  6. Stop churning, and fold in chopped cookies, if desired.
  7. Place in a freezer-safe bowl to freeze for an extra three hours, or overnight. Cookies will soften and meld a little with the ice cream overnight so I like to give it lots of time for that.

Notes

1 For crushing cookies, place them in a Ziploc and use a rolling pin or a mason jar. Or use a food processor if you have one. I crushed about 2/3 the recipe, then chopped (I just broke them into 4-8 pieces with my hands) about half of the remainder and added that in. Add as many or as few as suits you.

Kahlúa Chocolate Ice Cream {National Ice Cream Month}

[Welcome! In case you missed it, this month is National Ice Cream month. Each Tuesday I’ll be sharing a new ice cream recipe for the entire month of July. If you want to see the previous recipes, they can be found at the following links: orange-vanilla Dixie cups, Baileys, and peanut butter fudge ripple.]

Ah, Kahlúa. The coffee liqueur we all know and love. (Unless you don’t, in which case today’s flavor is probably not for you.) This is actually a flavor I make fairly often, even though I never got around to posting it before now. It is a slight modification on my chocolate ice cream recipe, but a whole lot more fun. Very popular with all the ladies I’ve served it to, but unfortunately I don’t have a wide male test audience so I can’t speak to its gender neutrality. In any case, it’s one of my go-to flavors and definitely great for ladies’ night.

Kahlúa Chocolate Ice Cream {{Baking Bytes}}

Smooth and creamy, chocolatey with a completely customizable amount of Kahlúa, this is an easy recipe to tweak to your preferences. Not big on the boozy taste? Use just two ounces (or even less) of the liqueur. Big fan of Kahlúa? Bump it up to four ounces for more impact. I recommend starting with one ounce, and adding it one half to one ounce at a time until it has your preferred strength. Pro tip: drink some water between each taste test. Also, be wary of adding more than four ounces as the ice cream may not harden properly even after several hours in the freezer.

Kahlúa Chocolate Ice Cream {{Baking Bytes}}

While making a batch for the blog, I tried the blender method from last week’s recipe instead of heating it like I have in the past. It worked beautifully and was way faster, plus it cuts down on chilling time. I will definitely be using this method in the future, and have updated my previous chocolate ice cream post to match.

Like the Baileys ice cream, this one stays very soft in the freezer so you want to dish it up pronto after you take it out. (You can see it starting to melt in my pictures and that was less than two minutes outside of the freezer.) It is excellent both plain and with whipped cream and/or chocolate sauce. Although I’ve never made it this way, I think it would be delightful with the fudge ripple from the peanut butter ice cream.

Kahlúa Chocolate Ice Cream {{Baking Bytes}}

Personally I think this recipe needs little talking up, so I’ll leave it here. If you’re a chocolate and/or Kahlúa fan, this one’s for you. If this recipe doesn’t fit your style, be sure to check back next week for the last post: an American classic.

Kahlúa Chocolate Ice Cream 

Makes ~6 cups

Ingredients

1 cup sugar
1/3 cup unsweetened cocoa powder
2 cups heavy whipping cream
1 cup half and half (or milk)
1/2 cup egg substitute
2-4 oz Kahlúa1

Directions

  1. Mix all ingredients in a blender until smooth and completely combined.
  2. Cover bowl and chill in the refrigerator at least 4 hours, or overnight.
  3. Freeze according to your ice cream maker’s directions, then place in a freezer-safe bowl to freeze for an additional three hours, or overnight.

Notes

1 I usually add 3 oz of Kahlúa, which is semi-strong without overwhelming the chocolate flavor. Use less for just a hint of flavor or more if you’re looking for more Kahlúa than chocolate. As previously mentioned, be wary of adding more than 4 oz as it may not harden properly!

Peanut Butter Fudge Ripple Ice Cream {National Ice Cream Month}

[Welcome! In case you missed it, this month is National Ice Cream month. Each Tuesday I’ll be sharing a new ice cream recipe for the entire month of July. If you want to see the first two recipes, they can be found here and here.]

Week three already, can you believe it? This week we are diving headfirst into decadence with a peanut butter and chocolate confection. Regular readers have probably noticed that peanut butter is something I consider to be a staple food. I eat it at least once a day, usually spread atop an English muffin with a dusting of cinnamon and sugar (my standard breakfast), or as a dip for a sliced apple sprinkled with cinnamon (my go-to work snack). I never grow tired of peanut butter, whether I’m eating it straight out of the jar or in a more complicated creation. I even took my own jar of Jif when I spent six weeks in Japan, having learned from my Scotland semester abroad that peanut butter is not quite as common in other parts of the world. (My mom saved the day by mailing me a jar to Scotland so I could eat all the PB&J I wanted, much to the confusion of my British flatmates and friends.)

Peanut Butter Fudge Ripple Ice Cream {{Baking Bytes}}

In any case, peanut butter is a big deal here in the home of Baking Bytes. M almost always tops his preferred flavor of vanilla ice cream with chocolate sauce, peanut butter, and a banana. (According to him, the banana makes it healthy.) I thought this week I’d try combining some of those flavors into one sweet treat, namely peanut butter ice cream with a chocolate ripple.

Peanut Butter Fudge Ripple Ice Cream {{Baking Bytes}}

My first attempt had way too much peanut butter (like that’s even a thing) and ended up more like extra fluffy peanut butter than an ice cream. I toned it down for my second attempt and in addition to not freezing hard as a rock, it’s definitely ice cream. Smooth and very peanut buttery, the chocolate ripple breaks up the thickness of the flavor. I’d never tried a ripple before, but it turned out to be very easy. If a mix-in isn’t really your style, just top it with your favorite chocolate sauce or keep it plain; it is certainly delicious all on its own.

Peanut Butter Fudge Ripple Ice Cream {{Baking Bytes}}

Below find my recipes for peanut butter ice cream and a chocolate ripple, as well as instructions for combining the two. Keep in mind this is not a hot fudge recipe, it is meant to stay soft in the freezer as a mix-in, rather than be served on top, so it is very thin at room temperature – this is normal. Just make sure you chill it in the fridge before you add it to the ice cream or it may blend in too much.

Peanut Butter Ice Cream 

Makes ~6 cups

Ingredients

3/4 cup sugar
2 cups heavy whipping cream
1 cup half and half (or milk)
1/4 – 3/4 creamy peanut butter1
1/2 cup egg substitute
1 tsp vanilla

Directions

  1. Mix all ingredients in a blender until smooth and completely combined; mixture will be somewhat thick.
  2. Cover bowl and chill in the refrigerator at least 4 hours, or overnight.
  3. Freeze according to your ice cream maker’s directions, then place in a freezer-safe bowl to freeze for an additional three hours, or overnight.

Notes

1 You could use chunky if you want, although likely the texture will still be pretty smooth after blending. The more peanut butter you add, the harder the ice cream will be. I like to use about 1/2 or 2/3 cup, which results in a strong flavor but still stays fairly soft. If you’re looking for a more subtle peanut butter flavor, I’d cut that amount in half.

Fudge Ripple

Borrowed from Brown Eyed Baker
Makes about 1.5 cups1

Ingredients

½ cup sugar
1/3 cup light corn syrup
½ cup water
6 tablespoons unsweetened cocoa powder2

½ teaspoon vanilla extract

Directions

  1. In a medium saucepan, whisk together all ingredients except vanilla. Cook over medium heat, whisking often, until the sauce comes to a low boil.
  2. Continue cooking for another minute, whisking almost continuously.
  3. Remove sauce from the heat, stir in the vanilla, and let cool in the pot for several minutes.
  4. Chill in the fridge for at least 30 minutes before using in ice cream.

Notes

I did not use near this amount in my ice cream, so I’m storing the leftovers in the freezer to use in another recipe. Depending on how much fudge ripple you like, you may end up with extra. I used about a third to half of the recipe, and I would probably use a little more next time to make sure the ripple permeates every bite.

The original recipe calls for Dutch-processed cocoa powder but I just used Hershey’s because that’s what I always have on hand. I used one tablespoon dark cocoa powder and the rest regular.

Peanut Butter Fudge Ripple Ice Cream {{Baking Bytes}}

Fudge Ripple Ice Cream

Ingredients

1 recipe ice cream of choice, chilled but not churned
1 recipe of fudge ripple (above), chilled

Directions

  1. If you haven’t already, place a freezer-safe bowl in the freezer.
  2. Freeze ice cream according to your ice cream maker’s directions.
  3. Remove bowl from freezer, and drizzle some chocolate sauce on the bottom.
  4. Gently spread about one cup of ice cream into the bowl, and top with another drizzle of chocolate sauce. Avoid stirring or the ice cream will look muddy. Repeat with remaining ice cream (you may have sauce leftover), finishing with a sauce drizzle on top.
  5. Return bowl to freezer for about 3 hours, or until ice cream is firm (or serve immediately if desired firmness is already there.)

Peanut Butter Chocolate Chip Cookies

Hope you’re having a delightful Monday! If you aren’t, maybe these cookies will help to improve it. This is probably the recipe I use most often as it’s one of M’s favorites. It’s also very consistent in baking and pops out lovely round cookies every time. Although we’ve been buying Skippy peanut butter ever since Costco stopped selling Jif (jerks), I still prefer my adaptation of the Jif recipe. It makes perfect and soft cookies every time and doesn’t require softened butter, making it a good go-to recipe for any time of the year. It also freezes well, so feel free to make a double batch and save half for later. Geared more toward a peanut butter fan than a chocolate lover, these cookies are the antithesis to the chocolate peanut butter chip cookies I’ve posted previously.

Peanut Butter Chocolate Chip Cookies {{Baking Bytes}}

Spectacularly peanut buttery with a smattering of chocolate chips, I like to make these cookies small for a bite-sized treat. They are chewy and sweet and practically require an accompanying glass of milk, so I like to have the option of eating one or five, depending on how big of a sugar rush I’m looking for. If you prefer larger cookies, have no fear. Use two tablespoons of dough instead of one, flatten slightly, and bake for an extra two minutes or so. I like to bake a test cookie if I’m not using my usual method just to make sure I don’t ruin a whole tray.

Peanut Butter Chocolate Chip Cookies {{Baking Bytes}}

Personally, I think these cookies speak for themselves so I’ll stop here. If you’re in the mood for a peanut butter experience, whip up a batch and have a few warm from the oven; your Monday can only get better from here.

Peanut Butter Chocolate Chip Cookies {{Baking Bytes}}

Peanut Butter Chocolate Chip Cookies 

Adapted from Jif’s Irresistible Peanut Butter Cookies
Makes about 5 dozen small cookies

Ingredients

1 1/4 cups lightly packed brown sugar
3/4 cup peanut butter1
1/2 cup Crisco shortening
3 Tbsp milk
1 Tbsp vanilla extract

1 large egg

2 cups all-purpose flour
3/4 tsp baking soda
3/4 tsp salt

1 cup chocolate chips

Directions

  1. Preheat oven to 375 degrees Fahrenheit and line cookie sheet(s) with parchment paper or silicon baking mats.
  2. In the bowl of your stand mixer, beat sugar, peanut butter, shortening, milk, and vanilla on medium speed until completely blended and fluffy.
  3. Add egg, beating until just combined
  4. Add flour, baking soda, and salt, mixing on low until just incorporated. Dough should not stick to your finger. If it does, stir in extra flour in very small amounts until it’s no longer sticky.
  5. Stir in chocolate chips.
  6. Using a 1 Tbsp cookie scoop, place two inches apart on prepared cookie sheets and bake for 7-9 minutes.2 They will look slightly under done, but should be matte, not shiny.
  7. Cool briefly on cookie sheet, then place on a wire rack to cool completely.
  8. Store in an air-tight container on the counter for up to 1 week (or maybe longer, they are always gone by this time), or in the freezer for several months.

Notes

1 I always use creamy, but crunchy peanut butter will definitely work. Both Skippy and Jif work great, but I have not tried a natural peanut butter in this recipe, so use caution if you do. You may need to add a little extra flour at the end, so check the dough before you add chocolate chips.

2 If you’re using dark pans, they will likely be closer to the 7-minute time, if you’re using light pans (or a silicon mat) they will probably need closer to 9 minutes. I use light aluminum pans and silicon mats and 9 minutes is correct for me.

[Psst. Don’t forget to tune in tomorrow morning for a new ice cream recipe! Hint: alcohol ahead. If you missed last week’s ice cream recipe, it can be found here.]