Cardamom Carrot Cupcakes

Hello all you fine people, hope your October is going splendidly. I have finished two of three half marathons for the month (in Victoria, BC and Chattanooga, TN) and am currently spending the week in Iowa for work before heading to Oregon for my final race. Quite the trip seeing several friends and doing all the races, but I’m sure I’ll be glad to be home next week.

Cardamom Carrot Cupcakes {{Baking Bytes}}

In any case, I’ve gone back to my usual sugary treats and have a lovely cupcake recipe for you today. During the month of September I gave up foods with added sugar (which was awful and I’ll probably never do that again) and so the first weekend of October I went a little crazy with the baking and made pumpkin bread, these cupcakes, and a surprise bonus post for next week. (Spoiler: it involves pumpkin.) I used new mini loaf pans for the pumpkin bread and they worked fantastically. (These pans, if you’re curious.)

Cardamom Carrot Cupcakes {{Baking Bytes}}

I’d been wanting to make these cupcakes for awhile now, but carrot always feels like fall to me so I put it off all summer long. Although the original recipe is not spiced, I used spices from another Cupcake Project recipe I’d made several years ago. I’d enjoyed the latter recipe greatly but with the multitude of flavors going on it was just a bit overwhelming for me. When she posted her “spring” version earlier this year, it seemed much more my speed.

Cardamom Carrot Cupcakes {{Baking Bytes}}

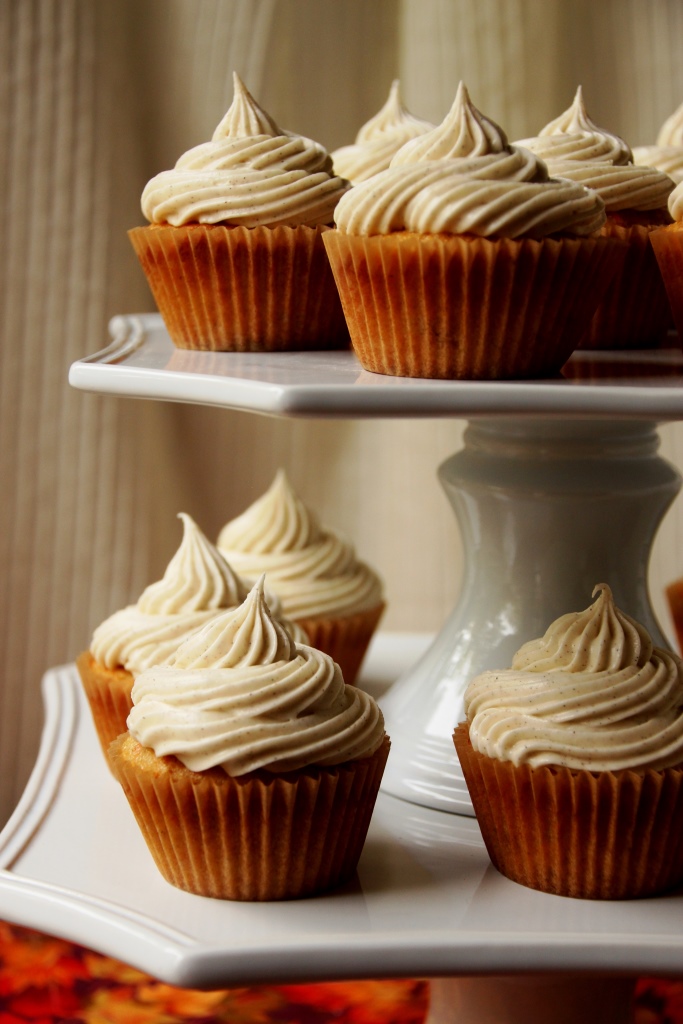
A light carrot and honey flavor enhanced with a few fall spices makes for a wonderful and somewhat unique flavor. The texture of the cupcake is fantastic and they rose perfectly for me which is always a nice surprise. Also, I tried out these cupcake liners I bought at Costco earlier this year and they are AMAZING. They unwrap from the cupcake with absolutely zero sticking which I was extremely excited about. Cannot recommend them enough.

Cardamom Carrot Cupcakes {{Baking Bytes}}

In any case, if you’re looking for a fall treat that is maybe a little different from the norm, these are the cupcakes for you. I decided to pair them with the frosting from the original recipe because it is incredible and a totally different flavor from the usual maple and cinnamon of the season.

Cardamom Carrot Cupcakes {{Baking Bytes}}

I hope you enjoy the concoction or use the recipes to create your own. And also check back next week for a fun Halloween idea.

Cardamom Carrot Cupcakes

Adapted from Cupcake Project
Makes about 18 cupcakes

Ingredients

1 3/4 cup all-purpose flour
1 tsp cinnamon
1/2 tsp cardamom
1 tsp baking powder
3/4 tsp baking soda
1/2 tsp salt

1/2 cup honey
1/2 cup unsalted butter, room temp

2 eggs

1/4 cup lemon juice

1 cup finely chopped carrots
1/4 cup finely chopped crystallized ginger

Directions

  1. Preheat oven to 350 degrees Fahrenheit. Line 18 cupcake wells with paper liners and set aside.
  2. In a medium bowl, whisk together flour, spices, baking powder, baking soda, and salt.
  3. Mix in honey and butter (yes, by hand) until completely combined.
  4. Stir in eggs one at a time, then add lemon juice.
  5. Fold in carrots and crystallized ginger.
  6. Fill each cupcake well with about 1/4 cup of batter, and bake 20 minutes. Tops should spring back when pressed gently.
  7. Let cool completely, then frost as desired.

Cardamom Cream Cheese Frosting

Borrowed from Cupcake Project
Frosts 14-20 cupcakes

Ingredients

8 oz cream cheese, room temperature
1/4 cup unsalted butter, room temperature

3 cups powdered sugar
2 tsp cardamom
1 tsp vanilla

Directions

  1. Using an electric mixer, beat cream cheese and butter until light and fluffy. This will take a couple of minutes.
  2. Gently stir in powdered sugar one cup at a time, adding more or less if you prefer a stiffer or looser frosting, respectively.
  3. Beat in cardamom and vanilla until completely combined and mixture is fluffy again, about 30 seconds.
  4. Spread or pipe onto cooled cupcakes and enjoy.

Lasagna Roll-ups

It seems that fall may be on the way here, just in time for me to leave. Heading out this Friday for over two weeks of traveling and running three half marathons. If I can’t walk when I get home, you’ll know why.

Traditionally October is full of pumpkin delicacies prancing across the internet in overwhelming numbers, so I thought this year I’d start off with something a little less obvious. I saw this recipe on Pinterest (as usual) and thought it looked like a fantastic idea. Pre-portioned and easy to serve, it’s a great recipe for a family dinner as well as a potluck scenario. Even better, it can be prepared ahead and baked the next day to cut down on prep time for busy weeknights.

Lasagna Roll-ups {{Baking Bytes}}

For my first attempt I followed the original recipe as written; although it was good, it was a bit too “skinny” tasting for our preferences. M requested at least “twice as much meat and probably four times the cheese” so I made some adjustments for my next round. With cheesy goodness abound it went over much better. If you’re looking for a bit healthier option, maybe you want to head over to the original linked below, but if you like gooey and cheesy you’re definitely in the right place. It’s easily made vegetarian by just not adding meat or by subbing zucchini or mushrooms or whatever you like.

Preparing them is a bit time-consuming but I expect not more so than regular lasagna and possibly less. Having never made lasagna from scratch I can’t actually confirm this, but it seems plausible. And the hassle you save serving it (especially to a crowd) is easily worth a few extra minutes of prep time.

Lasagna Roll-ups {{Baking Bytes}}

Melty mozzarella, parmesan, and ricotta meld with the spinach and meat for a melt-in-your-mouth experience. Serve with a side salad and/or a vegetable for a well-rounded meal. Or don’t. I’m not your mother.

Lasagna Roll-ups

Adapted from The Girl Who Ate Everything
Makes 12 roll-ups

Ingredients

12 lasagna noodles
12 oz ground or diced meat (optional; I used hot Italian sausage)

10 oz chopped spinach (see note)
15 oz ricotta cheese
2 cups + 1/2 cup grated mozzarella cheese, divided
1/2 cup + 1/2 cup grated parmesan cheese, divided
1 egg
1 clove garlic, minced
1 tsp dried Italian seasoning
salt and pepper, to taste

32 oz spaghetti or other tomato sauce

Directions

  1. Pour about 1/2 cup of spaghetti sauce in the bottom of a 9×13″ baking dish.
  2. Cook lasagna noodles according to package directions.
  3. If using meat, sauté it with a little olive oil over medium heat until browned. You can add the garlic here too if you want.
  4. In a large bowl, mix spinach, ricotta, 2 cups mozzarella, 1/2 parmesan, egg, garlic, seasonings, and meat until well combined.
  5. Put several paper towels on the counter and gently lay cooked noodles on top. Gently pat the tops dry with an additional towel.
  6. Divide cheese mixture between noodles (about 3/4 cup per noodle) and gently spread it evenly across the entire noodle.
  7. Drizzle a couple of tablespoons of sauce on top of the cheese mixture.
  8. Gently roll up a noodle, not too tightly, and place seam-side down in the pan.  The paper towel might stick a little but it pulled off easily with no reside for me. Repeat with remaining noodles.
  9. Pour remaining sauce over lasagna rolls and sprinkle with remaining cheese.
  10. Cover loosely with foil. (You can refrigerate it at this point if you want to bake it the next day.)
  11. Bake at 350 degrees Fahrenheit for about 1 hour (no need to preheat the oven), removing foil for about the last 10 minutes so the cheese will brown a little.
  12. Let rest a few minutes, then serve hot.

Notes

I used frozen spinach both times. If you do, make sure it’s completely thawed and you squeeze as much water out as possible. Fresh spinach should also work fine so I will likely use that in the future. I also accidentally added 16 oz the second time and it was still yummy, although perhaps a bit more spinach-y than I personally prefer.

Baked Beef & Bean Taquitos

Hi friends, hope your September is going well. I’ve got an easy entrée here for you today so I’ll get right to it. Taquitos are something we ate fairly regularly when I was a kid, although they were usually the kind out of a box because I wasn’t much into cooking back then. This recipe is an easy dinner as well as a delicious one, and you can easily tailor the filling and the tortilla texture to suit your preferences.

Baked Beef & Bean Taquitos {{Baking Bytes}}

Ground beef (or deer, in my case) seasoned with salsa and chili powder and mixed with black beans and bell pepper includes some extra vegetables while being a very filling and rounded meal. Goes great with a side salad and/or fruit or they’re excellent just on their own. Tailor the heat by using a hotter salsa in the filling or let people dip their own if you have vastly different spice tolerances in the family. You could also chop up a jalapeno in there if you’re in to that sort of thing.

Baked Beef & Bean Taquitos {{Baking Bytes}}

As for the outside, you only need bake them until they’re as crunchy as you prefer. Since the filling is already cooked the only oven goal is to bake the tortilla slightly. I did mine about 15 minutes because they cook a little slower on a silicon mat and I was aiming for them to be firm enough to pick up and dip, without getting too brown on the outside.

Baked Beef & Bean Taquitos {{Baking Bytes}}

These are a great way to switch it up without a ton of extra work, and much easier to eat than tacos. They also work great as leftovers for an easily packable lunch or a convenient dinner. Heat them in the microwave if you’re in a hurry and don’t mind a soft tortilla, or over medium-low heat on the stove if you’re looking for the crunchy exterior.

Baked Beef & Bean Taquitos {{Baking Bytes}}

If you’re wanting a quick meal for mid-week, you could probably do everything except bake them the night before, and then just pop them in the oven when you get home. Keep in mind they will probably need a little longer to bake in order to make sure they are heated all the way through. It also works well to only make the filling ahead of time, and then heat it slightly and fill the taquitos while the oven is preheating.

Baked Beef & Bean Taquitos {{Baking Bytes}}

I’m sure these will become a new staple in our house, and I hope you enjoy them too. If you have any variations, I’d love to hear about them!

Baked Beef & Bean Taquitos

Adapted from Just a Pinch
Makes about 15

Ingredients

1 small onion, chopped finely
1 Tbsp canola oil
1 clove garlic, minced

1 lb ground beef (or deer, or whatever)

1 bell pepper, diced

1 can (15 oz) black beans, rinsed
1 cup salsa
2-3 tsp chili powder
salt and pepper, to taste

1 package (about 20) 6″ flour (or corn) tortillas, room temperature2

Directions

  1. In a large frying pan, combine oil, onion, and garlic. Saute over medium heat for 3-5 minutes, or until onion starts to soften.
  2. Add the ground meat and continue to saute until it’s nearly all browned.
  3. Add bell pepper and saute until the meat is completed cooked.
  4. Add remaining ingredients, reduce heat to low, and simmer gently for about ten minutes, or until mixture is hot.
  5. Meanwhile, heat oven to 400 degrees Fahrenheit and line a baking sheet with parchment paper or a silicon mat.
  6. When filling is hot, place about 1/4 cup in a tortilla and roll it up as tightly as you can without burning your fingertips. Place seam-side down on prepared baking sheet. Repeat until you run out of filling or tortillas.
  7. Brush lightly with canola oil (optional) and bake for 8-20 minutes, until desired level of crunchiness is met.
  8. Serve immediately with your favorite sour cream and salsa.

Notes

The salsa flavor is fairly prominent so make sure you use one you like!

I prefer flour tortillas but corn would work just fine. They will be much easier to roll if they are room temp, so if you normally keep yours in the refrigerator be sure to put them on the counter that morning, or heat them briefly in the microwave or on the stove before you start.

I doubled the batch so I’d have lots and it worked great to have leftovers.

Roasted Cinnamon Almonds

Today’s recipe is inspired by Costco. Costco is one of my favorite stores to peruse because they have awesome stuff in all categories from housewares to clothing to food. The samples are also a pretty fantastic perk, although M and I don’t often go to Costco during sample time so we can avoid the crowds. A few weeks ago I made a quick stop in the afternoon to pick up one of the fake orchids they have (which I’m still psyched about) and made the sample rounds while I was there. One of the things I came across was roasted cinnamon sugar almonds.

Normally I’m not a big nut person (the notable exception being almond roca) but I thought I’d give these a try on a whim, and holy crap they are amazing. To be fair, I’m pretty sure they are like 75% sugar so basically it’s cinnamon almond candy, but nonetheless they were fantastic. It gave me the idea to make my own, less candy-like version at home.

Roasted Cinnamon Almonds {{Baking Bytes}}

Doing my usual Pinterest perusal came up with mostly very similar recipes, which I modified to fit my own needs. I wasn’t really looking for a sugary snack this time around, but if you’re wanting a sweeter recipe, like for holiday gifts, I give a range of sugar amounts in my notes below the recipe.

Crunchy roasted almonds coated with cinnamon and sugar are a high-protein and tasty option for any time of day. Make them without sugar for a healthy snack, or add the sugar for a sweet treat. I personally like both options, although the latter is probably more of a crowd pleaser. (They also turn out shinier, and ergo prettier, like the ones pictured.)

Roasted Cinnamon Almonds {{Baking Bytes}}

They do take a while to bake, but the process is pretty low maintenance and makes your house smell lovely. You could also definitely make two batches at a time if you have two lipped cookie sheets – the almonds will keep for at least a couple of weeks.

Roasted Cinnamon Almonds

Adapted from the Internet
Makes 4 cups

Ingredients

1 egg white
1 tsp water
1 tsp vanilla
1.5 tsp cinnamon
up to 1/2 cup brown sugar, to taste

4 cups raw almonds

Directions

  1. Preheat oven to 250 degrees Fahrenheit. Line an edged baking sheet with a silicon mat (or parchment paper) and set aside.
  2. In a large bowl, whisk together all ingredients except almonds.
  3. Add almonds, and stir until they are well coated with the cinnamon mixture.
  4. Spread evenly on prepared baking sheet. It’s okay if they touch but you don’t want a pile.
  5. Bake for 60-90 minutes, stirring them once or twice. I like mine more roasted so I went closer to 90 minutes, but they are great after an hour also. Give one a taste (carefully) and see what you think.
  6. Let cool completely, then store in an airtight container.

Notes

Using no sugar is still delicious and a healthier treat, or 1/4 cup gives a relatively mild sweet flavor. If you’re looking for something really sugary (more along the lines of Costco’s version), add up to 1/2 cup of sugar, feeling free to use up to half white sugar if you prefer.

Zucchini Boats

Hello my lovely readers, hope your August is off to a splendid start. I am heading for a trip home to Alaska on Friday but I wanted to make sure and share with you this fantastic entrée. Perhaps, like me, you’re a bit sugared-out after five straight weeks of ice cream and are looking to “detox” with something sans sugar completely. Well, look no further! A couple of weeks ago I saw a recipe for lasagna zucchini boats on Pinterest, which I thought sounded delicious but also like way too much work. If you’re new here, I am pretty lazy when it comes to making things that don’t qualify as dessert or occasionally breakfast. In any case, I liked the idea of a zucchini base but otherwise similar to my stuffed peppers that I have made previously. I threw together some filling and filled up my zucchini, topping them with cheese of course, and ended up with a pretty fabulous meal.

Zucchini Boats {{Baking Bytes}}

Wild rice, onion, peppers, zucchini, Italian sausage and various spices come together in a lovely blend, complemented perfectly by a zucchini base. The filling is cooked beforehand, so baking them is mainly to soften the zucchini and melt the cheese, if you add it. This recipe is superbly easy to tailor, so you can pump up the heat with more red pepper flakes, or go a completely different route depending on what you have in your cupboard. It also has the pleasant attribute of being able to taste the filling before you finish up the entrée, so you can play with the flavors as you make them.

Zucchini Boats {{Baking Bytes}}

Furthermore, you can easily make them vegetarian by leaving out the meat, and vegan by also ditching the cheese. If you’re a mushroom person (gross), they would also go well in addition to or in lieu of the sausage. And, of course, any other ground meat could be substituted just fine, although you may want to add some additional spices.

Zucchini Boats {{Baking Bytes}}

They also reheat splendidly in the microwave, so it makes for great leftovers if you don’t eat them all the first night, so go buy some zucchini and make these for dinner.

Zucchini Boats
Makes 6 servings

Ingredients

1 cup uncooked rice (I used a wild rice blend)

3 large uniform zucchini
1 bell pepper, diced
1 medium onion, diced

1/2 lb Italian sausage (optional)

1 Tbsp Oregano, to taste
1 tsp red pepper flakes, to taste
1 tsp garlic powder, to taste
salt and pepper, to taste

1/2 cup grated cheese (optional, I used cheddar)

Directions

  1. Cook rice according to directions, set aside.
  2. Trim zucchini to fit in a 9×13″ baking dish (if necessary), then cut lengthwise in half. Hollow out the inside leaving about 1/4″ of zucchini as an edge. (An ice cream scoop works well for this.) Place zucchini in the baking dish and set aside.
  3. Dice zucchini guts, set aside.
  4. Preheat oven to 350 degrees Fahrenheit.
  5. In a large frying pan or wok, cook sausage over medium heat until almost done.
  6. Add diced zucchini, bell pepper and onion, and cook an additional few minutes or until the veggies are warmed and a bit softened.
  7. Add spices and stir to combine.
  8. In a large bowl, combine cooked rice and veggies.
  9. Spoon filling into hollowed zucchini (you will likely have leftover filling), then bake for 25 minutes, or until zucchini are easily pierced with a fork.1
  10. Top with grated cheese, if desired, and bake for an addition 3-5 minutes until the cheese is melted, then serve hot.

Notes

I had about 2 cups of filling left over. It is great reheated in a tortilla like a burrito, or on its own. Or use it to stuff a couple additional bell peppers.