S’mores Ice Cream {National Ice Cream Month}

[Introducing…Frozen Friday! In honor of National Ice Cream Month, each Friday in July, starting today, I will share a new ice cream recipe, enjoy!]

I hope all my United Statesian readers had a wonderful Independence Day, and the rest of you had a wonderful regular ole Monday. I spent the last week+ in Lead, SD visiting M while he works there. We celebrated by watching Independence Day on the 3rd, and going to the Lead fireworks display on the 4th. The movie was a bit better, I must say.

As you may have guessed, I actually meant to have this posted last Friday, but between traveling and working remotely it fell by the wayside. My sincere apologies. There will be a surprise bonus post sometime this month to bring the total up to five.

S'mores Ice Cream {{Baking Bytes}}

In any case, ice cream! Ice cream is one of my favorite things to make and play with new recipes. Partially because it’s really hard to screw it up (even if it doesn’t turn out how you wanted, it’s rarely inedible) and also because it’s one of my favorite desserts. Thinking of new flavors and tinkering with the proportions until it’s what I dreamed in my head is both rewarding and delicious. Admittedly my ice cream consumption is rather higher throughout early summer for this reason, but I consider it a sacrifice worth making. You’re welcome.

S'mores Ice Cream {{Baking Bytes}}

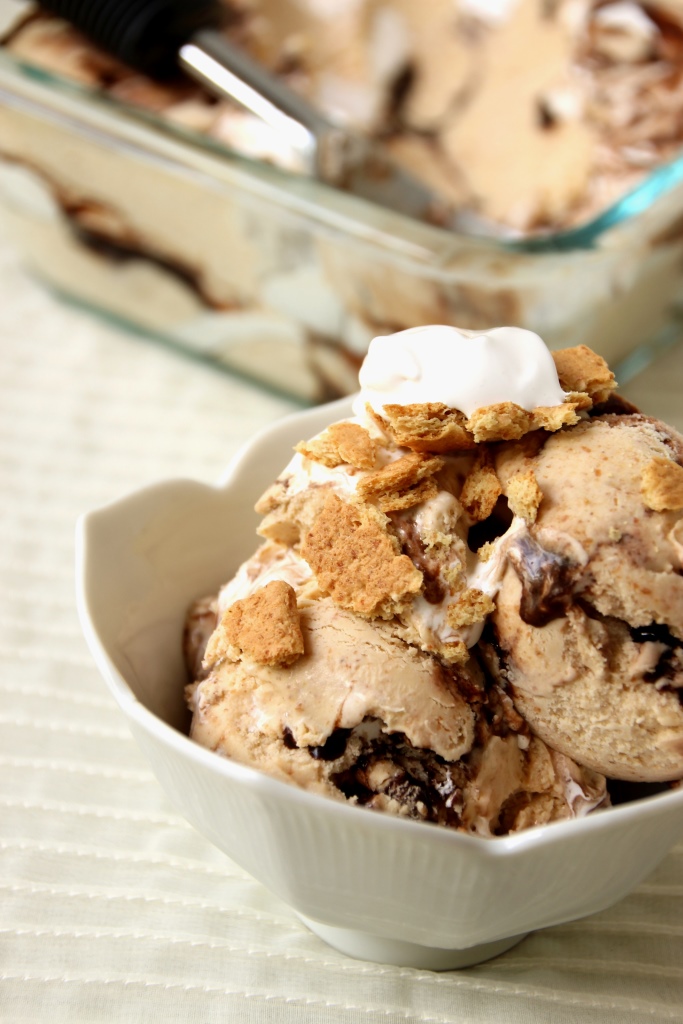
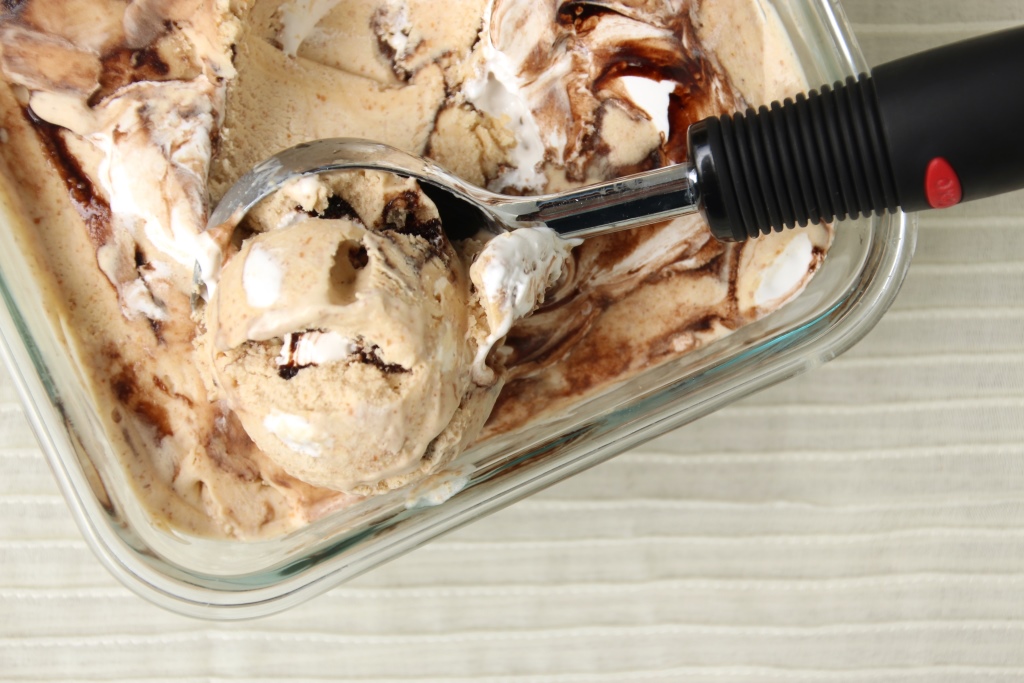
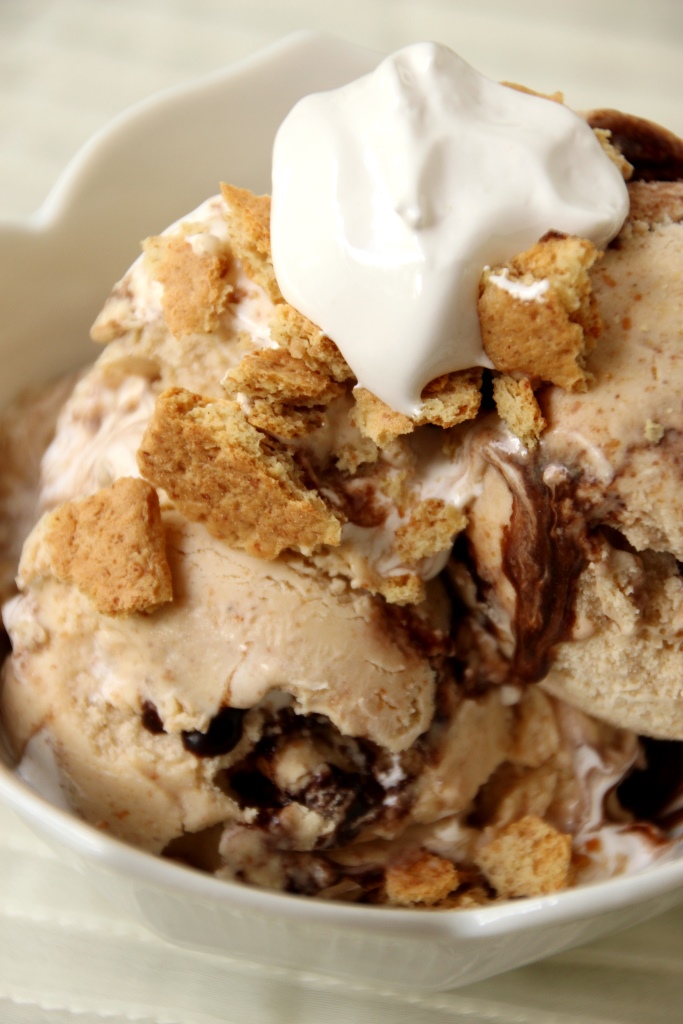
We’ll kick off the month with what might be my new favorite flavor, or definitely at least Top 5: s’mores ice cream. Graham cracker ice cream swirled with homemade chocolate and marshmallow makes for a melt-in-your-mouth s’mores experience – no fire necessary. It has the added bonus of being substantially less messy to make and eat, which is a huge win in my book.

S'mores Ice Cream {{Baking Bytes}}

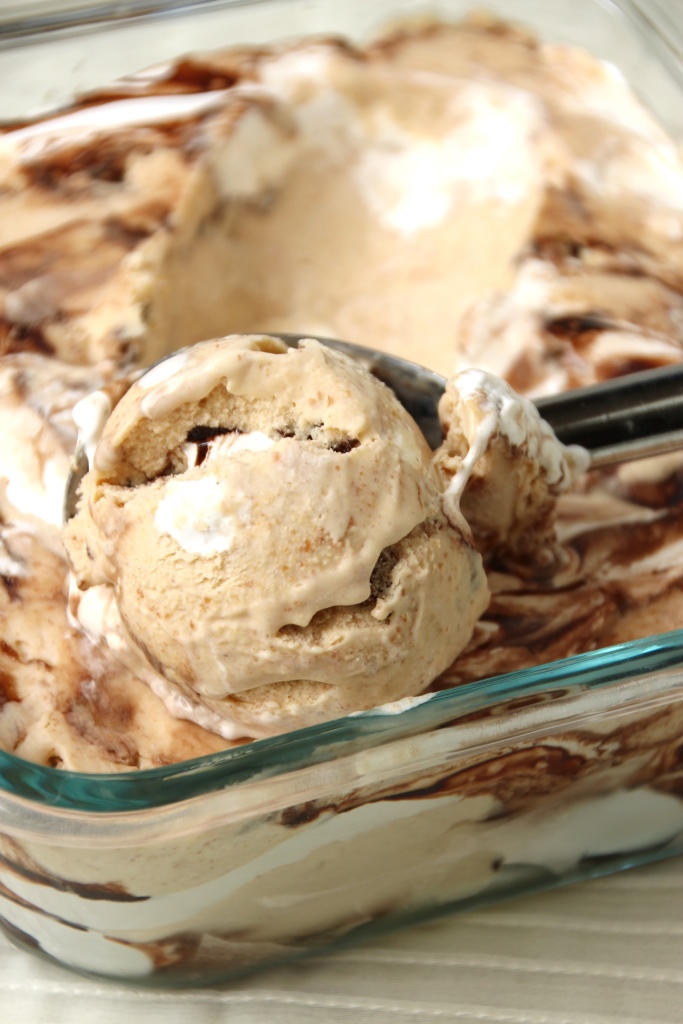
The ice cream is smooth and creamy with that wonderful Graham cracker flavor. Honestly, it’s delicious all on its own and likely I’ll add it into my usual rotation even without the extras. For a cheater version, you can just top the ice cream with chocolate sauce and marshmallows without making them yourself and doing the swirl. However, I highly recommend doing the whole she-bang. All of the components are simple to make and beginner friendly, and the result is something magical.

S'mores Ice Cream {{Baking Bytes}}

The marshmallow creme was surprisingly easy; I actually expected it to be much more complex. Much like pudding or mousse, however, it’s mostly just heating and stirring things. Not a big deal at all. I’ve always been somewhat freaked out by store-bought marshmallow creme, so having this super easy (and pretty quick) option for ice cream is fantastic. Tastes delicious and doesn’t have anything artificial in it. Yum. I used my go-to chocolate sauce recipe here, but you can substitute your own favorite if you prefer. Just make sure it’s regular chocolate sauce, and not hot fudge, as the latter will freeze too hard.

S'mores Ice Cream {{Baking Bytes}}

Kick your summer up a notch with this s’mores ice cream, sure to be both kid- and adult-approved.

Graham Cracker Ice Cream 

Makes ~6 cups

Ingredients

2 cups heavy whipping cream
1 cup half and half
1/2 cup egg substitute
1-2 packages Graham crackers1
1/2 cup brown sugar

Directions

  1. Place all ingredients in a blender and blend until smooth.
  2. Chill contents in blender in the fridge at least 4 hours, or overnight.
  3. Blend briefly, then freeze according to your ice cream maker’s directions.
  4. Transfer to a freezer-safe bowl to freeze for an additional three hours, or overnight. Or follow s’mores ice cream recipe below.
  5. Top with additional crushed Graham crackers for some extra flair and a little crunch.

Notes

For a milder Graham cracker flavor, use just one package. For a more kapow experience, use up to two. I like a pretty strong flavor, so I use two packages minus two or three crackers that I crush separately and reserve for topping.

Fudge Ripple

Borrowed from Brown Eyed Baker
Makes 1+ cups1

Ingredients

½ cup sugar
1/3 cup light corn syrup
½ cup water
6 tablespoons unsweetened cocoa powder2

½ teaspoon vanilla extract

Directions

  1. In a medium saucepan, whisk together all ingredients except vanilla. Cook over medium heat, whisking often, until the sauce comes to a low boil.
  2. Continue cooking for another 2 minutes, whisking almost continuously.
  3. Remove sauce from the heat, stir in the vanilla, and let cool in the pot for several minutes.
  4. Chill in the fridge for at least 30 minutes before using in ice cream.

Notes

The quantity varies a bit depending on cooking time, in my experience. I used about 1/2 cup in my ice cream and put the rest in the fridge to use later. You can also freeze it but you may need to take it out for a bit before it becomes pourable.

The original recipe calls for Dutch-processed cocoa powder but I just used Hershey’s because that’s what I always have on hand. I used one tablespoon dark cocoa powder and the rest regular.

Marshmallow Creme

Borrowed from Cooking Classy
Makes 1+ cups1

Ingredients

3/4 cup sugar
1/2 cup light corn syrup
1/4 cup water
1/8 tsp salt

2 egg whites
1/4 tsp cream of tartar

1 teaspoon vanilla extract

Directions

  1. In a small saucepan, whisk together sugar, corn syrup, water, and salt over medium heat. Continue cooking, whisking occasionally, until mixture has reached 240 degrees.
  2. Meanwhile, add egg white and cream of tartar to the bowl of a stand mixer. Whip with an electric mixer (I prefer to use a handheld rather than my stand mixer for small amounts like this) on medium-high speed until mixture is fluffy and has soft peaks. If you weren’t already using your stand mixer and whisk attachment, set that up now.
  3. When sugar mixture has come to the correct temperature, remove from heat. Turn your stand mixer to low, and slowly pour hot sugar mixture down the side of the bowl into the egg whites while the mixer is running.
  4. When all the sugar mixture is added, increase speed to medium-high and whip until mixture is glossy and medium peaks form. This will take several minutes.
  5. Scrape the bowl, add vanilla, and continue to whip on medium-high until stiff peaks form.
  6. Store in an airtight container in the fridge until ready to use.

Notes

This is half the original recipe, and I still had some leftover. It keeps well in the fridge so feel free to double it and have lots of extra for toppings.

S’mores Ice Cream

Ingredients

1 recipe Graham cracker ice cream, chilled but not churned
1 recipe of fudge ripple, chilled
1 recipe of marshmallow cream

Directions

  1. If you haven’t already, place a freezer-safe bowl in the freezer.
  2. Freeze ice cream according to your ice cream maker’s directions.
  3. Transfer about 1 cup of marshmallow creme to a frosting bag or Ziploc, and snip a 1/2″ hole.
  4. Remove bowl from freezer, and drizzle some chocolate sauce on the bottom.
  5. Gently spread about one cup of ice cream into the bowl. Pipe a swirl of marshmallow creme, then drizzle chocolate sauce over the marshmallow cream. Repeat until all ice cream is used up. Tip: end with plain ice cream or just a small drizzle as it could muddle together once you add the lid.
  6. Return bowl to freezer for at least 3 hours, or until ice cream is firm. Serve solo or with additional crushed Graham crackers, marshmallow creme, and/or chocolate sauce for topping.

Broccoli Beef

Two days until July – I’m so excited! Why? You may ask. Well, for the month of June my challenge to myself was to give up bread (tortillas and pasta included) and peanut butter. Mainly to see if I could do it, because these items are basically life staples, and to help me branch out into different food.

Broccoli Beef {{Baking Bytes}}

I did end up having to make some exceptions (I traveled a fair amount this month which makes it a lot harder to avoid bread, especially since I really don’t like to waste food unnecessarily) but overall it was a successful challenge. I am *super* looking forward to being able to use tortillas again for wraps, and to have peanut butter on a waffle, but it also helped me come up with some new favorites: quinoa bowls, baked sweet potatoes, and this broccoli beef dish.

Broccoli Beef {{Baking Bytes}}

Super easy since it’s made in the crock pot, this broccoli beef is just as good as takeout and not much more work. You could easily prep it all the night before and store it in the fridge (use a separate bowl, not your crock pot container), and dump it into the slow cooker in the morning. Add the final ingredients right when you get home, turn it to high, and you’ll have dinner ready to go within the hour while you unwind or do some chores or whatever else you need to do in the interim.

Broccoli Beef {{Baking Bytes}}

Amazing sauce, thinly sliced beef (or elk in my case), and veggies galore. Traditional broccoli beef is just that, broccoli and beef, but I like to add a bell pepper for extra veggies, extra flavor, and extra color. Although in full disclosure, I add bell peppers to basically all my entrees where it wouldn’t be weird. A double batch just fits in a 6-quart crock pot, so you can feed a crowd or put half in the freezer for another day.

Broccoli Beef {{Baking Bytes}}

Goes great with a side of rice, quinoa, noodles, zoodles, or just enjoy it solo. It reheats well and is just as delicious on day 5 as it is fresh from the cooker. And if you finish the meat and veggies before the sauce, it works great as a condiment for rice or quinoa bowls.

Broccoli Beef {{Baking Bytes}}

Note: I have a hunch you can add the corn starch slurry at the beginning, and assuming it’s cooked on high for at least one hour near the end it should thicken as expected. However I have not yet had time to test this theory. Once I do, I’ll update here.

Broccoli Beef

Adapted from Le Creme de la Crumb
Makes about 3 quarts

Ingredients

1 cup beef broth (or 1 bouillon cube + 1 cup boiling water)
1/3-1/2 cup low sodium soy sauce
1/4-1/3 cup brown sugar (not packed)
1 Tbsp sesame oil
4 cloves garlic, minced
1/2 tsp red pepper flakes

1.5 lbs steak, slightly frozen

3 Tbsp cornstarch
1/4 cup cold water

1 lb broccoli
1 bell pepper, thinly sliced (optional)

Directions

  1. In a crock pot, whisk together broth, soy sauce, brown sugar, sesame oil, garlic, and pepper flakes.
  2. Thinly slice meat (this is easier if it’s still slightly frozen), and cut into 2″ pieces.
  3. Gently add meat to crock pot.
  4. Cook on low for 4-6 hours, or high for 2-3 hours.
  5. 1 hour before serving: Vigorously whisk or shake together corn starch and water. Stir into crock pot. Add broccoli and bell peppers, turn heat to high, and cook for another hour.
  6. Serve solo or with rice, quinoa, pasta, or your favorite grain.
  7. Refrigerate or freeze leftovers. Make a double batch if you like to have lots!

Easy Zucchini Rollups

A few weeks ago during a relaxed trip to Costco, one where I actually perused all the aisles (except the chips/drinks aisles…I never go down those), I noticed a Roasted Garlic & Chili Aioli sauce. (It was much cheaper at Costco, for the record.) It was low sugar and sounded delicious, so I took a chance and bought the two-pack on a whim. I figured if it was good I could keep one at home and one at work, and if it wasn’t, I’d just donate them both to work. Fortunately for me, it is amazing and I’ve been using it on all sorts of things.

Also a few weeks ago, I decided to give up bread and peanut butter for the month of June. With my marathon training I’ve gained a couple extra pounds and wanted to help myself ditch them a little sooner. Bread and peanut butter are both life staples for me, and I figured if I just gave up one I would end up over-compensating with the other, so ditching both seemed optimal. Terrible, but optimal.

Marathoner!

I completed my marathon on Saturday (Horray! I made it!) and will be cutting my miles back a bit to a more manageable weekly schedule. I have a 5k on Saturday and a half (probably) in mid-July, so that’ll help keep up the schedule, just without those crazy 20-milers. I did make a planned exception for bread on race day (huckleberry stuffed French toast and a Monte Cristo for brunch…so good) but otherwise I’ve been really good about my breadless life. Mostly been doing scrambled eggs or a modified version of my favorite green smoothie1 for breakfast, lettuce wraps for lunch, and quinoa bowls or crock pot meals for dinner. The aforementioned aioli has been just fantastic for adding flavor and a little kick to those wraps and quinoa bowls.

Easy Zucchini Rollups {{Baking Bytes}}

Another favorite lunch are these zucchini rollups. They are super easy and only take a few minutes to prepare, which makes them great for both during work and after. I like to broil mine for a couple minutes (we have a toaster oven at work) for melty cheese, but you can absolutely eat them cold and crunchy as well.

Thin zucchini (use a mandolin, trust me) is topped with whatever you want, then rolled up into a tasty wannabe sandwich. My go-to concoction is listed below, but really you can use almost anything. Meat-lover? Use extra slices or multiple varieties. Vegetarian? Nix the meat and add extra veggies. Vegan? Sub hummus or pesto for the aioli, ditch the meat and cheese, and load up on leafy greens, peppers, mushrooms, or whatever else you’re in to. Savory cream cheeses are delightful as a condiment (you can ditch the regular cheese, or not), basically any cheese will work as long as it’s sliced thinly or a soft cheese, and you can mix it up with ham, turkey, roast beef, pepperoni, or whatever your favorite sliced meat is.

Easy Zucchini Rollups {{Baking Bytes}}

For extra crunch or to up the veggie factor, thinly sliced bell peppers, carrots, onion, extra zucchini, cucumber, or whatever you have lying around will work just great. Cut it to the width of your zucchini slices and you are good to go. If you are adding sliced or shredded items, it works best to add them on top of your condiment to kind of glue everything together. Add a couple of layers of spinach, kale, chard, or whatever you have lying around and you have a tasty and well-rounded meal, easily tailored to your preferences for taste and portion sizing.

I find the zucchini slices will keep in the fridge for at least a week if they are submerged in water, so you can slice and dice all your veggies ahead of time to speed up the preparation process when you’re ready to make them. Use as little or as much of each topping as you like, just leave a couple of inches of one end empty so it’ll stay rolled up. However, if, like me, you get a bit overzealous sometimes, you can poke a toothpick through to secure them.

Easy Zucchini Rollups {{Baking Bytes}}

Great for lunch, dinner, or even as an appetizer, these zucchini rollups are a delicious and healthy (and low carb, and can be gluten-free, if you’re into that) option to have in the repertoire. I’ve not tried it, but I am sure they would keep in the fridge for a few hours after being assembled if you need to make them ahead of time.

Give them a try and be sure to report back with your favorite flavor combinations!

Easy Zucchini Rollups

Ingredients

1 large zucchini
Cheese, thinly sliced (I used cheddar)
Meat, thinly sliced (I used deli ham)
Aioli sauce (or condiment of choice)
Spinach

Topping ideas: thinly sliced bell pepper, julienne-cut carrots or zucchini, any leafy greens, cream cheese, pesto, honey mustard, sliced almonds, hummus, etc

Directions

  1. Use a mandolin or a lot of patience to very thinly slice a zucchini. If it is too thick they will just break instead of roll. (I used the thinnest setting on my mandolin.) Store slices submerged in water in the fridge until ready to use.
  2. Start the broiler on your oven and line a baking sheet with parchment paper.
  3. Press zucchini slices with a paper towel to remove excess moisture, and lay gently on the baking sheet.
  4. Layer zucchini with meat, cheese, aioli, and spinach (and any additional toppings), leaving about 2″ of the wider end completely empty.
  5. Gently roll from the filled end, securing with a toothpick if necessary (mainly depends on how thick your toppings are.)
  6. Broil 1-2 minutes, until cheese is melted. Note: it is likely that your paper and toothpicks will char, but the rollups will be perfect.
  7. Enjoy immediately!

Notes

Made as said in the recipe except substitute 3Tbsp PBfit for peanut butter (another Costco whim), use plain Greek yogurt, and 1/2 cup milk. I also add 2 Tbsp chia seeds to 5 Tbsp water, let sit until gelled, and add that too. I also freeze and crush my spinach ahead of time so I can fit in closer to 1.5 cups in my little blender, with the added benefit that I don’t have to blend things in two stages to make sure it’s finely pureed.

Lemon Pie Spoons

Summer!

Just kidding, until last weekend it has mostly been pouring rain and howling winds here. I will admit it’s made for some pretty challenging runs during my marathon training. Turns out 20 miles in drenching rain and/or 20-mph headwinds is not super awesome. I know, shocker. Regardless, around March I started thinking about lemons again, partially because my grandmother loved lemon meringue pie and her birthday was in March, and partially because Costco starts carrying giant bags of the wonderful yellow fruit around April. With the closing of ski resorts and the flowering trees, lemon just seems like the right flavor for the season.

Lemon Pie Spoons {{Baking Bytes}}

After making a large batch of granola, I was left with several egg yolks chilling in my fridge. My usual go-to for egg yolks is just to throw an extra one in scrambled eggs, but I didn’t think I’d get through them all that way very quickly. Secondary method is always pudding, but pudding sounded a bit heavier than the dessert I was really looking for. Enter: mousse!

Lemon Pie Spoons {{Baking Bytes}}

Substantially lighter in texture without compromising the ka-pow of flavor, mousse always feels like the summery version of pudding. Obviously lemon was the way to go. I cut Mandy’s recipe in half, very slightly adjusted it, and was on my way to a tasty treat. Her recipe called for a graham cracker crust that I’m sure is delightful, but I wanted to test an idea I’d been pondering.

Lemon Pie Spoons {{Baking Bytes}}

Last fall I’d seen some great ideas (on Pinterest, of course) using cookie spoons, which I thought were super cute. However, I am not a huge fan of sugar cookies and even more importantly, I don’t enjoy making them. I was curious whether the same idea would work with pie crust, and that seemed like the perfect delivery mechanism for lemon mousse.

After texting my mom and asking whether she thought my spoons are oven safe (which I’m sure made her raise an eyebrow), I made some pie crust, made a mini spoon template with parchment paper, and begin cutting away. They baked up super cute and although they are a bit fragile, they work great for a dollop of mousse or for dipping. Although it didn’t take terribly long to cut by hand, for round two I bought a cookie cutter on Amazon, which was not only faster, but allowed me to be more efficient with the dough. Plus now I have a reason to make more spoon desserts.

Lemon Pie Spoons {{Baking Bytes}}

These lemon pie spoons are small, light, and require no cutting and slicing and plating, which makes them great for potlucks. Big lemon flavor and flaky pie crust come together in a delicious bite-sized treat. It’s important to use a pie crust recipe you like the flavor of, as it’s rather prominent given the somewhat higher crust:filling ratio. I’ve linked mine below, but feel free to use your own.

Lemon Pie Spoons {{Baking Bytes}}

This would be a fun confection for a summer barbecue where you don’t want to worry about fridge space. You can make the spoons and the mousse a day or two ahead of time (store the spoons on the counter, and the mousse in the fridge), then assemble shortly before you head to the party. They’ll be fine on the counter (inside, if it’s hot) for several hours, leaving you free to enjoy the party. Although they might droop a bit, they are definitely safe to eat.

Fair warning: they are addicting! Make a batch to share, assuming you don’t eat them all yourself.

Lemon Pie Spoons

Adapted from Mandy’s Recipe Box
Makes about 5 dozen mini spoons

Ingredients

Pastry for single-crust pie (unbaked)

4 egg yolks
1/2 cup sugar
1/3 cup lemon juice (2-3 lemons)
zest of 1 lemon (optional)

3/4 cup heavy whipping cream

Directions

  1. For the spoons: Preheat oven to 425 degrees Fahrenheit. On a large baking sheet, arrange as many oven-safe spoons as you can fit. (A silicon mat will help them slide around less, if you have one.) Set aside.
  2. On a floured surface, roll out your pie crust to about 1/8″ thick. Use a cookie cutter (or a paper template and a sharp knife) to cut out as many spoons as possible. Pile all trimmings together, then gently roll out again and cut more spoons.
  3. Carefully transfer each pie crust spoon to a real spoon on the prepared baking sheet, pressing the dough into the real spoon’s indent.
  4. Bake 10-15 minutes, until crust is golden and slightly puffy. You may want to rotate the pan halfway through if your spoons are of different heights.
  5. Let cool a few minutes on the spoons, then gently and carefully (the metal spoons are hot!) remove them to a wire rack to cool completely, and repeat until all pie crust is used. Store on the counter until ready to use, up to 3 days.
  6. For the mousse: In a small saucepan, whisk together egg yolks, sugar, lemon juice, and lemon zest (if using.)
  7. Stir with a wooden spoon over medium heat until mixture thickens and turns cloudy. Continue cooking until it’s thick enough to coat the back of a wooden spoon (although it’ll look clear).
  8. Use a mesh sieve and strain the lemon curd into a small bowl. Refrigerate at least one hour, stirring a couple of times if possible, or until ready to use. Mixture should be cool to the touch. Also place a large mixing bowl and your beaters (or KitchenAid whisk attachment) in the fridge at this time.
  9. When curd is sufficiently chilled, remove large bowl and beaters from the fridge. Beat heavy cream on medium/high until stiff peaks form.
  10. Gently fold in the curd to the whipped cream until it’s not streaky.
  11. Return mousse to fridge until ready to serve, up to 3 days.
  12. For assembly: Arrange pie crust spoons on a tray or serving platter as desired.
  13. Transfer mousse to a frosting bag with a star tip (or a Ziploc), cut off the tip, and carefully pipe onto the spoons. (You may have extra mousse.) Serve as soon as possible!
  14. Alternate assembly: Place mousse into 4-oz serving dishes and add a pie crust spoon. Serve with extra spoons for dipping!

Loaded Cauliflower Casserole

Sometimes during my questionably numerous hours on the internet, I come across “healthified” recipes that look pretty good, but still make me wonder why you wouldn’t just make the original.

This is one of those recipes.

Loaded Cauliflower Casserole {{Baking Bytes}}

I’ll admit, I made it mostly out of curiosity. Unlike many modern Americans, I am not afraid of potatoes. In fact, potatoes themselves are quite healthy for you, and can be an excellent source of nutrients. Sure, they are pretty high carb, but I’ve never paid much attention to carbs so it doesn’t concern me. Potatoes get a bad rap but it’s not the vegetable that is the problem, it’s how we prepare it: French fries are clearly unhealthy, but then of course we like to pile on loads of salt, cheese, chili, et cetera, just to really make sure we’re not benefiting at all. Mashed potatoes are typically made with loads of butter and cream and various other dairy products that add tons of fat and unnecessary calories, along with their delicious, wonderful flavors. Baked potatoes, we say, those are healthy! And yes they are…until we add the toppings.

Whoops.

Loaded Cauliflower Casserole {{Baking Bytes}}

This particular recipe kinda makes me giggle because the things that make potatoes unhealthy are still quite present in here, whereas the potatoes themselves have been substituted with cauliflower. I vastly cut down the additions from the original, and even made it a second time to cut them down some more, but I’m still not sure I’d consider it a truly healthy side dish.

In any case, it is quite delicious, and if you’re into the low-carb situation, maybe it’ll be great for you. It probably won’t become a staple around here, but it’s a great way to spice up an otherwise familiar palate. Or sneak some cauliflower into picky eaters.Loaded Cauliflower Casserole {{Baking Bytes}}

Creamy and cheesy and optionally topped with bacon, it has a texture like slightly lighter mashed potatoes and all the fun flavors that go with them. It makes for a great side dish and could easily be made vegetarian simply by nixing the bacon. The second time I made it without bacon and it was excellent as well.

Although I likely won’t be making it weekly, or even monthly, I did really enjoy the final product and it was a fun way to eat cauliflower. It also reheated nicely which is always a pleasant surprise. Hope you enjoy it!

Loaded Cauliflower Casserole {{Baking Bytes}}

Loaded Cauliflower Casserole

Adapted from Calamity Jayne
Makes one 8×8 dish (6-8 servings)

Ingredients

2 lbs cauliflower, diced

1/3 cup sour cream (full fat preferred)
2 cups grated cheese, divided (I used cheddar)
salt and pepper, to taste (I used about 1/2 and 1 tsp, respectively)

optional toppings: 3-4 slices crumbled bacon, 2 Tbsp minced chives

Directions

  1. In a large pot, boil cauliflower until softened, about ten minutes.
  2. Preheat oven to 425 degrees Fahrenheit. Spray an 8×8″ baking dish with cooking spray, set aside.
  3. Drain completely and return to pot. Mash or puree into desired texture. I used an immersion blender to puree mine completely in order to mimic mashed potatoes.
  4. Return pot to stove over medium heat, and cook at least 5 minutes longer (stirring constantly) to evaporate excess water. Remove from heat.
  5. Add sour cream and 1 cup of cheese, and stir until completely combined. Salt and pepper to taste, making sure it’s well mixed.
  6. Spread cauliflower mixture into prepared baking dish, and top with remaining cheese (and bacon, if using.)
  7. Bake for about 20 minutes, until cheese is melted and cauliflower is bubbling. It might look kind of watery, but don’t worry, that’s normal.
  8. Let cool on the counter for about 5 minutes before serving, then top with chives (optional) and enjoy.

Notes

In my opinion this step is paramount. Nothing is worse than watery mashed potatoes and this casserole is no different. I recommend tasting a couple of times, and keep going until the cauliflower doesn’t just taste of water, especially if you pureed it.