Beet & Feta Grilled Cheese

This sandwich is dedicated to Kathy, who is in many ways my opposite but has the best insights on the Ames food scene and is a huge fan of beets.

One of my favorite local stores is an oil and vinegar shop by the name of Olivelle. It’s a relatively recent discovery for me but has quickly grown into quite the collection of balsamic vinegars, infused oils, and spice blends. I’ve featured some of their products before, mostly as salad dressings, but they are amazing on basically everything from breakfast to dessert.

Olivelle also does really fun cooking demonstrations where you watch four different courses being made and then get to enjoy eating them. It’s both delightful and delicious and makes for a fantastic girls’ night out. At my most recent attendance, there was a roasted beet salad with a blood orange fig dressing that kind of blew my mind. It was the perfect blend of savory and sweet and a truly great winter salad that I look forward to crafting next season (or maybe this one, if winter continues at its current velocity).

Beet & Feta Grilled Cheese {{Baking Bytes}}

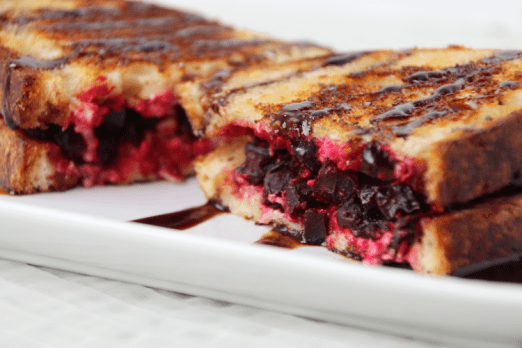
Inspired by the flavor combination, this week’s grilled cheese is highly non-traditional and equally delicious: roasted beets and feta, with an optional (but supremely recommended!) blood orange fig drizzle.

Although I really enjoy roasted beets, I’d somehow never purchased them before this adventure. One of the great things about running this blog is the incentive to step outside my box, and this was no exception to a quality outcome. Like sweet potatoes, beets take a while to roast but you could certainly do it ahead of time and reheat them a bit right before making the sandwich. It’s both a great way to use up leftovers from salad or breakfast hash and worth it to make them specifically for this meal, I promise. The beet and feta filling is not gooey like a traditional grilled cheese, but has a totally new flavor profile that really classes up the final result. It reminds me a bit of last year’s Boursin and veggie version in that it doesn’t stick together very well but is completely worth the slightly messier experience.

Beet & Feta Grilled Cheese {{Baking Bytes}}

Naturally sweet, the beets lend a harmony of sweet and savory that is balanced nicely by the Feta cheese (I also think chèvre would work splendidly), and complimented by my favorite sourdough bread. The denser bread contrasts nicely with the softened filling and the drizzle of blood orange balsamic dressing is the perfect addition to really up the wow factor. Delightful as an entrée or cut up for an appetizer, it was a win with four out of four taste testers and a really fun way to add a twist to an otherwise commonplace meal.

Beet & Feta Grilled Cheese {{Baking Bytes}}

As an added bonus, the bright color of beets and balsamic drizzle give a professional presentation to the plate – great for parties! (Especially on a snazzy rectangular plate.)

Beet & Feta Grilled Cheese
Makes one sandwich

Ingredients

1 beet, peeled and diced into 1/4″ pieces (or smaller)
1/2 Tbsp olive oil
salt and pepper, to taste

1/4 cup feta (or chèvre), crumbled
2 slices sourdough bread
olive oil or butter

Blood Orange Vinegar Dressing
1 Tbsp Olivelle Blood Orange Olive Oil
1 Tbsp Olivelle Harvest Fig Balsamic Vinegar

Directions

  1. Preheat oven to 450 degrees Fahrenheit. Line a baking sheet with parchment paper or coat with olive oil.
  2. In a small bowl, combine beet, oil, salt, and pepper and stir until evenly coated.
  3. Spread onto prepared pan and roast 20-30 minutes, or until fork tender.
  4. When the beets are nearly done, heat a small amount of oil or butter in a lidded nonstick frying pan over medium-low heat.
  5. In (the same) small bowl, gently stir together 1/4 cup roasted beets (you’ll probably have leftovers) with feta cheese.
  6. Place bread side-by-side in the pan and top one slice with beet and feta mixture. Cover with lid and cook until bread is golden and cheese is warmed through, about 5 minutes.
  7. Meanwhile, whisk together Blood Orange Olive Oil and Fig Balsamic Vinegar until completely combined.
  8. Top beets with the other slice of bread (cooked side out) and remove sandwich to plate.
  9. Slice in half and (somewhat) optionally drizzle with blood orange fig dressing.
  10. Enjoy immediately!
Advertisement

Mimosa Ice Cream (Floats!) {National Ice Cream Month}

[Welcome to Frozen Friday! In honor of National Ice Cream Month, I am sharing a new ice cream recipe each Friday morning. In case you missed it, be sure to check out last week’s s’mores ice cream too!]

With week two we step away from the kid stuff and delve into a more adult palate. And by that I mean we’re adding alcohol. Liquor and beer have already played a key role in past flavors like Baileys, chocolate Kahlúa, and chocolate Guinness, but this will be the first foray into using a wine.

Mimosa Ice Cream {{Baking Bytes}}

A brunch favorite, and one of the few ways I actually enjoy orange juice (outside of creamsicle ice cream, of course), the mimosa is a go-to beverage for both classy and casual affairs, and somehow avoids the morning drinking taboo. As someone who doesn’t do much drinking, it’s pretty unlikely I’d have one to start the day, but I think it’s a fabulous addition to brinner (that’s breakfast for dinner, if you’re among the uninitiated), especially for ladies nights.

Mimosa Ice Cream {{Baking Bytes}}

Today we take the orange juice and champagne combo into dessert territory: mimosa ice cream. A fairly complex flavor for ice cream, it starts out solely orange on the tongue but you’ll quickly notice there’s something else there. It’s not fizzy, obviously, but the champagne lightens the flavor and plays perfectly with the bright citrus of the orange juice.

Mimosa Ice Cream {{Baking Bytes}}

I used one part orange juice to two parts champagne, but you can easily adjust the ratios to suit your preferences, just make sure you have 1.5 cups of liquid total. This is one of the few flavors that I felt was perfect on the first try, but I do tend to prefer a somewhat subtle alcohol flavor in my desserts. The liquid is reduced to a half cup (or slightly less) to maintain the wonderful flavor but remove most of the excess water, resulting in a much creamier texture. Likely I’ll use this method even for my orange creamsicle flavor in the future.

Mimosa Ice Cream {{Baking Bytes}}

For extra fun (and easy portion control), serve in champagne flutes. You could even scoop ahead of time and store in the freezer if you’re planning to serve it at a party. If you’re missing the carbonation, top each flute with a little extra champagne to make a mimosa float. Delicious and fun and sure to impress anyone you feel like impressing.

Mimosa Ice Cream {{Baking Bytes}}

This flavor is much less decadent than last week’s, and is great for a small portion. Give it a try for your next party, and definitely let me know how it goes!

Mimosa Ice Cream {{Baking Bytes}}

Mimosa Ice Cream (Floats!)

Makes about 6 cups

Ingredients

1/2 cup pulp-free orange juice1
1 cup sweet champagne or prosecco1

2 cup heavy whipping cream
1 cup half and half
3/4 cup sugar

yellow and red food coloring (optional)

Directions

  1. In a small saucepan, combine orange juice and champagne. Simmer gently over medium heat until volume is reduced to 1/2 cup (or slightly less.) Remove from heat and let cool for a few minutes on the counter.
  2. Whisk together all remaining ingredients until completely combined. Slowly stream in reduced orange mixture, whisking constantly.
  3. If desired, add food coloring. I used 4 drops yellow and 1 drop red for photography purposes, but add more or less to suit your preferences. It does lighten fairly considerably after it’s frozen.
  4. Cover bowl and chill in the refrigerator at least 4 hours, or overnight.
  5. Place a freezer-safe bowl in your freezer to chill.
  6. Meanwhile, freeze ice cream according to your ice cream maker’s directions. Transfer to chilled bowl and return to freezer for at least 3 hours, or until ready to serve.
  7. For floats, scoop small balls of ice cream (I used a 2 Tbsp cookie scoop) into champagne flutes. Carefully pour in champagne and serve immediately.

Notes

1 If you only have pulpy juice on hand, just use a mesh strainer to remove the pulp. You can use any ratio of orange juice and champagne as long as it adds to 1.5 cups total. It certainly does not have to be an expensive champagne (Barefoot certainly isn’t), but I do recommend using one you would willingly drink plain or in a normal mimosa.

Orange Creamsicle Ice Cream (& DIY Dixie Cups) {National Ice Cream Month}

Welcome to July! We are halfway through the year, can you believe it? June went by crazy fast; probably because I spent a third of it at home in Alaska, but I digress. We bring in the second half of the year with National Ice Cream Month. Didn’t know that’s a thing? That’s okay, I forgive you. You have all month to make up for it.

To celebrate I’m going to do something a little different with the blog. In addition to the regular bi-weekly Monday posts, I will be posting a weekly ice cream recipe. We’ll have something for everyone with both classic flavors and some less traditional ones. These posts will go live on Tuesday mornings, giving you plenty of time to make a batch for your weekend barbecues.

DIY Orange Vanilla Dixie Cups {{Baking Bytes}}

For this first week, I’m introducing orange creamsicle ice cream. Remember those tiny Dixie cups of half vanilla, half orange deliciousness that came with the silly wooden spoon? Here is a DIY version just for you. It’s a little bit more time-consuming than just making one flavor, of course, but they are super cute, super delicious, and super easy.

If you’re not interested in the combo, this orange ice cream can certainly hold its own. Reminiscent of a creamier Orange Julius, it bursts with orange flavor and a hint of vanilla. It’s very easy to adjust to how “orange-y” you want yours to be. The citrus flavor is delightfully summery, making it a wonderful treat on a hot day. Despite the extra water from the orange juice, it stayed scoopably (that’s a word, I promise) soft in my freezer, but if it freezes too hard in yours just let it sit on the counter for 5-10 minutes before dishing.

DIY Orange Vanilla Dixie Cups {{Baking Bytes}}

Below find my recipes for orange creamsicle and vanilla ice cream, as well as instructions for making your own Dixie cups. They would be a great addition to a 4th of July barbecue, sure to impress the whole crowd, adults and children alike. I did add food coloring to this batch of orange so it would stand out next to the vanilla, but you certainly don’t have to. The orange juice is a key flavor, so make sure you buy a quality brand of 100% juice (or juice your own oranges). I like to get the Simply Orange brand.

I used these Snapware, 1-cup glass containers, but anything of similar size should do. Small canning jars, waxed paper cups, whatever you can find. Depending on where you live, you may be able to find actual disposable ice cream cups to use, if you’re worried about glass breaking. It’s best to use a lidded container, but you can always cover the tops with parchment paper (so they’re stackable) if you’re not planning to keep them in the freezer more than a few days.

DIY Orange Vanilla Dixie Cups {{Baking Bytes}}

Orange Creamsicle Ice Cream

Makes 4-5 cups

Ingredients

1/2 cup sugar
1 cup heavy whipping cream
1/2 cup half and half
1/2 – 1 cup pulp-free orange juice (I used 3/4 cup)
1/4 cup egg substitute
3/4 tsp orange extract
1/2 tsp vanilla extract

yellow and red food coloring (optional)

Directions

  1. Whisk together all ingredients until completely combined.
  2. If desired, add food coloring. I used 6 drops yellow and 2 drops red, but add more or less to suit your preferences. It does lighten fairly considerably after it’s frozen.
  3. Cover bowl and chill in the refrigerator at least 4 hours, or overnight.
  4. Freeze according to your ice cream maker’s directions, then place in a freezer-safe bowl to freeze for an extra three hours, or overnight.

Notes

1 If you have pulpy juice on hand, just use a mesh strainer to remove the pulp. For a subtler orange flavor, use 1/2 cup. For a strong flavor, use 1 cup. The larger end of the range will result in a more grainy texture, but it’s still creamy.

Vanilla Ice Cream 

Makes approx. 3.5 cups

Ingredients

1/2 cup sugar
1 cup heavy whipping cream
1/2 cup half and half
1/4 cup egg substitute
3/4 tsp vanilla extract

Directions

  1. Whisk together all ingredients until completely combined.
  2. Cover and chill in the refrigerator for at least 4 hours, or overnight.
  3. Freeze according to your ice cream maker’s directions, then place in a freezer-safe bowl to freeze for an extra three hours, or overnight.

Notes

1 This is the same recipe as my previously posted vanilla ice cream recipe, just halved and with less vanilla so as to not compete so strongly with the orange.

DIY Dixie Cups 

Serves 8-10 (6-8oz each)

Ingredients

1 recipe orange creamsicle ice cream (above)
1 recipe vanilla ice cream (above)

Directions

  1. Make and freeze vanilla ice cream.
  2. Make orange ice cream, but stop once you’ve placed the mixture into the fridge. If using glass jars for your servings, place those in the freezer at this time. Chill everything for at least 4 hours.
  3. Scoop vanilla ice cream into your jars, using a spatula (or something else sturdy and flat) to hold the ice cream into half the container while you press it to fill the space. Smooth the tops and return to the freezer for at least 30 minutes, or until your orange ice cream is done.
  4. Freeze orange ice cream according to your ice cream maker’s directions.
  5. Retrieve the cups from the freezer, and fill the remaining half with orange ice cream. Smooth the tops, and return to the freeze for at least 2 hours, or until ready to eat.
  6. Serve directly from the freezer to adoring fans.

These sound a lot more complicated than they actually are. There is a lot of down time waiting for things to freeze/chill, but it’s not a difficult recipe. The most time-efficient method would be like this:

  • Day 1 pm: Mix vanilla and put in the fridge. Mix the orange and put it in the fridge also. If you’re using glass containers, put them in the freezer now because it won’t hurt them to be in there a long time.
  • Day 2 am (e.g. before work): Churn the vanilla and put it in the freezer. Wash and dry the ice cream maker bowl, and return it to the freezer. (This should take about half an hour total.)
  • Day 2 pm (e.g. after work): Portion the vanilla to fill half of each cup, and put them back in the freezer. Churn the orange ice cream. Retrieve the half-filled cups, fill with orange, smooth the tops, and return to the freezer until ready to serve.

Obviously, depending on how much time you have you can spread this out a lot more, but this timeline will give you ready-to-eat desserts for Day 3, meaning you still have time to make them for the 4th of July, and actually enjoy the barbecue, even if you don’t start until Wednesday. If you are making these for more than 10 people, double the vanilla recipe, and make 1.5 of the orange (I don’t think double will fit in a standard ice cream maker.) You should have enough for closer to 20, or more if you make them smaller, of course.