Squash & Lemon Spiral Tart

Springtime means lemon in my brain, so when I saw this spiral tart from Bunsen Burner Bakery I knew I wanted to incorporate that flavor. A lemon hummus seemed the perfect accompaniment to a series of veggies and I set out to test this hypothesis.

Squash & Lemon Spiral Tart {{Baking Bytes}}

The bright flavor of lemon is complimented by a generous amount of garlic. I opted to use my hefty supply Olivelle products but you can use standard varieties if needed. The turmeric lifts the yellow coloring up a notch which isn’t necessary for the tart but it’s beautiful for a party platter. You’ll have plenty of leftover hummus to enjoy on its own, and it provides a lovely creamy base for this tart without any additional sogginess.

Squash & Lemon Spiral Tart {{Baking Bytes}}

My trusty no-fail pie crust recipe is the base for this delicious dish. Since I don’t have a tart pan (something I should probably rectify, pronto) I used a standard 9″ pie plate, which works just fine. I love this pie crust recipe because it never gets over browned, but you can easily substitute your own go-to pastry here if you wish.

Squash & Lemon Spiral Tart {{Baking Bytes}}

The flaky pastry and crisp lemon flavor of the hummus blend beautifully into a base for all your veggies of choice. I chose zucchini, carrot, summer squash, and eggplant, but feel free to use whatever you have laying around the kitchen that you can slice with a mandolin. You’ll want veggies thin enough to bend, but no thinner. On my mandolin I used the thinnest setting for the carrot and the next one up for the rest of the vegetables, but definitely do a test slice to see what makes sense for yours.

spiral_tart_2

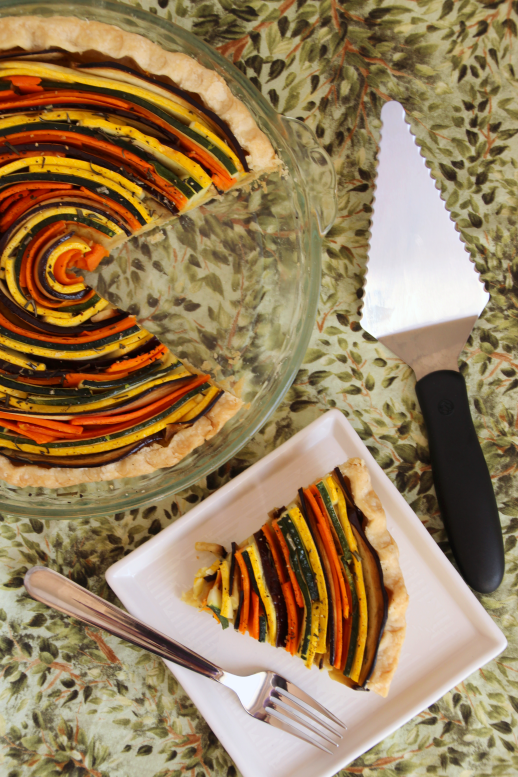
Concentric rings of vegetable goodness are pleasing to the eye and the tongue. Finished with a bit of rosemary (or your favorite herb) for a spark of flavor and a pretty garnish, this tart is a prefect addition to your next brunch. This tart is inherently vegan (presuming you use a vegan pie crust) but for the rest of us a sprinkle of goat cheese is the perfect topping for each piece. To round out the meal, I enjoyed mine with a side of eggs and fruit.

spiral_tart_5

This tart would be sure to please at a Mother’s Day brunch, or to brighten any regular day too. If you have any leftovers, they are excellent cold or reheated in the oven, so be sure to enjoy every last bite!

Squash & Lemon Spiral Tart

Inspired by Bunsen Burner Bakery
Makes one 9″ tart

Ingredients

pastry for a single-crust pie

1 medium zucchini
1 small eggplant
1 small yellow squash
3 large carrots
1 Tbsp (Caramelized Garlic ) olive oil

1/2 cup lemon garlic hummus (below)

1-2 tsp fresh rosemary or other herb

lemon garlic hummus (adapted from Well and Full)
1 can chickpeas, rinsed and drained
3 Tbsp (Caramelized Garlic or Sicilian Lemon) olive oil (I used 2 Tbsp Garlic and 1 Tbsp Lemon)
2 Tbsp tahini
1-3 cloves garlic (depending on if you’re using infused oil)
zest and juice from 1 large lemon
1/2 tsp (Garlic) salt
1/4 tsp ground turmeric
freshly ground black pepper, to taste

Directions

  1. Make ahead: add all hummus ingredients to a food processor, starting with half the lemon juice, and process until smooth. Taste and add additional lemon juice (for flavor) or oil (for consistency) as needed. Refrigerate until ready to use.
  2. Gently lay pastry in a 9″ pie plate or tart pan. Trim and crimp the edges, as desired. Refrigerate pastry for 15 minutes.
  3. Preheat oven to 350 degrees Fahrenheit.
  4. Prick pastry generously all over with a fork (or use pie weights if you prefer) and bake for 15 minutes. Set aside to cool while you prepare the veggies.
  5. Use a mandolin to thinly slice all the veggies. (On mine I used setting 2 for the squash and eggplant, and setting 1 for the carrots.) Add all the slices to a large bowl and use your hands to gently toss in olive oil. Don’t add too much oil because the eggplant likes to soak it all up!
  6. Retrieve the pastry and spread 1/2 cup of hummus evenly along the bottom.
  7. Starting from the outside, layer the strips of veggies in whatever order you like; I opted for a repeating pattern of concentric circles but it’s totally up to you.
  8. Spray with olive oil (or lightly brush it on) and sprinkle with rosemary or herb of choice.
  9. Bake for 45 minutes or until vegetables are tender and starting to crisp, and crust is a golden brown. If necessary (it wasn’t for me) you can cover the crust edges with foil if they are browning too quickly.
  10. Serve warm, optionally topped with goat cheese. Goes great with a side of eggs and fruit!
  11. Store leftovers in the fridge. I suspect it’d last about 3 days but I can’t confirm because we ate it all before then. Enjoy chilled or reheat in the [toaster] oven at 300 degrees Fahrenheit for 10 minutes.

Banana Cacao Nib Scones

Hello my lovely readers, I hope the beginning of the new year is going smoothly for everyone. (If you want to get straight to the recipe, feel free to skip to the non-italicized text.) With regards to resolutions, this year I’ve decided to do something a little different. Alongside my usual set of running/baking/professional goals, I’ve decided to set a theme: mindfulness. Each month I am going to focus on being more mindful about something in my life. After reading the cookbook Run Fast, Eat Slow I have been inspired to make January’s theme into Mindful Eating.

This doesn’t mean counting calories or following a list of restricted items, but it’s more about improving my relationship with food. It’s easy to feel guilty about eating (or not eating) certain things, to rush through meals in order to move onto something else, to just make things because they’re easy and fast and not because I’m particularly excited to eat them. This month I’m going to focus on food in a way that makes me happy, both mentally and physically: taking the time to make things from scratch as well as actually slowing down and enjoying what I’m eating; having fewer meals in front of a screen; enjoying decadent items as treats not cheats; focusing on what makes me feel happy and energetic and ready for the days to come. 

This is intended to be a long-term change in the way I really think about food. Although I’m not one to be exacting about my diet, I do often feel restricted by what society is touting as healthy these days. Healthy doesn’t necessarily mean low-fat or low-calorie, carbs are not the devil and sugar isn’t the end of the world. Certainly I am going to be mindful of eating unnecessary added sugar, but I already know a low-carb diet doesn’t work that great for me, fats are important for flavor and staying power, and I want every calorie I eat to come from something I enjoy. I will no longer be describing anything as “guilt-free” because food should not be inherently shameful. I would love to hear your thoughts on this endeavor, should you be willing to share them. (Also I highly recommend the book, and you can expect to see some of those recipes on here in the coming months.)

In light of that, today we have another recipe that I made mostly out of curiosity. Consistent readers (and anyone that knows me in real life) will know that I don’t bake anything dairy-free, gluten-free, flourless, or vegan with any amount of regularity because these are not food traits I personally find important. I am, however, often intrigued by such recipes and will make them on occasion just for funsies.

Banana Cacao Nib Scones {{Baking Bytes}}

The original recipe called for things I don’t buy, like self-raising flour, coconut sugar, and almond meal, but I followed her modification suggestions and made a few of my own to tailor the recipe for myself. I replaced some of the flour with ground oatmeal for a heartier flavor, nixed the almond meal in favor of chia seeds, and used regular ole’ brown sugar instead of coconut sugar. I cut the sugar way back since I was figuring the banana adds a fair amount of sweetness (and because I already have my favorite sweeter scones) and added some whole oatmeal for texture.

Banana Cacao Nib Scones {{Baking Bytes}}

A few weeks ago I found some cacao nibs on massive clearance, and bought two of the bags. They were a great addition to these scones, no extra sugar but a little bit of chocolate flavor to enhance the banana. However they are definitely not cheap so feel free to leave them out or use mini chocolate chips as a more decadent replacement.

These scones are fairly dense but soft and moist and delicious. They are also pretty healthy, with low amounts of added sugar and a little bit of protein and good carbs from the oatmeal. Probably you shouldn’t eat three of them, but one is a perfect light-ish breakfast, especially when paired with a cup of coffee.

Banana Cacao Nib Scones {{Baking Bytes}}

I made these a few times and below is my favorite of those iterations. It can be baked into regular size or mini scones, depending on your preferences and whether you plan to serve them solo or as part of a fuller breakfast. They’re also easily portable and a great brunch option, although I think they’re best slightly warmed.

The banana and oatmeal combination is delicious by itself or topped with any number of toppings. Jam or butter and cinnamon sugar were my favorites, but mostly I ate them plain. I especially like the less sweet version if it’s going to be spread with a sweet topping anyway, but you can definitely increase the sugar here if you prefer.

Banana Cacao Nib Scones {{Baking Bytes}}

Give these a try and let me know what you think, and if any of your friends could guess they were vegan.

PS – These can be made gluten-free by using gluten-free flour and uncontaminated oats, and they are vegan/dairy-free unless you use normal chocolate chips, although I’m sure there are vegan/dairy-free versions of those out there you could substitute with.

Banana Scones

Adapted from OmNomAlly
Makes 12-16 mini or 6-8 large scones

Ingredients

2 large, overripe (~300g) bananas
1/2 cup (120 mL) coconut oil, melted
1/4 – 1/3 cup (40-60g) lightly packed brown sugar1
2 Tbsp (20g) chia seeds
1 tsp vanilla

1 1/4 cups (190g) all-purpose flour (use almond flour for gluten-free options)
1 1/2 cups oatmeal (120g), finely ground2
1/2 cup (40g) oatmeal, whole
1 Tbsp baking powder
3/4 tsp salt
1/4 cup cacao nibs, optional3

Directions

  1. Preheat oven to 400 degrees Fahrenheit. Line a baking sheet with a silicon mat or parchment paper.
  2. In a large bowl, mash banana completely. Add coconut oil (microwave briefly if it’s not already mostly liquid), brown sugar, chia, and vanilla. Whisk until well combined, then let rest at least 3 minutes, or until chia seeds have softened.
  3. Add flour, both ground and whole oatmeal, baking powder, salt, and cacao nibs (or chocolate chips), and stir until completely combined. Mixture will be a little loose and quite sticky, but should be solid enough to hold its shape.
  4. Pour onto prepared baking sheet and shape into rounds about 1″ tall. Use two rounds for mini scones, or one for large scones. Use a pizza cutter or a sharp knife to cut rounds into 6 or 8 wedges.
  5. Bake until golden on top and slightly browned on the bottom, about 20 minutes. Be careful not to over bake; they are better slightly too moist than slightly too dry.
  6. Serve warm. Great plain, with butter and cinnamon sugar, or your favorite jam. Store leftovers in an airtight container on the counter up to 3 days, but they are best on day one.

Notes

For sweeter scones, especially if you’re going to enjoy them plain, use the larger amount, or up to 1/2 cup. For less sweet scones, especially if you’re going to doctor them with jam, use the smaller amount. I personally like 1/4 cup best even plain, but the masses may prefer a sweeter option.

Use a blender to grind 1 1/2 cups of the oatmeal into a powder. Leave 1/2 cup as normal for texture. =)

Cacao nibs are a great way to add a little chocolate flavor without the sugar and calories of chocolate chips. They are quite mild but delicious in baked goods. However for a more decadent treat, or if you don’t have cacao nibs on hand, you can substitute mini chocolate chips for delicious results, or leave them out entirely.

Cinnamon Rolls

Has winter hit your neck of the woods? It definitely hit Montana and it’s snowy and beautiful outside. I don’t know about you, but cold weather always instills a craving for cozy foods like soup and pot roast, hot chocolate and gingersnaps, oatmeal or waffles.

Cinnamon Rolls {{Baking Bytes}

Although working with yeast is rare for me, a few weeks ago I decided to make a batch of cinnamon rolls from scratch. Cinnamon rolls are one of my favorite decadent treats, and it’s a good thing they are such a time-consuming endeavor or I’d probably make them a lot more often. I am very particular about cinnamon rolls, and don’t often even buy them for this reason. They must be soft both inside and out, heavy on the cinnamon and light on the frosting; a thin glaze is even better. I am not one for heavy frosting on much of anything, but I absolutely feel a quality cinnamon roll doesn’t need to hide beneath cream cheese and butter.

Cinnamon Rolls {{Baking Bytes}

A few years ago when my parents came to visit for Thanksgiving, my mom and I made this cinnamon roll recipe. It’s everything a cinnamon roll should be, with the light flavoring of oatmeal which I find to be a wonderful addition. Like most yeast recipes, this one takes a few hours from start to finish, although most of that is waiting around for the dough to rise.

Cinnamon Rolls {{Baking Bytes}

Nonetheless they result in pillowy rolls perfect for a cozy winter morning. Full of cinnamon and drizzled with a light glaze, they feel a little lighter than your average out-of-the-can variety, and the gentle oatmeal flavor is unique but delicious. Served with some savory options like scrambled eggs or sausage, these would be perfect for Christmas breakfast to treat the family this year.

Cinnamon Rolls {{Baking Bytes}

If you’re appalled at the idea of waking up *even earlier* Christmas morning just to make cinnamon rolls, never fear. I am definitely not suggesting you make a hectic morning even more so, but encouraging you to make these ahead for a simple breakfast that can bake while you open presents.

Since it’s rare that I have a need for 12 large cinnamon rolls, I opted instead to cut my batch into 18 slightly smaller ones. I baked one set right away (because, yum) and put the remainder in the freezer. A couple of weeks later, I pulled them out, shoved them into a pan (with some difficulty; more on that later), and after letting them rise overnight, baked them up fresh in the morning with no more work than preheating the oven. All the delight with little of the work.

Cinnamon Rolls {{Baking Bytes}

You could make these up anytime between now and Christmas and pop them in the freezer until you’re ready for them, which is great for anyone that feels the holidays get even more hectic as the actual day draws near. If you go the freezer route, I highly recommend using disposable pans and freezing the rolls in the pan. Although it’ll take a little bit more space in your freezer, it means less work once you’re ready to bake them. In their frozen state I had quite the time getting them squeezed into a pan, and this effort can be easily avoided by just freezing them that way. If, like me, you try to avoid using disposable things when possible, or just always forget to buy them, you can line the pan you’d normally use with plastic wrap, place your rolls inside, and freeze the whole thing till the rolls are hard. Then you can remove them from the pan, wrap tightly in the plastic and put in a Ziploc, and still have your dish available for using.

Cinnamon Rolls {{Baking Bytes}

Splitting the batch into two pans of nine not only gives you a freezer batch ready for another day, but also results in slightly smaller rolls that are great for portion control or to be served alongside heartier additions. The next time you’re feeling up to a little kitchen challenge, make these rolls. I’m sure you and your family will love them. If you have leftovers, store them covered on the counter. The rolls are great reheated in the microwave for about 20 seconds, just enough to warm them up.

Oatmeal Cinnamon Roll

Adapted from SparkRecipes
Makes 12 or 18 rolls

Ingredients

Dough
1 packet yeast
1 cup warm water, 105 – 115 degrees

1 cup milk, warmed
1/2 cup butter, softened
1/2 cup sugar
1 egg, room temperature
3/4 tsp salt

3-4 cups white bread flour
1 cup whole wheat bread flour (or wheat all-purpose)
1 cup old-fashioned oats, ground fine in a blender

Filling
3 Tbsp butter, melted
1 cup brown sugar
1 Tbsp cinnamon

Glaze
1 cup powdered sugar, sifted
1 tsp vanilla
2 Tbsp milk

Directions

  1. Run the bowl of your stand mixer under hot water for one minute, or until the bowl feels warm.
  2. Add yeast to the bowl then gently pour in the warm water to dissolve. Let rest 10 minutes, or until foamed.
  3. Stir in milk, butter, sugar, egg, and salt (I do this by hand).
  4. Add wheat flour, oatmeal flour, and 3 cups of bread flour to the bowl. Using the dough hook, mix until well incorporated.
  5. If necessary, add more flour 1/4 cup at a time until the dough pulls away from the sides of the bowl. It will still be sticky. (I used a total of 3.75 cups of bread flour.)
  6. Cover bowl and let rise for one hour, or until doubled in size.1 
  7. Mix together brown sugar and cinnamon, and set aside.
  8. Butter or spray one 9×13″ pan (for 12 large rolls) or two 8×8″ pans (for 18 medium rolls). Set aside.
  9. Preheat your oven to 350 degrees.
  10. On a floured surface, roll the dough into an 18×15″ rectangle. (I sometimes make mine slightly wider than 18″ so I can cut off the ends for more even rolls, but it’s not necessary.)
  11. Brush dough with melted butter, leaving one inch of a long edge clear.
  12. Spread sugar mixture evenly over the butter.
  13. As tightly as you can, roll up the long side so you end up with an 18″ cylinder.
  14. Reshape if necessary, then use unflavored dental floss or a very sharp knife to cut into 12 or 18 slices, then place in your pans. (Freezer option: see notes2)
  15. Bake for 20-25 minutes, or until golden brown and the center is 190 degrees Fahrenheit. (I highly recommend using an instant read thermometer for this!) If necessary, cover outer rolls with foil for the last 5 minutes, or until center rolls are done, to prevent excessive browning.
  16. Whisk together sugar, vanilla, and milk until smooth, then drizzle over hot rolls. Serve warm!

Notes

My favorite method for getting dough to rise consistently: Microwave a mug of water for 2.5 minutes. Move the mug to the corner of the microwave, add your bowl or pan of dough, shut the door, and let rise as usual. This keeps the dough warm and humid even if the rest of your house is cold or drafty. If you do this for both stages of rising, use new water each time to avoid super-heating it and having it explode.

Freezer option: Cut log into 18 slices. Either place 9 each into greased 8×8″ disposable pans (recommended) or set them onto a cookie sheet. Freeze until solid, then wrap tightly in plastic wrap and place into a Ziploc bag.
To bake: Remove rolls from freezer and unwrap completely. Place into a greased pan if they aren’t already, then cover with a thin dish towel and let rise overnight (at least 8 hours). Bake until center reaches 190 degrees Fahrenheit, about 30 minutes. You may need to cover the rolls for the last 10 minutes to prevent over-browning while the center cooks through.

Chocolate Chip Zucchini Bread

With summer coming to a close tomorrow, perhaps your garden is overflowing with things to use or store. Although we only have a small garden, I did get an excitingly abundant harvest given its size. The raspberries were proliferous for several weeks (some are in the freezer to bake with this winter), green beans galore, a few delicious broccoli heads, a decent amount of potatoes, giant zucchini (hopefully still some more in the coming weeks), and for the first time ever, carrots!

This is the third year in a row I’ve tried growing fingerling carrots, and the first year they grew bigger than my baby thumbnails. Planting them on the very edge so they weren’t overgrown by the beans seemed to be the key, and I’m excited to eat them. I planted two rows so likely will chop some up for the freezer. Roasted vegetables are my favorite and I’m sure we’ll be eating many panfuls in the coming weeks.

Chocolate Chip Zucchini Bread {{Baking Bytes}}

My zucchini plant was not as abundant as some, likely due to the lack of sunlight my garden gets, but it still produced quite a few and there should be some more to pick if the weather doesn’t turn super cold right away. If, like many people, you have more zucchini than you know what to do with, then this is definitely the recipe for you.

Chocolate Chip Zucchini Bread {{Baking Bytes}}

I see recipes for zucchini bread, muffins, scones, pancakes, waffles, etc, all over the place, but many of them are heavy on the sugar and chocolate. Although this is delicious, it somewhat ruins the health factor of the zucchini if you’re basically eating dessert bread.

Chocolate Chip Zucchini Bread {{Baking Bytes}}

I recently came across this recipe on Pinterest (as usual) and loved that the chocolate was only in chip form, and the sugar content relatively low. I made some modifications like I always do, and it resulted in a very tasty but much less sweet variation.The zucchini flavor is mild but the bread is warm and inviting with cinnamon and nutmeg throughout. It’s sweetened with honey and a few chocolate chips, but maintains a much less decadent flavoring than your typical sugary quickbreads. You can obviously increase the chocolate chips if you want, but I felt this amount was plenty. Even with 30% less sugar than the original recipe, it still functions just as well as a dessert as it does for breakfast or an afternoon snack.

Chocolate Chip Zucchini Bread {{Baking Bytes}}

Krista’s recipe called for walnuts, but I never put nuts in baked goods as I don’t care for the textural juxtaposition of soft bread and crunchy nuts if I’m not emotionally prepared for it. However, this time I chopped a few walnuts and sprinkled them on top, and it was a wonderful, crunchy addition to the bread. It’s a method I may use in the future for banana or pumpkin bread to give it a little something extra. If you don’t like walnuts, pecans or sliced almonds would work great too, or you can leave them off entirely, of course.

Chocolate Chip Zucchini Bread

Adapted from Joyful Healthy Eats
Makes 1 loaf (12 slices)

Ingredients

1 3/4 cups whole wheat flour
2 tsp cinnamon
1 tsp baking powder
1/2 tsp baking soda
1/2 tsp salt
1/2 tsp ground nutmeg

1/3 cup raw honey
1/3 cup coconut oil

1/2 cup applesauce
1 egg
2 tsp vanilla

1 1/4 cup grated zucchini
1/3 cup + 2 Tbsp chocolate chips, divided

1/4 cup chopped walnuts (optional)

Directions

  1. Preheat oven to 350 degrees Fahrenheit. Grease (butter, coconut oil, PAM, whatever) and flour a loaf pan, shaking out excess flour. Set aside.
  2. If you haven’t already, use a cloth or paper towels to squeeze as much excess water from your zucchini as possible. Get your upper body workout here, if your zucchini is drier your bread is less likely to have wet spots in the middle. Set aside.
  3. In a medium bowl, whisk together flour, cinnamon, baking powder, baking soda, salt, and nutmeg. Set aside.
  4. In a separate microwave-safe bowl, combine honey and coconut oil. If they are not already liquid, heat 20-30 seconds and whisk until smooth. It’s okay if there are some small bits of coconut oil still solid.
  5. Add applesauce, egg, and vanilla, and whisk until completely combined.
  6. Slowly pour wet ingredients into dry ingredients, stirring (I used a rubbed scraper) until completely combined.
  7. Fold in zucchini and 1/3 cup chocolate chips, then pour into prepared loaf pan.
  8. Sprinkle with remaining chocolate chips and walnuts, if using.
  9. Bake 50 minutes, or until a toothpick comes out clean.
  10. Let cool most of the way in baking pan, then run a knife along the edge and turn out onto a cooling rack to cool completely, or slice and serve pronto because it smells way too delicious to wait.
  11. Store completely cooled leftovers in an airtight container on the counter.

Lemon Pie Spoons

Summer!

Just kidding, until last weekend it has mostly been pouring rain and howling winds here. I will admit it’s made for some pretty challenging runs during my marathon training. Turns out 20 miles in drenching rain and/or 20-mph headwinds is not super awesome. I know, shocker. Regardless, around March I started thinking about lemons again, partially because my grandmother loved lemon meringue pie and her birthday was in March, and partially because Costco starts carrying giant bags of the wonderful yellow fruit around April. With the closing of ski resorts and the flowering trees, lemon just seems like the right flavor for the season.

Lemon Pie Spoons {{Baking Bytes}}

After making a large batch of granola, I was left with several egg yolks chilling in my fridge. My usual go-to for egg yolks is just to throw an extra one in scrambled eggs, but I didn’t think I’d get through them all that way very quickly. Secondary method is always pudding, but pudding sounded a bit heavier than the dessert I was really looking for. Enter: mousse!

Lemon Pie Spoons {{Baking Bytes}}

Substantially lighter in texture without compromising the ka-pow of flavor, mousse always feels like the summery version of pudding. Obviously lemon was the way to go. I cut Mandy’s recipe in half, very slightly adjusted it, and was on my way to a tasty treat. Her recipe called for a graham cracker crust that I’m sure is delightful, but I wanted to test an idea I’d been pondering.

Lemon Pie Spoons {{Baking Bytes}}

Last fall I’d seen some great ideas (on Pinterest, of course) using cookie spoons, which I thought were super cute. However, I am not a huge fan of sugar cookies and even more importantly, I don’t enjoy making them. I was curious whether the same idea would work with pie crust, and that seemed like the perfect delivery mechanism for lemon mousse.

After texting my mom and asking whether she thought my spoons are oven safe (which I’m sure made her raise an eyebrow), I made some pie crust, made a mini spoon template with parchment paper, and begin cutting away. They baked up super cute and although they are a bit fragile, they work great for a dollop of mousse or for dipping. Although it didn’t take terribly long to cut by hand, for round two I bought a cookie cutter on Amazon, which was not only faster, but allowed me to be more efficient with the dough. Plus now I have a reason to make more spoon desserts.

Lemon Pie Spoons {{Baking Bytes}}

These lemon pie spoons are small, light, and require no cutting and slicing and plating, which makes them great for potlucks. Big lemon flavor and flaky pie crust come together in a delicious bite-sized treat. It’s important to use a pie crust recipe you like the flavor of, as it’s rather prominent given the somewhat higher crust:filling ratio. I’ve linked mine below, but feel free to use your own.

Lemon Pie Spoons {{Baking Bytes}}

This would be a fun confection for a summer barbecue where you don’t want to worry about fridge space. You can make the spoons and the mousse a day or two ahead of time (store the spoons on the counter, and the mousse in the fridge), then assemble shortly before you head to the party. They’ll be fine on the counter (inside, if it’s hot) for several hours, leaving you free to enjoy the party. Although they might droop a bit, they are definitely safe to eat.

Fair warning: they are addicting! Make a batch to share, assuming you don’t eat them all yourself.

Lemon Pie Spoons

Adapted from Mandy’s Recipe Box
Makes about 5 dozen mini spoons

Ingredients

Pastry for single-crust pie (unbaked)

4 egg yolks
1/2 cup sugar
1/3 cup lemon juice (2-3 lemons)
zest of 1 lemon (optional)

3/4 cup heavy whipping cream

Directions

  1. For the spoons: Preheat oven to 425 degrees Fahrenheit. On a large baking sheet, arrange as many oven-safe spoons as you can fit. (A silicon mat will help them slide around less, if you have one.) Set aside.
  2. On a floured surface, roll out your pie crust to about 1/8″ thick. Use a cookie cutter (or a paper template and a sharp knife) to cut out as many spoons as possible. Pile all trimmings together, then gently roll out again and cut more spoons.
  3. Carefully transfer each pie crust spoon to a real spoon on the prepared baking sheet, pressing the dough into the real spoon’s indent.
  4. Bake 10-15 minutes, until crust is golden and slightly puffy. You may want to rotate the pan halfway through if your spoons are of different heights.
  5. Let cool a few minutes on the spoons, then gently and carefully (the metal spoons are hot!) remove them to a wire rack to cool completely, and repeat until all pie crust is used. Store on the counter until ready to use, up to 3 days.
  6. For the mousse: In a small saucepan, whisk together egg yolks, sugar, lemon juice, and lemon zest (if using.)
  7. Stir with a wooden spoon over medium heat until mixture thickens and turns cloudy. Continue cooking until it’s thick enough to coat the back of a wooden spoon (although it’ll look clear).
  8. Use a mesh sieve and strain the lemon curd into a small bowl. Refrigerate at least one hour, stirring a couple of times if possible, or until ready to use. Mixture should be cool to the touch. Also place a large mixing bowl and your beaters (or KitchenAid whisk attachment) in the fridge at this time.
  9. When curd is sufficiently chilled, remove large bowl and beaters from the fridge. Beat heavy cream on medium/high until stiff peaks form.
  10. Gently fold in the curd to the whipped cream until it’s not streaky.
  11. Return mousse to fridge until ready to serve, up to 3 days.
  12. For assembly: Arrange pie crust spoons on a tray or serving platter as desired.
  13. Transfer mousse to a frosting bag with a star tip (or a Ziploc), cut off the tip, and carefully pipe onto the spoons. (You may have extra mousse.) Serve as soon as possible!
  14. Alternate assembly: Place mousse into 4-oz serving dishes and add a pie crust spoon. Serve with extra spoons for dipping!